
Automating Lambda Serverless Red Team Infrastructure
To start out, here are the tools and blogs that helped inspire this idea, or are similar in execution:
https://blog.xpnsec.com/aws-lambda-redirector/
https://github.com/warhorse/warhorse // https://docs.war-horse.io/
https://shells.systems/oh-my-api-abusing-tyk-cloud-api-management-service-to-hide-your-malicious-c2-traffic/
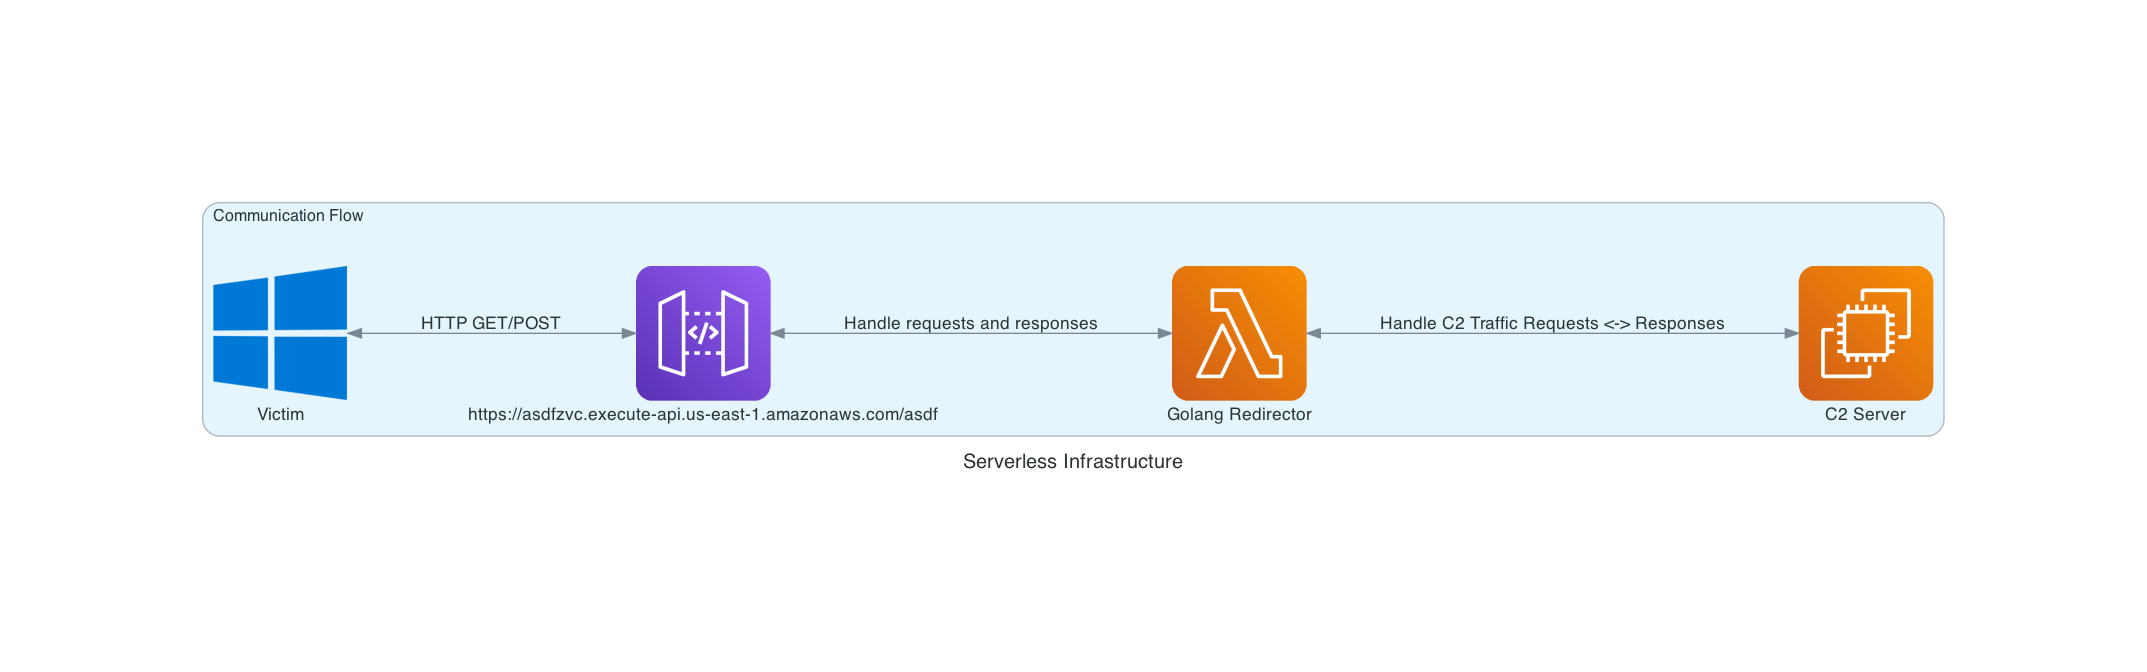
Similar to my most recent post, I will again be talking about automating Red Team Infrastructure deployment, along with a pretty interesting concept of “serverless” redirectors.
While exploring all the different ways of configuring Red Team infrastructure, I went down several rabbit holes, such as going super hardcore and maximizing OPSEC (Setting up Nebula VPNs, several redirectors, burnabale bastions, etc). I also attempted to make infrastructure as “a la carte” as possible that I not only lost many nights of sleep going crazy to get things working, but also lost any type of sustainable and useful infrastructure that was repeatable and reliable.
After emerging from this rabbit hole hell older, wiser(?), and way more jaded on devops in general, I tried to find some middle ground across all these types of infrastructure setups. One in which requires the least amount of maintenance, and allows for a huge amount of modularity.
Let’s start digging into the end prodcut of what is effectively my Joker origin story :)
Project Structure and Inspo
As mentioned at the beginning of this blog, I pulled inspiration from many sources during my journey into Red Team DevOps, which includes MANY more people and links than I showed here. The two biggest inspirations are from xpn (who I always credit as someone that no matter how unique you think your idea or PoC’s are, he has already done the same research many years ago and better than everyone else), and Ralph whose infrastructure automation dropped and did not get as much traction as it should have, it’s insane.
All that to say, nothing I’m doing is super unique: I just tied a few seperate ideas together and modified them a bit to make more sense for my team’s setup.
The basic project structure looks like this:
domainexpansion
├── playbooks
│   ├── cobalt.yml
│   ├── mythic.yml
│   └── sliver.yml
├── templates
│   ├── inventory
│   │   └── aws_ec2.yml
│   ├── Makefile
│   ├── cs_profile
│   ├── install-sliver.sh.j2
│   ├── redirector.go
│   └── serverless.yml.j2
├── README.md
├── ansible.cfg
├── config.yml
├── destroy.yml
├── generate.yml
└── requirements.yml
This may seem random now but will make sense soon. The most interesting files are config.yml, generate.yml, destroy.yml, redirector.go, and serverless.yml.j2. Let’s review those real quick.
config.yml: This was pulled straight from warhorse. The general idea is that per operation you build out a configuration file which will affect what gets deployed and configured. More on this later.
generate.yml: Again, pretty much pulled from warhorse, this not only generates Jinja2 templates as needed, but will then stand up the infrastructure as noted in the config.yml file.
destroy.yml: Similar to the generate playbook, just tears everything down for you when you’re done.
redirector.go: This was completely copy pasted from xpn’s blog, also found here. This is the code that will run within our AWS API Gateway that basically just handles requests from both beacons and responses from the C2 server.
serverless.yml.j2: This is a Jinja2 template that, will take a value from the config.yml file and a returned value from standing up an EC2 server within Ansible. This then generates serverless.yml which is fed to Serverless
Now that I’ve confused you even more, let’s start from the top and get into actually using these to build our infrastructure.
Deployment and Digging into the Code
First, we will start by building out our config.yml file.
---
ansible_ssh_user: ubuntu
blackflash:
  general:
    op_name: "BlogTest"
    user_tag: 'anubis'
    license_key: xxxx-xxxx-xxxx-xxxx
    teamserver_password: SuperSecretPassword
    stage_endpoint: api
    role: cobaltstrike
A quick explanation of some of these vaules, plus others that can be added:
ansible_ssh_user should remain the same, this is here to be stored as a global variable
op_name: pretty self explanatory :)
user_tag: operator moniker to go by, just to tag who stood up what
license_key: this is the cobalt strike license key. Only needed if using cobalt: true
teamserver_password: password used during stand up of cobalt. Only needed if using cobalt: true
stage_endpoint: This defines the first level URI of the Lambda endpoint
role: This is where you defined whether you want to run cobaltstrike , sliver, or mythic, by setting the appropriate value
mythic: agents: The github links for the mythic agents you want configured within Mythic. Default behavior is NO agents to be built, but can be added later on. Only needed if using mythic: true
These all affect how the configuration seen in the screenshot at the beginning of this section will be set up. The general communication flow stays the same, but what C2’s get deployed, URI of the API Gateway, and so on can be dynamically configured.
Now that we have our configuration file set up, this project as a whole requires three dependencies:
-
Need
boto3in python:pip3 install boto3 -
And obviously Ansible, but additionally, need to install some required collections by running this command against the provided requirements file:
ansible-galaxy collection install -r requirements.yml
One additional setup (if using CobaltStrike as the C2 server), is that under the templates directory, there is a cs_profile that needs to be filled in with the desired Mallebale Profile, ensuring that the HTTP GET/POST URI’s include what is defined under stage_endpoint in the config.yml file.
With all that out of the way, we are ready to spin up our infra!
Finally Running Something
Now that everything is all set up (assuming you changed any region values in generate.yml to what you want), we can finally rev this thing up.
To stand up your infrastructure, simply run ansible-playbook generate.yml -e @config.yml. This will do the following, in this order:
- Create operation directories under a parent folder called
WarRoom - Create dynamic SSH keys for the EC2 instance
- Generate the
serverless.ymlfile based on template data - Generate and move specific C2 config files based on which you chose
- Compile Go code into an executable
- Create EC2 instance
- Run
serverlessusing the generated config file to stand up AWS Lambda and API Gateway - Print out the generated API Gateway URL
- Configure EC2 instance to the specified C2
During step 7, it will hang for a decent amount of time, sometimes an uncomfortable amount…
Here is a 10-minute screen recording cut down to 1 minute (told you it would take a long time!):
After all is said and done, you should now have a C2 setup that can use the URL that prints out as a redirector. The magic behind the redirection is in the Go code, specifically:
	teamserver := os.Getenv("TEAMSERVER")
	client := http.Client{}

	// Set to allow invalid HTTPS certs on the back-end server
	http.DefaultTransport.(*http.Transport).TLSClientConfig = &tls.Config{InsecureSkipVerify: true}

	// Build our request URL as received to pass onto CS
	url, err = url.Parse("https://" + teamserver + "/" + request.RequestContext.Stage + request.Path)
The way that we can pass the TEAMSERVER variable, as explained in XPN’s blog, is in our serverless.yml.j2 here:
provider:
  name: aws
  runtime: go1.x
  stage:
  region: us-east-1
  environment:
    TEAMSERVER: ${param:teamserver}
Then in generate.yml, we pass the teamserver paramater like this: serverless deploy --param "teamserver="
This will pull the private IP address of the EC2 instance and pass it as an environment variable to Serverless.
The beauty about all of this is that, as long as you deploy everything within the same VPC and make sure that the AWS Lambda is in a security group that has an ACL rule for the C2 server, then we don’t need any external communications between EC2 <-> Lambda Function.
The network communication between EC2 and Lambda all happen internally on AWS infrastructure. Furthermore, we get a free domain with a valid, globally-trusted certficate for a redirector. And all we need is a self-signed TLS certificate on the C2 in order to handle the TLS communication!
This may not seem that exciting or all that crazy, but having to jump through hoops to get trusted domains, automating pulling certficates from LetsEncrypt, and managing Nginx rules and configs, this is a dream come true.
Finally, let’s show a screenshot of a beacon working through our redirector:
Listener settings using our Lambda for a redirector:
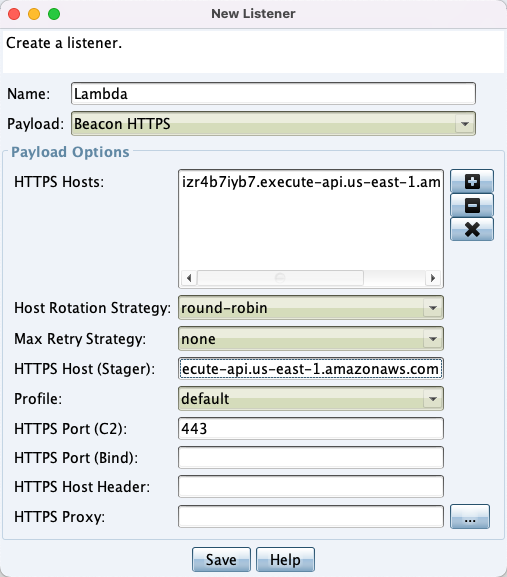
Beacon Get:
![]()